You don’t need to be an artist to create amazing art.
You don’t need drawing skills, design software, or years of creative training. You don’t need to understand complex technology or learn complicated tools. All you need is an idea—something you can picture in your mind—and the willingness to type a few words describing it.
That’s it. That’s the entire barrier to entry for AI art generation in 2025.
If you can imagine a cozy coffee shop at sunset, a dragon made of flowers, or your dog as a Renaissance painting, you can create it. The AI handles everything you traditionally needed artistic skill to accomplish: composition, color theory, lighting, perspective, detail. You provide the vision. The AI brings it to life.
This guide will walk you through creating your first stunning AI-generated image in five simple steps. By the time you finish reading, you’ll have created actual art—something you can download, share, or even print—using nothing but your imagination and a completely free tool.
Let’s remove the mystery and get you creating.
The Only Tool You Need to Start (It’s Free!)
The biggest mistake beginners make is trying to learn multiple AI art tools simultaneously. You open five different platforms, get overwhelmed by features you don’t understand, and quit before creating anything.
Don’t do that.
Start with Microsoft Copilot Designer (powered by DALL-E 3). Here’s why it’s perfect for your first AI art experience:
Zero barriers: No account creation required. No credit card. No email verification. You literally go to the website and start creating immediately.
Simple interface: There’s one text box and one button. That’s it. No overwhelming menus, settings, or options to confuse you.
Genuinely free: 15 fast generations per day, plus unlimited slower generations. You won’t hit limits while learning.
Excellent quality: DALL-E 3 is one of the best AI art technologies available, and Microsoft offers it completely free through Copilot Designer.
No Discord required: Unlike some popular AI art tools, you don’t need to navigate complicated platforms. It works like any normal website.
Think of Copilot Designer as training wheels. Once you’ve created your first 10-20 images and understand how AI art works, you can explore more advanced tools. But for your first image? Simplicity wins.
Start creating with Microsoft Copilot Designer (opens in new tab)
The Secret to AI Art: Understanding “Prompts”
Before you create your first image, you need to understand one critical concept: prompts.
A prompt is simply a description of what you want the AI to create. It’s like giving instructions to an artist who can paint anything you imagine—except this artist works instantly and for free.
The basic formula for any AI art prompt:
[Subject] + [Style] + [Details]Let’s break this down with examples:
Subject: What’s in the image?
- A cat
- A mountain landscape
- A futuristic city
- A coffee cup
Style: What should it look like?
- Watercolor painting
- Cinematic photograph
- Digital illustration
- Vintage poster
Details: What makes it specific?
- Warm golden lighting
- Surrounded by autumn leaves
- At sunset
- With soft focus
Putting it together:
❌ Weak prompt: “A cat”
✅ Strong prompt: “A fluffy orange cat sitting in a sunny window, watercolor painting style, soft pastel colors”
❌ Weak prompt: “A mountain”
✅ Strong prompt: “Snow-capped mountain peak at sunrise, cinematic photograph, dramatic pink and orange sky”
The difference? The strong prompts give the AI enough information to create something specific and visually interesting. The weak prompts are too vague—the AI has to guess what you want, and the results will be generic.
The good news: You don’t need to be a professional writer. Simple, clear descriptions work perfectly. “A happy dog running through a field of sunflowers, bright sunny day, photograph style” will create beautiful results.
You’re not writing poetry. You’re giving clear instructions. If you can describe what you see in your imagination using simple words, you can create AI art.
Let’s Make Your First Image: A 5-Step Walkthrough
Stop reading about AI art and actually create some. Follow these five steps exactly as written, and you’ll have your first AI-generated image in the next three minutes.
Step 1: Open Microsoft Copilot Designer
Go to copilot.microsoft.com in your web browser.
Look for the “Designer” option or the image creation feature. The interface may look slightly different depending on when you’re reading this, but look for anything mentioning “create images” or “image creator.”
Important: You might be prompted to sign in with a Microsoft account. While you can use Copilot Designer without an account, signing in (free) gives you faster generation times and higher quality. It takes 30 seconds and is completely free—just use an existing Microsoft, Outlook, or Xbox account, or create a new one.
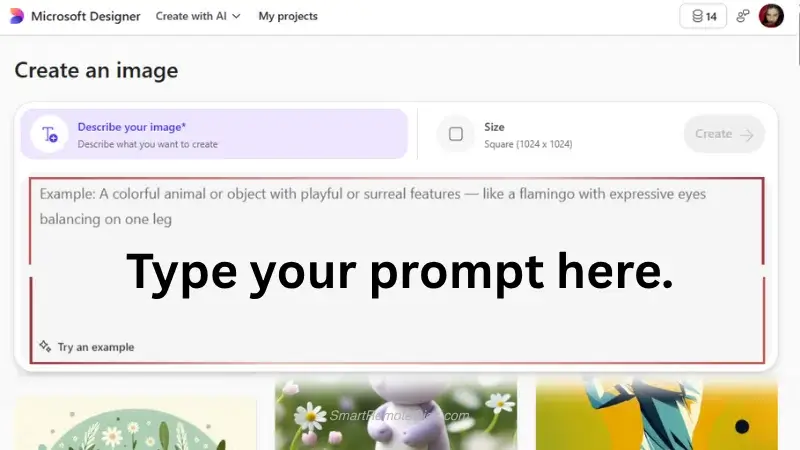
Step 2: Find the “Magic Box” (The Prompt Field)
Once you’re in the image creation interface, you’ll see a text box. This is where the magic happens.
It might say something like “Describe the image you want to create” or “What would you like me to create?” Different versions of the interface use slightly different text, but the purpose is the same: this is where you type your prompt.
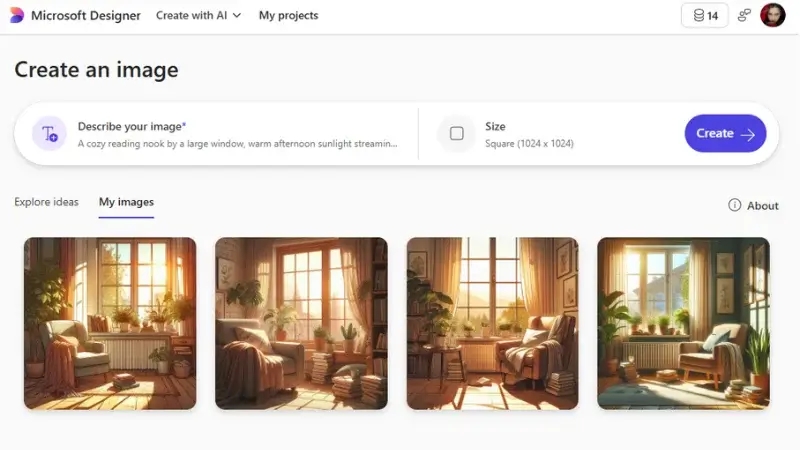
Step 3: Write Your First Simple Prompt
Let’s start with something straightforward but visually interesting. Copy and paste this exact prompt into the text box:
A cozy reading nook by a large window, warm afternoon sunlight streaming in, comfortable armchair with soft blankets, stack of books nearby, houseplants on the windowsill, peaceful atmosphere, illustration styleThis prompt works well for beginners because:
- It describes a clear, specific scene (not vague like “a room”)
- It includes lighting details (“warm afternoon sunlight”) that make images more atmospheric
- It mentions a style (“illustration style”) so the AI knows what aesthetic you want
- It’s descriptive enough to create something interesting, but simple enough to understand
Don’t overthink this step. Just paste the prompt and move to the next step.
Step 4: Generate Your First Image
Click the “Generate” or “Create” button.
Now wait. This part takes 10-30 seconds depending on how busy the system is. The AI is processing your description, understanding the composition, choosing colors, determining lighting, and rendering your image.
What’s happening behind the scenes: DALL-E 3 is analyzing your prompt word by word, comparing it against millions of images it learned from during training, and creating something entirely new that matches your description. It’s not finding a similar image somewhere—it’s actually generating original art based on your specific instructions.
The system will typically generate four variations of your prompt. Each interprets your description slightly differently—different compositions, color palettes, or emphasis on different elements you mentioned.
Step 5: Download Your Art!
Look at your four images. Which one do you like best?
There’s no wrong answer. One might have better lighting. Another might have a composition you prefer. Another might capture the “peaceful atmosphere” more effectively. Choose whichever speaks to you.
Click on your favorite image to view it larger, then look for a download button (usually a downward arrow icon or a button that says “Download” or “Save”).
The image downloads as a high-resolution PNG file—ready to share, use as a desktop background, print, or do whatever you want with it.
Congratulations. You just created your first AI-generated artwork. You went from idea to finished image in under five minutes, with zero artistic skill required.
What you’ve actually learned:
- How to access and use an AI art generator
- The basic structure of an effective prompt
- How to evaluate multiple AI-generated variations
- The complete workflow from prompt to downloaded image
That’s the foundation. Everything else is refinement.
3 Beginner Tips to Instantly Improve Your Results
Now that you’ve created your first image, let’s improve your next one. These three tips will dramatically upgrade your AI art with minimal effort.
Tip 1: Always Mention Lighting
Lighting transforms ordinary images into striking art. Compare these two prompts:
❌ “A forest path”
✅ “A forest path with dappled sunlight filtering through the trees, golden hour lighting, warm glow”
The second prompt creates atmosphere and mood. Professional photographers obsess over lighting because it’s that important—and AI art generators respond to lighting descriptions the same way.
Easy lighting keywords to try:
- “Golden hour lighting” (warm, glowing sunset/sunrise light)
- “Soft diffused light” (gentle, even lighting with no harsh shadows)
- “Dramatic side lighting” (strong light from one side, creates depth)
- “Backlit” (light source behind the subject, creates silhouettes and halos)
- “Moonlight” (cool blue tones, mysterious atmosphere)
Add one lighting descriptor to every prompt and watch your results improve instantly.
Tip 2: Experiment with Different Art Styles
The same subject can look completely different depending on the art style you specify. Try your “cozy reading nook” prompt again, but this time add different style keywords:
Original: “…peaceful atmosphere, illustration style”
Try these variations:
- “…peaceful atmosphere, watercolor painting”
- “…peaceful atmosphere, cinematic photograph”
- “…peaceful atmosphere, vintage poster art”
- “…peaceful atmosphere, anime style”
- “…peaceful atmosphere, oil painting”
Each creates a wildly different image from the same description. This is one of AI art’s greatest strengths—you can explore dozens of artistic interpretations without starting from scratch each time.
Popular style keywords for beginners:
- “Photograph” or “cinematic photograph” (realistic)
- “Illustration” or “digital illustration” (stylized but clear)
- “Watercolor painting” (soft, artistic, flowing)
- “Oil painting” (textured, classic fine art feel)
- “Pencil sketch” (simple, elegant, minimalist)
Tip 3: Be Specific About What You Want
Vague prompts create generic results. Specific prompts create unique, interesting images.
Compare:
❌ Vague: “A dog”
✅ Specific: “A golden retriever puppy with floppy ears, playing in autumn leaves, happy expression, photograph style, shallow depth of field”
❌ Vague: “A city”
✅ Specific: “Futuristic city skyline at night, neon lights reflecting in rain-soaked streets, cyberpunk style, purple and blue color scheme”
The specific prompts tell a story. They create a mood. They give the AI enough context to make interesting creative choices.
Ask yourself these questions to make prompts more specific:
- What’s the subject doing? (sitting, running, flying, etc.)
- What’s surrounding the subject? (in a forest, on a beach, in a busy street)
- What time of day is it? (sunset, midnight, early morning)
- What colors dominate? (warm autumn colors, cool blue tones, vibrant neon)
- What emotion should it convey? (peaceful, exciting, mysterious, joyful)
You don’t need to answer all these questions in every prompt, but answering 2-3 makes your images dramatically more interesting.
Common Beginner Mistakes (And How to Avoid Them)
Mistake 1: Giving Up After One Generation
Your first attempt might not match what you imagined. That’s completely normal. AI art usually requires 2-4 iterations to nail exactly what you want.
The fix: Change one element at a time. If the lighting isn’t right, adjust the lighting keywords. If the composition is off, be more specific about what’s in the foreground vs. background. If the style isn’t working, try a different style keyword.
Mistake 2: Making Prompts Too Complicated
Beginners sometimes write paragraph-long prompts thinking more words equals better results. Actually, the opposite is true. AI art generators work best with clear, concise descriptions.
The fix: Keep prompts to 1-2 sentences. Include the essential elements (subject, style, lighting, key details) and nothing more.
❌ Too complicated: “I want you to create an image of a magical forest with ancient trees that have glowing blue bark and mystical creatures hiding between the roots and there should be a small stream running through the middle with crystal clear water that reflects the moonlight and fairy lights hanging from the branches creating an enchanted atmosphere with mist rolling across the ground…”
✅ Just right: “Magical forest with glowing blue trees, mystical creatures in shadows, moonlit stream, fairy lights, misty atmosphere, fantasy illustration”
Mistake 3: Not Saving Your Prompts
You’ll create hundreds of images as you learn AI art. The ones you love? You’ll want to recreate similar styles later. But if you don’t save your prompts, you’ll forget exactly what you typed.
The fix: Keep a simple document (Google Doc, Notes app, anything) where you paste prompts that created great results. Add a note about what you liked. This becomes your personal prompt library.
You’re an AI Artist! What’s Next?
You’ve created your first AI-generated image. That puts you ahead of 90% of people who are curious about AI art but never actually try it.
Here’s where to go from here:
If you loved the experience and want to explore more:
Microsoft Copilot Designer is perfect for learning, but it has limitations. Once you’ve created 20-30 images and feel comfortable with prompting, explore more advanced tools that offer greater control and different aesthetic strengths.
Check out our comprehensive guide to the best free Midjourney alternatives—it compares six powerful AI art generators, showing which excels at different styles and use cases. Leonardo.Ai offers incredible control for game assets and fantasy art. Ideogram is unmatched for creating images with readable text. Each tool has unique strengths worth exploring.
If you’re excited about using AI across your entire creative workflow:
AI art generation is just one piece of a larger creative toolkit. You can use AI to write content, generate voices for videos, create social media posts, and build complete content systems.
Discover how these tools work together in our guide to the top 5 free AI tools that give you an unfair advantage. It shows how to combine AI art generation with other free AI tools to create professional content without expensive software or specialized skills.
If you want to keep practicing right now:
Here are five beginner-friendly prompts to try next. Each teaches a different aspect of AI art generation:
Prompt 1 (Learning style variation):
“A steaming cup of coffee on a wooden table, morning sunlight, watercolor painting style”
Then generate it again with “…oil painting style” and again with “…photograph style.” Compare how the same scene looks in different artistic styles.
Prompt 2 (Learning lighting):
“A lighthouse on a rocky cliff, stormy ocean waves, dramatic lighting, cinematic style”
Then try it with “…golden hour lighting” instead of “dramatic lighting.” See how lighting changes the entire mood.
Prompt 3 (Learning composition):
“Close-up portrait of a wise old owl, detailed feathers, forest background blurred, shallow depth of field, nature photography”
This teaches how to create images with a clear focal point and beautiful background blur.
Prompt 4 (Learning atmosphere):
“Cozy bookshop interior, shelves filled with old books, vintage aesthetic, warm amber lighting, inviting atmosphere, illustration style”
This combines multiple elements (setting, lighting, mood, style) into one cohesive scene.
Prompt 5 (Learning fantasy/creative):
“A dragon made entirely of autumn leaves and flowers, perched on a library bookshelf, magical atmosphere, fantasy art style”
This teaches how AI can combine impossible concepts into beautiful, imaginative images.
Generate all five. Save the ones you love. Experiment with variations. The best way to learn AI art is simply creating lots of images.
The Bigger Picture: Why This Matters
Learning AI art generation isn’t just about creating pretty pictures. You’re developing a valuable skill that has practical applications:
For business owners: Create social media graphics, blog header images, and marketing materials without hiring designers or buying stock photos.
For content creators: Generate custom thumbnails, channel art, and visual content that stands out from generic templates.
For hobbyists: Bring your imagination to life—create concept art for stories you’re writing, visualize characters from your D&D campaigns, or just make art because it’s fun.
For professionals: Rapidly prototype visual concepts, create mood boards for clients, or generate placeholder images for presentations.
The barrier to visual creation has never been lower. Ten years ago, creating the images you generated today would have required years of training in digital art software. Five years ago, it would have cost hundreds of dollars hiring freelance artists. Today, you did it yourself in minutes using free tools.
That’s not replacing human artists—it’s democratizing visual creation for people who were never artists in the first place. The hand-drawn illustration, the carefully composed photograph, the meticulously crafted painting—those still require human skill and artistic vision. But the ability to visualize an idea, to quickly create a concept, to generate something “good enough” for your blog post or presentation? That’s now accessible to everyone.
You’ve taken the first step. Keep creating. Experiment freely. There’s no cost to trying wild ideas, no penalty for generating images that don’t work out, no limit to what you can imagine and bring to life.
The only limit is whether you’ll actually use this skill or let it sit dormant because you were intimidated by the technology. You’ve proven you’re not intimidated. You created your first image. Everything from here is just refinement and practice.
Now go make something beautiful.
A beginner-friendly walkthrough for creating your first stunning AI-generated image in under five minutes. This guide uses a completely free and simple tool, requiring no artistic skill or technical knowledge. Go from a simple idea to a finished piece of art you can download and share.
Total Time: 5 minutes
Open Microsoft Copilot Designer

Navigate to copilot.microsoft.com in your web browser. Locate the “Designer” or “Image Creator” feature within the interface. Signing in with a free Microsoft account is recommended for faster generation times.
Find the “Magic Box” (The Prompt Field)

Once in the image creation interface, identify the text box where you will type your description. This field is usually labeled with text like “Describe the image you want to create” or “What would you like me to create?”.
Write Your First Simple Prompt
Copy and paste the provided beginner-friendly prompt into the text box: “A cozy reading nook by a large window, warm afternoon sunlight streaming in, comfortable armchair with soft blankets, stack of books nearby, houseplants on the windowsill, peaceful atmosphere, illustration style”.
Generate Your First Image

Click the “Generate” or “Create” button and wait 10-30 seconds. The AI will process your description and generate four unique visual interpretations of your prompt.
Download Your Art!

Review the four generated images and click on your favorite one to view it larger. Locate and click the download button (usually a downward arrow icon) to save the high-resolution image file to your device. You have now successfully created your first piece of AI art.
Tools:
- Microsoft Copilot Designer (or a web browser)