
Stable Diffusion represents something extraordinary in the world of AI art: a completely open-source, infinitely customizable image generation engine that you can run on your own hardware. Unlike subscription services, Stable Diffusion gives you the keys to unlimited creative control—but with that power comes complexity.
If you’ve explored how to use Stable Diffusion and felt overwhelmed by technical jargon, GitHub repositories, and command-line instructions, you’re not alone. The platform’s flexibility is both its greatest strength and its steepest barrier to entry for beginners.
Here’s the good news: this stable diffusion beginner guide will break down the complexity into two clear, actionable paths—one ridiculously easy (cloud services) and one powerfully customizable (local installation). By the end of this guide, you’ll be generating AI images regardless of your technical background.
Still weighing your options? Our in-depth comparison of Midjourney and Stable Diffusion explains why Stable Diffusion’s learning curve pays dividends in creative control and customization potential.
Let’s demystify Stable Diffusion together.
Before You Start: Choose Your Path (Cloud vs. Local)

The beauty of Stable Diffusion is choice. Before diving into technical details, let’s understand your two fundamental options and which one suits your needs.
Path A: Cloud Services (The Easy Way)
What it is: Web-based platforms that run Stable Diffusion on their servers. You access everything through your browser—no installation required.
Pros:
Cons:
Choose this if: You want to start creating today, lack a powerful gaming PC, or want to test Stable Diffusion before investing in hardware.
Path B: Local Installation (The Powerful Way)
What it is: Installing Stable Diffusion directly on your computer, giving you complete control over every aspect of generation.
Pros:
Cons:
Choose this if: You have a gaming PC with a decent GPU, want maximum control, value privacy, or plan to generate high volumes of images.
Pro Tip: Many users start with Path A to learn the basics, then graduate to Path B once they’re hooked. There’s no wrong choice—both paths lead to the same creative destination.
Path A: Getting Started with a Cloud Service
Cloud services are the easiest way to use stable diffusion without any technical overhead. Here’s how they work and how to get started.
How Cloud Services Work
Most stable diffusion online free (or paid) platforms follow the same basic structure:
- Create an account on the platform
- Access their web-based interface
- Enter your prompt and settings
- Click generate and wait for results
- Download or save your images
Popular Cloud Platforms
While specific platforms come and go, here are the most established options:
Free Options:
- Google Colab notebooks (free with limitations, requires Google account)
- Hugging Face Spaces (various free Stable Diffusion demos)
Paid Options (Pay-as-you-go):
- RunPod ($0.20-$0.80/hour depending on GPU)
- Vast.ai (competitive GPU rental marketplace)
- Mage.space (generous free tier, simple interface)
Basic Generation Workflow
Regardless of which service you choose, the interface will typically include:
1. Prompt Box: Where you describe what you want to create
Example: a cozy cabin in snowy mountains, warm interior lighting,
winter evening, highly detailed, digital painting
2. Negative Prompt: What you want to avoid in the image
Example: blurry, low quality, distorted, bad anatomy, watermark3. Generation Settings:
- Steps: 20-30 for most images (higher = more detail but slower)
- CFG Scale: 7-11 (how closely AI follows your prompt)
- Seed: Random number that determines variation
4. Generate Button: Click and wait 10-60 seconds for your image
That’s the essence of cloud-based Stable Diffusion—simple, immediate, and effective for learning the basics.
Path B: Installing Stable Diffusion Locally with Automatic1111
For those ready to unlock the full power of how to install stable diffusion on their own machine, let’s walk through the process step by step. We’ll use AUTOMATIC1111, the most popular and user-friendly Web UI.
Estimated Time for Local Install: 1-2 hours (including downloads). Follow these steps carefully, and you’ll be up and running.
Step 1: Check Your Hardware
Before proceeding, verify your computer meets these requirements:
Minimum Requirements:
- GPU: NVIDIA graphics card with 6GB VRAM minimum (8GB+ recommended)
- RAM: 16GB system RAM recommended
- Storage: 20GB+ free space for software and models
- OS: Windows 10/11, Linux, or macOS (with some limitations)
To check your GPU:
- Windows: Right-click Desktop → Display Settings → Advanced Display → Display Adapter Properties
- Look for NVIDIA GeForce RTX or GTX series with VRAM listed
Compatible GPUs (examples):
AMD and Intel GPUs: Technically possible but much more complicated. This guide focuses on NVIDIA for simplicity.
Step 2: Install the Prerequisites
You’ll need two pieces of software before installing Stable Diffusion.
Install Python
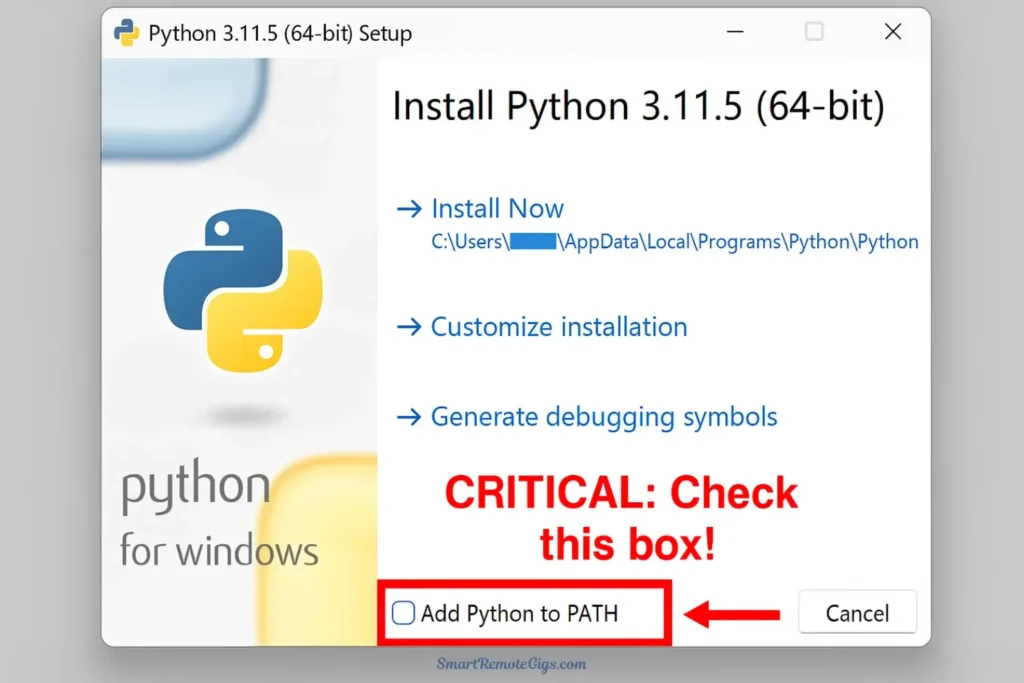
- Go to Python.org
- Download Python 3.10.x (not the latest 3.11+, as compatibility issues exist)
- Run the installer
- IMPORTANT: Check “Add Python to PATH” during installation
- Click “Install Now”
Install Git
- Go to git-scm.com
- Download the installer for your operating system
- Run the installer with default settings
- Git allows you to download and update Stable Diffusion easily
Step 3: Download Automatic1111 & a Model
Now for the main event: installing the stable diffusion automatic1111 tutorial components.
Download Automatic1111
- Create a folder where you want Stable Diffusion installed (e.g.,
C:\AI\stable-diffusion) - Open Command Prompt or Terminal in that folder
- Windows: Hold Shift, right-click in the folder, select “Open PowerShell window here”
- Run this command:
git clone https://github.com/AUTOMATIC1111/stable-diffusion-webui.gitThis downloads the entire Web UI to your computer.
Understanding Models: The AI’s Brain
A “model” is the actual AI that generates images. Think of AUTOMATIC1111 as the car, and the model as the engine. You need both.
These model files are large (2-7 GB), so the download may take some time. This file contains all the artistic knowledge the AI will use.
Where to get models:
- Hugging Face – Official repository
- Civitai – Community models (photorealism, anime, art styles)
For your first model, download:
- Stable Diffusion v1.5 (versatile, widely supported)
- Or Realistic Vision for photorealistic results
How to install a model:

- Download the model file (usually a
.safetensorsor.ckptfile, 2-7GB) - Place it in:
stable-diffusion-webui/models/Stable-diffusion/
Step 4: Launch and First-Time Setup
Time to see if everything works!
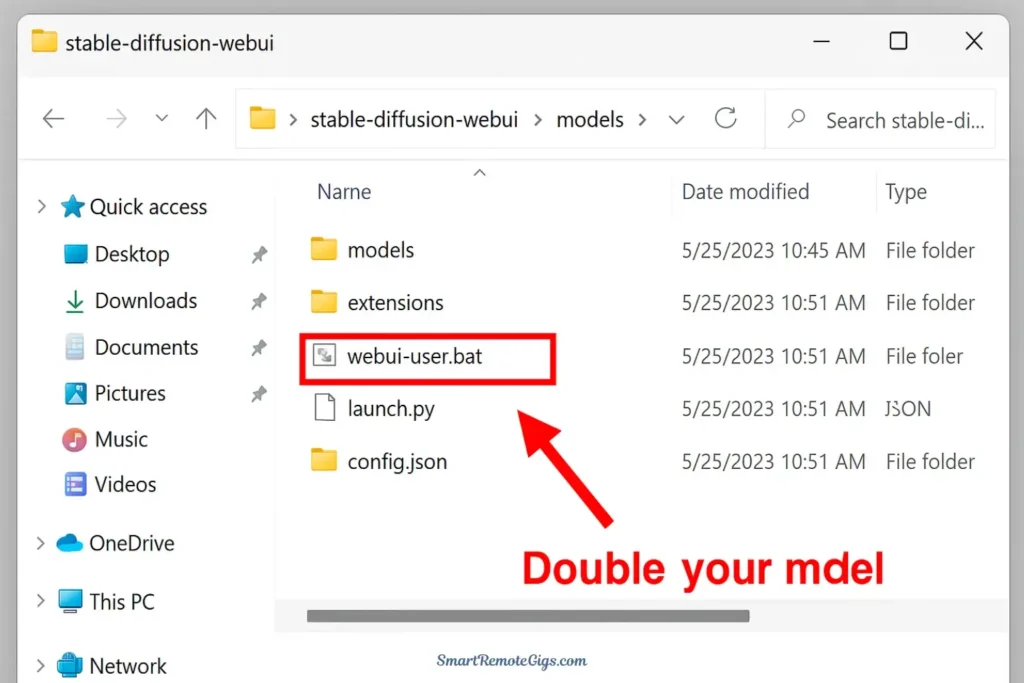
- Navigate to your
stable-diffusion-webuifolder - Windows: Double-click
webui-user.bat - Linux/Mac: Run
./webui.shin terminal
What happens:
- A black command window opens
- You’ll see lots of text scrolling (downloading dependencies)
- First launch takes 5-15 minutes as it installs requirements
- Eventually, you’ll see:
Running on local URL: http://127.0.0.1:7860
- Open your web browser and go to
http://127.0.0.1:7860
You should see the Automatic1111 interface! If you encounter errors, check:
- Python is version 3.10.x
- Your GPU has sufficient VRAM
- Antivirus isn’t blocking the installation
You’re In! Welcome to the Automatic1111 Interface
Congratulations! You’ve successfully installed Stable Diffusion locally. The hardest part is behind you. Now comes the fun part—creating art.
Your First Generation: Understanding the Interface
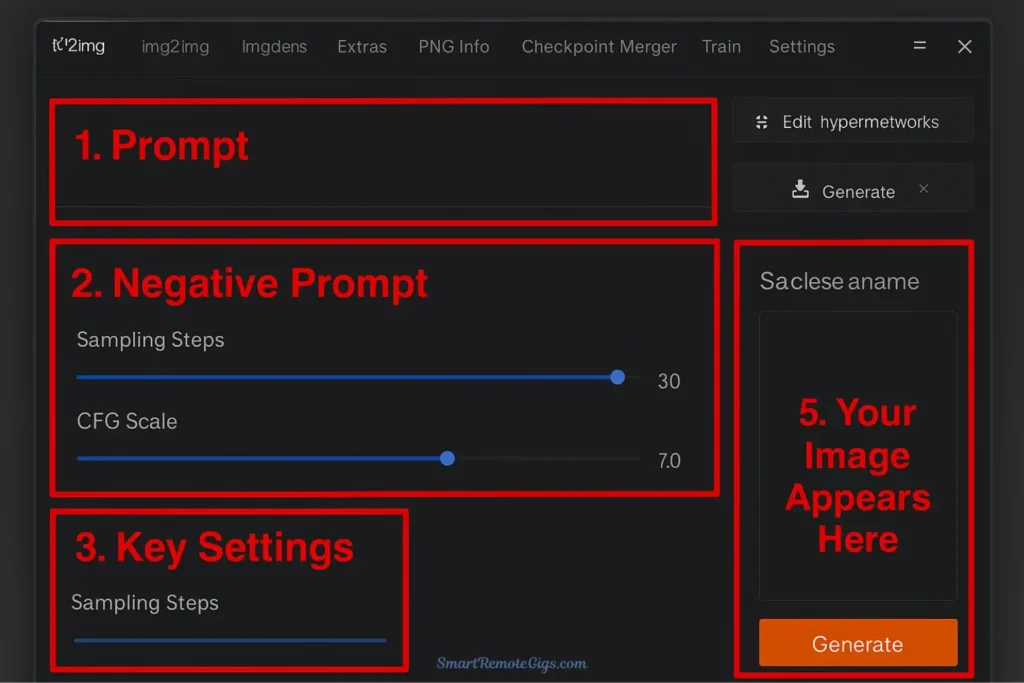
Whether you’re using Path A (cloud) or Path B (local), the generation interface follows similar principles. Let’s decode the essential settings.
The Prompt: Your Creative Vision
The prompt box is where creativity begins. Stable Diffusion responds well to detailed, descriptive prompts.
Basic Structure:
[Subject], [Style/Medium], [Details], [Quality/Lighting]Example Prompt:
a beautiful mountain landscape at sunset, oil painting style,
dramatic clouds, golden hour lighting, highly detailed,
trending on artstation, 8k resolution
Prompting Tips:
- Be specific about style (photograph, painting, 3D render, etc.)
- Include quality boosters: “highly detailed,” “professional,” “masterpiece”
- Mention lighting: “soft lighting,” “dramatic shadows,” “golden hour”
- Add artist references if desired: “in the style of Greg Rutkowski”
The Negative Prompt: Avoiding Pitfalls
Negative prompts tell Stable Diffusion what to avoid. This is crucial for quality.
Essential Negative Prompt (copy this):
blurry, bad quality, low resolution, distorted, deformed,
ugly, bad anatomy, extra limbs, watermark, signature, text
This prevents common AI artifacts and ensures cleaner results.
Key Settings Explained
Sampling Steps (20-50)
- How many times the AI refines the image
- 20 steps: Fast, good for testing
- 30-40 steps: Sweet spot for quality
- 50+ steps: Diminishing returns, slower
CFG Scale (7-15)
- How closely the AI follows your prompt
- 7: Loose interpretation, more creative freedom
- 10-12: Balanced, recommended starting point
- 15+: Strict adherence, can look over-processed
Sampling Method
- The algorithm used for generation
- Euler a: Fast, good quality (recommended for beginners)
- DPM++ 2M Karras: Popular for detailed images
- Experiment to find your preference
Seed
- Random number that determines the image variation
- -1: Random seed each time
- Specific number: Reproduce exact results
Width/Height
- 512×512: Default, fastest generation
- 768×768 or 1024×1024: Higher quality, requires more VRAM
- Start with 512×512 until comfortable
Generating Your First Image
- Enter a detailed prompt
- Add your negative prompt
- Set Steps to 30, CFG Scale to 10
- Keep default size (512×512)
- Click Generate
- Wait 10-60 seconds depending on your hardware
Congratulations! You’ve just generated your first Stable Diffusion image.
Frequently Asked Questions for Beginners
What are custom models and where do I get them?
Custom models are specialized versions of Stable Diffusion trained for specific styles or subjects. The base model is versatile, but custom models excel at particular tasks:
- Realistic Vision, DreamShaper: Photorealism
- Anything V5, CounterfeitXL: Anime and illustration
- Deliberate, RevAnimated: Artistic styles
Download custom models from Civitai.com or Hugging Face. Place them in your models/Stable-diffusion folder, restart the Web UI, and select them from the checkpoint dropdown.
Do I need to be a coder to use Stable Diffusion?
Absolutely not. While Stable Diffusion is technically complex under the hood, interfaces like AUTOMATIC1111 make it accessible without coding knowledge. You’ll use dropdown menus, text boxes, and buttons—no programming required. The initial setup involves copying a command or two, but after that, it’s entirely visual.
Why are my images coming out weird?
Common beginner issues and solutions:
- Blurry or low quality: Increase sampling steps to 30-40, check your CFG scale is between 7-12
- Distorted anatomy: Add more negative prompts like “bad anatomy, deformed, extra limbs”
- Doesn’t match prompt: Increase CFG scale or try a different sampling method
- Out of memory errors: Reduce image size to 512×512 or lower batch size
- Strange colors/artifacts: Try a different model or sampling method
How do I update Automatic1111?
Navigate to your stable-diffusion-webui folder, open terminal/command prompt, and run:
git pullThis downloads the latest updates. Restart the Web UI to apply changes.
Conclusion
You’ve just unlocked one of the most powerful creative tools available today. Whether you chose the easiest way to use stable diffusion through cloud services or took the path of local installation for maximum control, you’re now equipped to generate AI art on your own terms.
To recap your journey:
The real adventure begins with experimentation. Try different prompts, explore various models, adjust settings, and discover what resonates with your creative vision.
Ready to unlock Stable Diffusion’s true potential? Now that you have it running, it’s time to master the advanced features that separate beginners from power users. Read our guide to mastering LoRAs and ControlNet to discover how to achieve consistent characters and precise pose control.
Welcome to the world of open-source AI art. The only limit now is your imagination.
A complete guide for beginners on how to set up Stable Diffusion on their own computer. This tutorial covers checking hardware requirements, installing prerequisites like Python and Git, downloading the Automatic1111 Web UI, and generating your first AI image.
Total Time: 90 minutes
Step 1: Check Hardware and Install Prerequisites

First, ensure your computer has a compatible NVIDIA GPU with at least 8GB of VRAM. Then, install the necessary software: go to Python.org and install version 3.10.x, making sure to check the “Add Python to PATH” box during installation. Next, download and install Git from git-scm.com using the default settings.
Step 2: Download Automatic1111 and a Model File
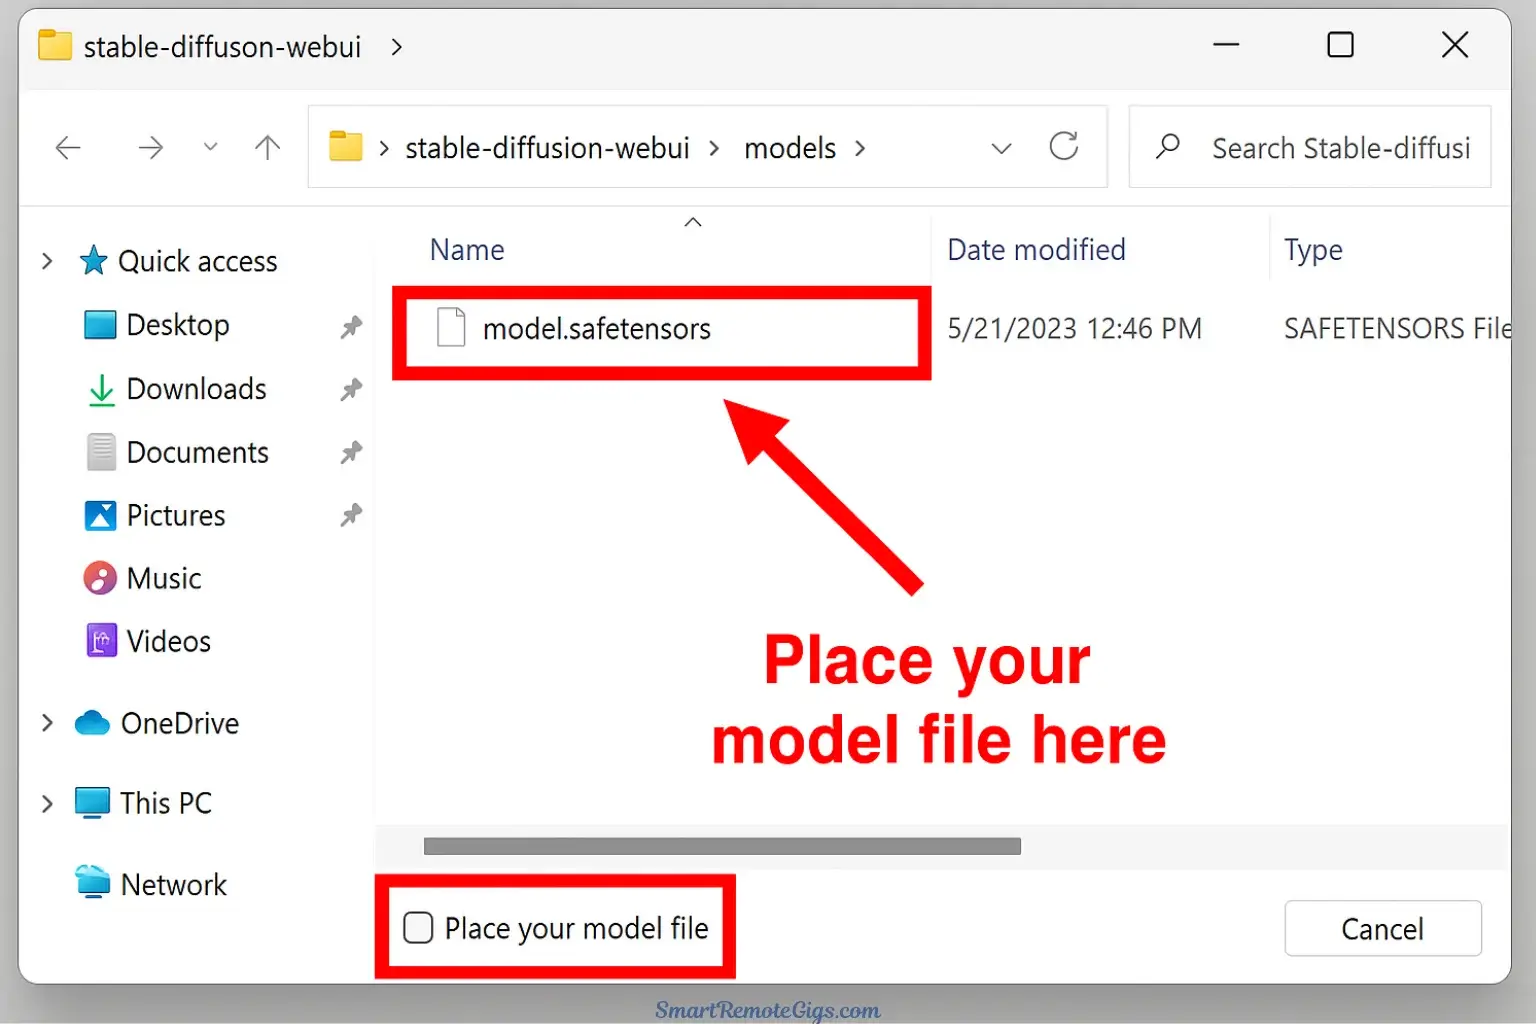
Create a new folder for your installation. Open a command prompt or PowerShell window in that folder and run the command git clone https://github.com/AUTOMATIC1111/stable-diffusion-webui.git. While that downloads, go to a site like Civitai or Hugging Face and download a base model file (e.g., Stable Diffusion v1.5). Place this .safetensors file inside the stable-diffusion-webui/models/Stable-diffusion/ folder.
Step 3: Launch the Web UI for the First Time

Navigate into the stable-diffusion-webui folder and double-click the webui-user.bat file. A command window will open and begin a lengthy first-time setup process, downloading necessary components. This can take 5-15 minutes. Once you see a line that says Running on local URL: http://127.0.0.1:7860, the process is complete.
Step 4: Generate Your First Image

Open a web browser and go to the local URL: http://127.0.0.1:7860. You will see the Automatic1111 interface. In the main “txt2img” tab, enter a description in the “Prompt” box, add common negative keywords like “blurry, low quality” to the “Negative Prompt” box, and click the large orange “Generate” button. Your first locally generated AI image will appear on the right.
Tools:
- A Windows/Linux PC with an NVIDIA GPU (8GB+ VRAM recommended)
- Python (Version 3.10.x)
- Git version control software
- A Stable Diffusion Model File (e.g., a .safetensors file)
- An internet connection for downloads