Staring at a blank page, cursor blinking mockingly, mind completely empty? You know you need to publish content consistently. You have ideas—somewhere in your brain—but translating those vague concepts into a coherent 1,500-word blog post feels insurmountable.
Writer’s block isn’t a creativity problem. It’s a process problem.
What if you had a co-pilot who could help you research your topic, structure your argument, and generate that crucial first draft—the one that’s always the hardest? Not to replace your voice or think for you, but to eliminate the blank page paralysis and get words flowing?
That’s exactly what AI can do when used correctly.
This guide details a practical, repeatable 4-phase workflow that takes you from “I should write about this topic” to “I just hit publish” faster than you’ve ever managed before. You’ll use free AI tools to handle the research grunt work, structure your content, overcome the blank page, and polish your final draft—while maintaining complete control over quality and voice.
This isn’t about letting AI write your blog for you. It’s about using AI strategically at each phase of the writing process to work smarter, not harder. By the end of this workflow, you’ll have a system you can repeat for every blog post, newsletter, or article you create.
Let’s eliminate writer’s block permanently.
The Free AI Writer’s Toolkit
Before diving into the workflow, you need the right tools. The good news? Everything you need is completely free and requires no technical expertise.
Your AI Research & Drafting Assistant: ChatGPT or Google Gemini
These conversational AI tools excel at brainstorming, research, outlining, and generating first drafts. Both offer free access with no credit card required. ChatGPT tends to produce slightly more natural-sounding prose, while Gemini integrates seamlessly with Google’s ecosystem. Choose whichever you prefer—the workflow works identically with either.
If you want to explore additional options beyond these two, check out our comprehensive guide to the best free ChatGPT alternatives—it compares features, strengths, and ideal use cases for different AI writing assistants.
Your Editing & Proofreading Assistant: Grammarly (Free Version)
Grammarly’s free tier catches typos, grammar errors, and awkward phrasing that you’ll inevitably miss during self-editing. It works as a browser extension, integrating into any text field or document editor. The premium version adds style suggestions, but the free version handles everything you need for this workflow.
Your Writing Environment: Any text editor
Google Docs, Microsoft Word, Notion, or even a simple text editor—use whatever feels comfortable. The workflow is tool-agnostic. You’re not learning specialized software; you’re learning a process.
That’s it. Two free AI tools and a place to write. No expensive subscriptions, no complicated platforms, no learning curve beyond what this guide provides.
Want to see how these tools fit into a larger free AI toolkit? Our guide to the top 5 free AI tools that give you an unfair advantage shows how to combine AI writing with other powerful free tools for content creation, design, and productivity.
Phase 1: The Foundation (AI-Powered Research & Outlining)
Most writers start with a vague topic idea and immediately try to write. That’s why they get stuck. Professional writers know the secret: the quality of your outline determines the quality of your final piece.
AI transforms outlining from a tedious research task into a 15-minute conversation.
Step 1: Validate Your Topic Idea
Before investing hours writing, confirm your topic is actually worth pursuing. Open ChatGPT or Gemini and use this prompt structure:
I'm considering writing a blog post about [YOUR TOPIC]. What are the main questions my audience would have about this? What subtopics should I consider covering to make this comprehensive?Example:
“I’m considering writing a blog post about using AI for content marketing. What are the main questions my audience would have about this? What subtopics should I consider covering to make this comprehensive?”
The AI will generate 8-12 questions or subtopics your audience cares about. This serves two purposes: it validates that your topic has depth worth exploring, and it reveals angles you hadn’t considered.
Read through the AI’s suggestions. Some will resonate immediately (“Yes, I need to cover that!”). Others might surprise you with relevant angles you overlooked. This is research acceleration—instead of spending an hour searching Google and compiling notes, you’ve identified your content pillars in minutes.
Step 2: Generate Your Structural Outline
Now that you know what subtopics matter, create the skeleton of your blog post. Use this prompt:
Create a detailed blog post outline about [YOUR TOPIC]. Include an introduction, 4-6 main sections (H2 headers), and 2-3 subsections under each main section (H3 headers). Focus on [SPECIFIC ANGLE OR AUDIENCE].Example:
“Create a detailed blog post outline about using AI for content marketing. Include an introduction, 4-6 main sections, and 2-3 subsections under each main section. Focus on small business owners who are new to AI but want practical strategies they can implement immediately.”
The AI will generate a comprehensive outline with headers, subheaders, and brief descriptions of what each section should cover.

Critical step: Don’t accept the AI’s outline blindly. This is where your expertise matters. Review the structure and ask yourself:
- Does this flow logically?
- Are there sections my audience doesn’t care about?
- Are there gaps where important information is missing?
- Does this match how I’d naturally explain this topic?
Edit ruthlessly. Reorder sections. Delete irrelevant parts. Add missing elements. The AI gave you a starting point; you’re refining it into something that matches your vision and your audience’s needs.
Step 3: Expand Key Sections
For any section where you feel uncertain about what to include, use AI to explore deeper:
For the section about [SPECIFIC H2 OR H3], what are the 3-5 most important points I should make? What examples would help illustrate these concepts?This gives you bullet points of key ideas to address. You’re not asking AI to write the section—you’re using it as a research assistant to ensure you don’t overlook crucial information.
What you’ve accomplished in Phase 1:
- Validated your topic has sufficient depth
- Created a comprehensive outline with logical flow
- Identified key points to address in each section
- Eliminated the “what should I write about?” paralysis
You now have a roadmap. The blank page isn’t blank anymore—it’s a structured document waiting to be filled in. That psychological shift is enormous.
Phase 2: The First Draft (AI as Your Assistant)
Here’s where most people misuse AI and end up with generic, lifeless content: they ask AI to “write a blog post about [topic]” and paste the entire result.
That’s wrong.
The correct approach is treating AI like a drafting assistant who works one section at a time under your direction. You maintain control of the voice, angle, and quality while AI handles the initial “get words on the page” heavy lifting.
The Section-by-Section Drafting Method
Open your outline. Start with your introduction. Use this prompt structure:
Write a 150-200 word introduction for a blog post about [YOUR TOPIC]. The introduction should [SPECIFIC INSTRUCTION ABOUT TONE, HOOK, OR ANGLE]. The target audience is [AUDIENCE DESCRIPTION].Example:
“Write a 150-200 word introduction for a blog post about using AI for content marketing. The introduction should start with a relatable pain point about content creation burnout, then promise a practical solution. The target audience is small business owners who create their own content but feel overwhelmed.”
The AI generates an introduction. Paste it into your document.
Now move to your first H2 section. Use this prompt:
Write 200-300 words for a section titled "[YOUR H2 HEADER]". This section should cover [BRIEF DESCRIPTION OF KEY POINTS FROM YOUR OUTLINE]. Keep the tone [CONVERSATIONAL/PROFESSIONAL/EDUCATIONAL/ETC.].Repeat this process for each section. You’re generating one section at a time, maintaining control over what each section covers and how it’s presented.
Why This Method Works
You maintain narrative control. By working section by section, you ensure each part flows logically from the previous one. You’re the director; AI is executing your vision.
You can course-correct immediately. If a section doesn’t match your expectations, you can revise your prompt and regenerate just that section without affecting the rest.
You avoid AI’s tendency toward generic content. Detailed, specific prompts produce better results than vague “write me a blog post” requests.
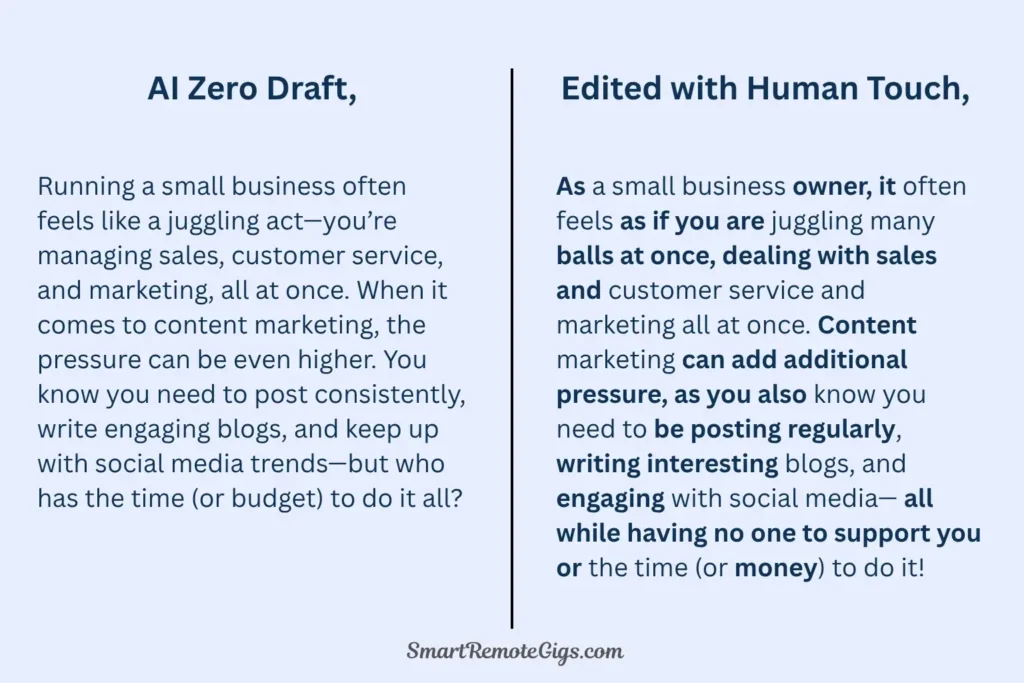
Understanding the Zero Draft Concept
What AI just generated isn’t your final blog post. It’s a zero draft—a rough version meant to get words on the page and establish a foundation.
Think of it like a sculptor’s clay model. It has the basic shape, but it’s not the finished piece. Phase 3 is where you transform this rough draft into something genuinely valuable.
Crucial mindset shift: You’re not evaluating whether AI wrote a great blog post. You’re evaluating whether AI gave you raw material you can refine into a great blog post. Those are completely different standards.
Phase 3: The Human Touch (Editing & Injecting Your Voice)
This is the most important phase for creating content that actually resonates with readers. AI-generated first drafts are functional but lifeless. They lack personality, nuance, and the specific insights that make content valuable.
Your job now is injecting humanity into the structure AI provided.
The Essential Editing Checklist
Work through your draft systematically, applying these transformations:
1. Fact-check every claim
AI occasionally generates plausible-sounding information that’s incorrect or outdated. Read each section critically. If AI makes a specific claim (statistics, dates, how a tool works), verify it independently. If you can’t confirm it, delete it or replace it with information you can verify.
This isn’t optional. Publishing inaccurate information damages your credibility permanently. Trust is hard to build and easy to destroy.
2. Add personal experience and examples
AI can’t draw from your unique experiences. Look for opportunities to add:
- Anecdotes from your own work
- Specific examples from your industry
- Lessons you learned the hard way
- Mistakes you made and how you corrected them
These personal touches transform generic advice into authentic guidance. Readers connect with specific stories, not abstract principles.
3. Inject your voice and personality
Read your draft aloud. Does it sound like you? If you write with humor, add it. If you’re direct and no-nonsense, sharpen that edge. If you use specific phrases or expressions consistently, include them.
AI writes in a neutral, inoffensive tone. Your readers don’t follow you for neutral and inoffensive—they follow you for your perspective and personality.
4. Eliminate AI’s telltale phrases
AI loves certain constructions that feel artificial:
- “In today’s digital landscape…”
- “It’s important to note that…”
- “As we delve into…”
- “Let’s explore…”
Delete these. Replace them with how you’d naturally transition between ideas.
5. Strengthen your examples and explanations
AI tends toward surface-level explanations. Look for places where you can:
- Provide a more detailed step-by-step walkthrough
- Include a specific screenshot or template
- Contrast good vs. bad approaches with concrete examples
- Anticipate and answer follow-up questions readers might have
6. Add strategic formatting
Break up dense paragraphs. Add bolding to emphasize key takeaways. Use bullet points for lists. Insert subheadings where long sections need structure.
AI generates walls of text. Humans read in scanning patterns, looking for relevant information. Help them find it.
The Voice Injection Test
After editing, read three random paragraphs to someone familiar with your writing (or to yourself, honestly). Ask: “Does this sound like me, or does it sound generic?”
If it sounds generic, you haven’t edited enough. Keep refining until your personality comes through consistently.
Phase 4: The Polish (AI for SEO & Proofreading)
Your blog post is now substantive, accurate, and written in your voice. The final phase is polish—catching errors, optimizing for search, and ensuring professional presentation.
SEO Optimization with AI
Use ChatGPT or Gemini to brainstorm meta descriptions and title variations:
I wrote a blog post about [TOPIC]. Generate 3 different meta descriptions (under 155 characters) that would encourage clicks from search results.AI will provide options. Choose the one that best represents your content while being compelling to potential readers.
You can also ask AI to suggest title variations:
My current title is "[YOUR TITLE]". Suggest 5 alternative titles that are more compelling while accurately representing the content.Sometimes AI suggests a title variation you wouldn’t have considered that’s genuinely better. Sometimes your original is best. You’re gathering options, not blindly accepting AI’s suggestions.
Proofreading with Grammarly
Copy your entire blog post and paste it into a document with Grammarly enabled (or use Grammarly’s online editor).
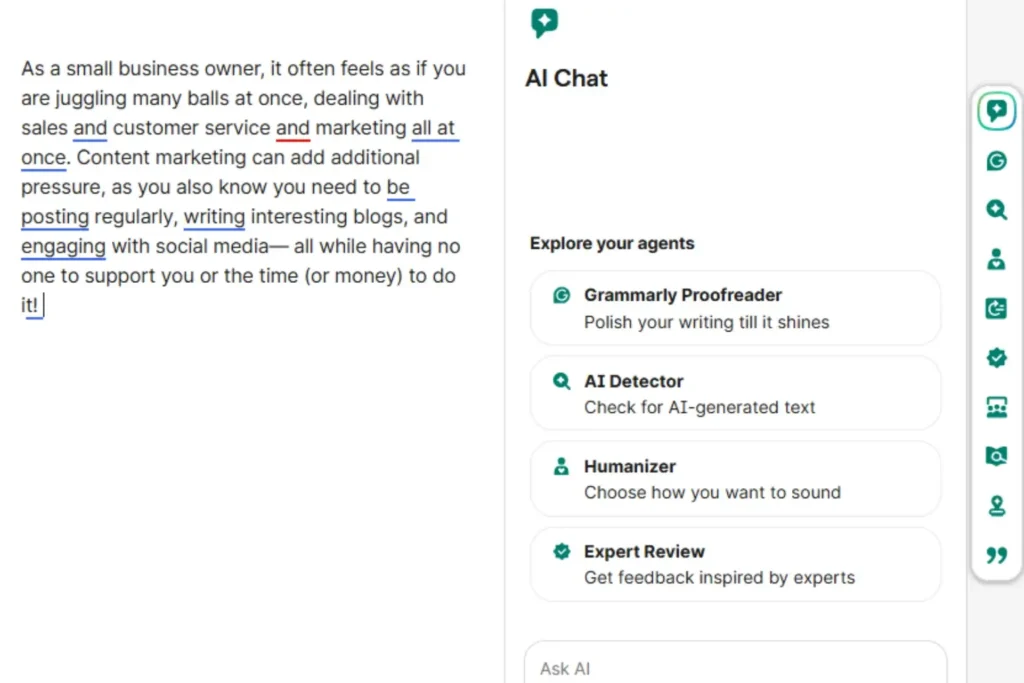
Work through Grammarly’s suggestions systematically:
- Accept obvious typos and grammar corrections
- Evaluate style suggestions based on whether they improve clarity
- Reject suggestions that eliminate your intentional voice or style choices
Grammarly catches the typos you’re blind to after staring at your draft for hours. It’s not judging your writing quality—it’s catching technical errors that undermine professionalism.
The Final Read-Through
Before publishing, read your entire post one last time from top to bottom. You’re checking for:
- Awkward transitions between sections
- Repeated information that should be consolidated
- Logical flow issues where ideas don’t connect smoothly
- Any remaining AI-ish language you missed earlier
This final pass catches issues that only become apparent when reading the piece as a whole, rather than editing section by section.
A Note on Responsible AI Use
Using AI as a writing assistant is fundamentally different from plagiarism or passing off AI-generated content as entirely your own work.
You’re responsible for:
- The accuracy of every claim in your blog post
- The originality of your insights and perspective
- The quality of your examples and explanations
- Ensuring your content provides genuine value to readers
AI is responsible for:
- Helping you overcome blank page paralysis
- Accelerating research and outline creation
- Generating a first draft structure to refine
- Catching grammar and spelling errors
The workflow outlined here ensures you maintain authorship and quality control. You’re using AI as a tool, not a replacement for your expertise and judgment.
If you’re concerned about originality, remember: your editing in Phase 3 transformed the AI-generated draft so substantially that the final piece reflects your knowledge, voice, and perspective. The AI provided scaffolding. You built the actual structure.
Additionally, search engines and readers care about value, not how you generated your first draft. If your blog post answers questions thoroughly, provides unique insights, and solves problems for your audience, it’s valuable content—regardless of whether AI helped you create it.
For a deeper discussion of copyright, commercial use rights, and legal considerations when using free AI tools professionally, see our comprehensive guide: Are free AI tools safe for commercial use?
Your Repeatable Content Creation System
You now have a workflow you can use for every blog post, article, or long-form content piece you create:
Phase 1 (15-20 minutes): Use AI to research your topic and generate a comprehensive outline.
Phase 2 (30-45 minutes): Use AI to draft each section one at a time based on your outline.
Phase 3 (45-60 minutes): Edit ruthlessly, fact-check everything, inject your voice, and add personal examples and insights.
Phase 4 (15-20 minutes): Polish with AI-generated SEO elements and Grammarly proofreading.
Total time investment: 2-3 hours from blank page to published post.
Without this workflow, that same blog post might take 5-8 hours—and you’d spend half that time staring at a blank page, struggling with structure, or getting stuck mid-draft.
The Compound Effect
The real power of this workflow isn’t just time savings on a single post. It’s the compounding effect of consistent content creation.
When writing is faster and less painful, you publish more frequently. When you publish more frequently, you build audience faster. When you have more content, you rank for more search terms and capture more organic traffic.
The workflow removes friction from content creation. Less friction means more output. More output means better results from your content marketing efforts.
Getting Better Over Time
Your first few blog posts using this workflow will feel mechanical. You’re consciously thinking about each phase and what you should do. That’s normal when learning any new process.
By your fifth post, the workflow becomes intuitive. You’ll know instinctively which prompts generate good results, how much AI-generated text needs editing, and where you need to inject the most personality.
By your tenth post, you’ll have developed your own variations on this workflow—shortcut techniques that work specifically for your writing style and content type.
The workflow isn’t rigid. It’s a framework you’ll naturally customize as you gain experience. But it gives you a proven starting point instead of figuring everything out through trial and error.
From Paralysis to Published
Writer’s block survives because we approach writing as a monolithic task: sit down and produce a finished blog post. That’s overwhelming. No wonder we procrastinate.
This workflow transforms writing into a series of small, manageable tasks. Research your topic. Create an outline. Draft section one. Edit section one. Draft section two. Each task is achievable, none is intimidating.
You’ll still need to think critically, write clearly, and maintain quality standards. AI doesn’t eliminate the need for those skills—it just removes the obstacles that prevent you from applying them.
The cursor is still blinking. But the page isn’t blank anymore. You have a process that works. You have AI tools that accelerate the painful parts. You have a system you can trust to take you from idea to published post reliably, every single time.
Stop staring at the blank page. Start following the workflow. Your next blog post is waiting to be written—and now you know exactly how to write it.
Learn a practical, repeatable 4-phase system for writing high-quality blog posts faster. This workflow uses free AI tools to accelerate research, outlining, and drafting, helping you overcome writer’s block while maintaining full control over your unique voice and quality.
Total Time: 2 hours
Create a Foundation with AI-Powered Research & Outlining

Use a conversational AI to validate your topic idea and generate a detailed structural outline for your blog post. Refine the AI’s suggestions to create a logical flow with H2 and H3 headers that match your vision and audience’s needs.
Draft the First Draft with AI as Your Assistant

Working one section at a time from your outline, prompt the AI to generate a “zero draft” for each part. Provide specific instructions on tone and content to guide the AI, maintaining control over the narrative and structure.
Apply the Human Touch: Edit and Inject Your Voice
Rigorously edit the AI-generated draft. Fact-check all claims, add your personal experiences and unique examples, rewrite sentences to match your personality, and eliminate any generic or robotic-sounding phrases. This is the most critical step for ensuring quality.
Polish Your Post with AI for SEO & Proofreading

Use AI to brainstorm compelling title variations and SEO-friendly meta descriptions. Then, run your entire edited draft through a grammar checker like Grammarly to catch any remaining typos or grammatical errors before the final read-through.
Tools:
- A conversational AI (e.g., ChatGPT or Google Gemini)
- A grammar and spelling checker (e.g., Grammarly Free Version)
- A text editor (e.g., Google Docs, Microsoft Word)