
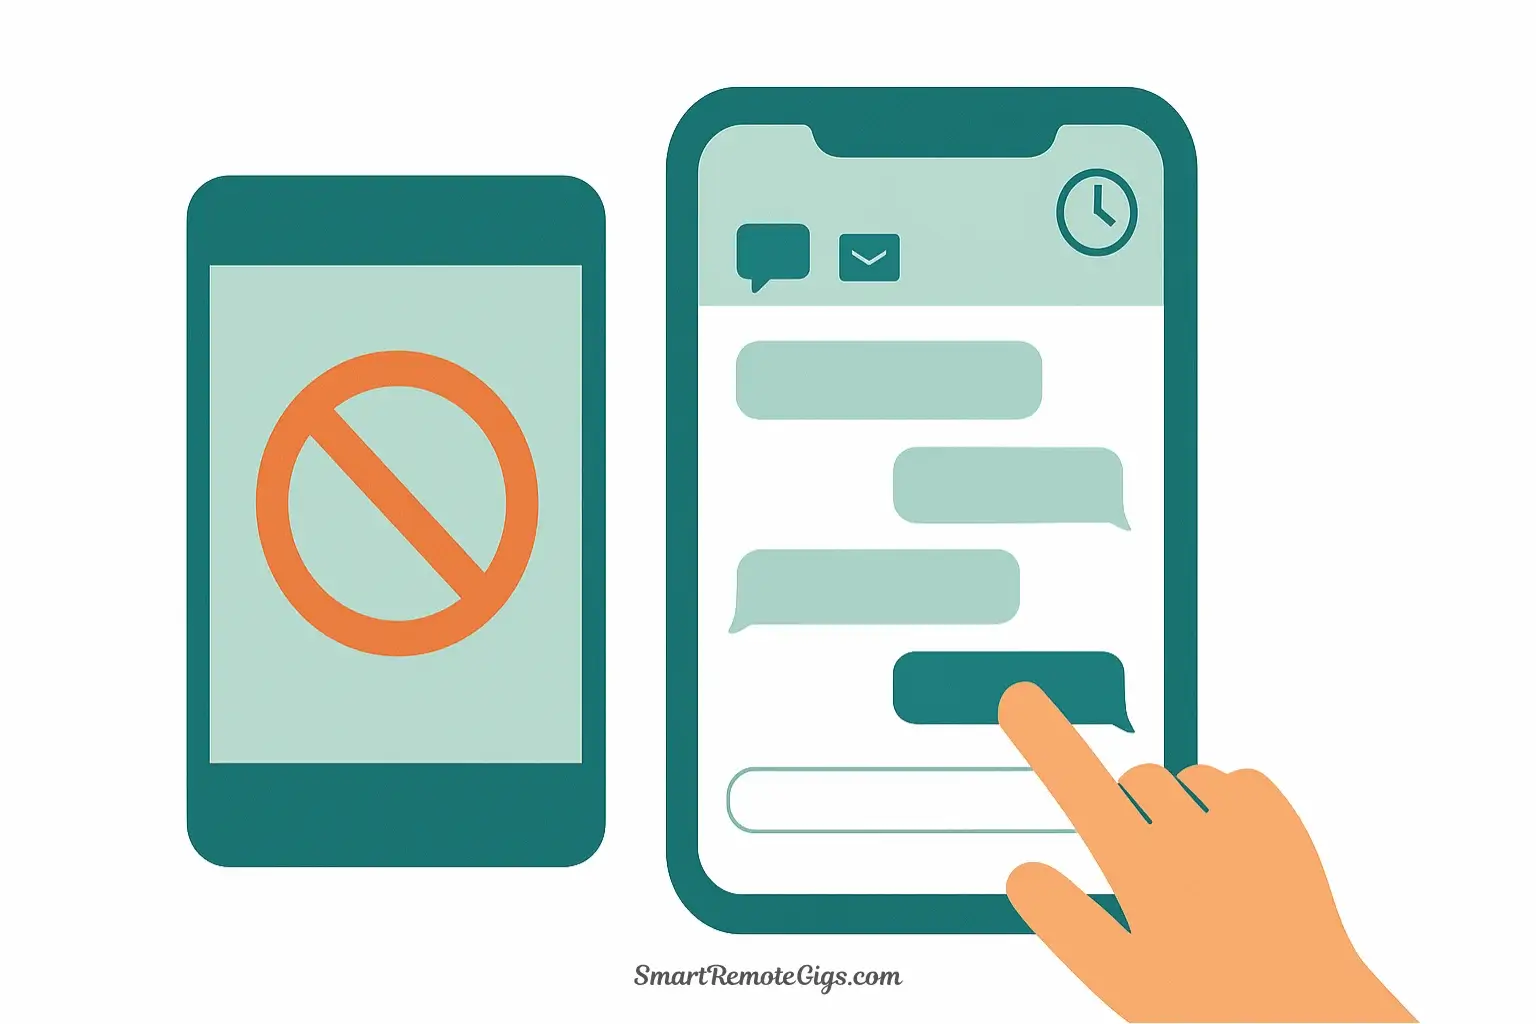
You open Instagram to post something for your business. Two hours later, you’ve scrolled through your feed, watched three reels, responded to DMs, checked LinkedIn, crafted and deleted four different captions, and still haven’t posted anything. Your content calendar remains blank. Your audience hasn’t heard from you in days. And you’ve just burned two hours of productive time in the social media vortex.
Sound familiar?
Social media is simultaneously essential for business growth and one of the biggest productivity black holes ever created. The traditional approach—thinking about what to post, creating it, and posting it in real-time—is a recipe for inconsistency, low-quality content, and massive time waste.
The solution isn’t to abandon social media. The solution is social media batching.
This guide presents a complete, five-phase content assembly line that takes you from blank page to a fully scheduled content calendar. By the end, you’ll have a repeatable workflow that transforms social media from a daily time-drain into a focused monthly project that produces consistent, high-quality content.
The High Cost of “Just Posting Something” (Why You Need a System)
Before we dive into the system, let’s understand exactly why the “post as you go” approach is costing you so much time and producing mediocre results.
The Real-Time Posting Problem:
When you create and post content in real-time, you’re forcing yourself to:
- Come up with ideas on the spot (creative work under pressure)
- Design graphics or find images immediately (switching to design mode)
- Write compelling copy in one take (no time for editing or refinement)
- Post at whatever time you happen to be available (often not optimal timing)
- Resist the temptation to scroll while you’re on the platform (nearly impossible)
Each of these steps requires a different mental mode. You’re context switching between creative ideation, visual design, copywriting, and strategic planning—all while fighting the addictive algorithms designed to keep you scrolling.
The Batching Advantage:
When you batch your social media content, you:
- Generate 10-30 ideas in one focused brainstorming session (creative flow state)
- Create all graphics or visuals in one design session (maintaining consistent style)
- Write and edit all captions with time for refinement (higher quality copy)
- Schedule everything at optimal times (data-driven posting strategy)
- Never need to open social apps during work hours (zero distraction)
Instead of spending 15-30 minutes per post scattered across 20 days (5-10 hours of fragmented time), you spend 4-6 hours in one focused week and produce better content. That’s 40-60% time savings with superior results.
If you’re new to the concept of grouping similar tasks, start with our foundational guide on how to task batch to understand the core principles before implementing this specific workflow.
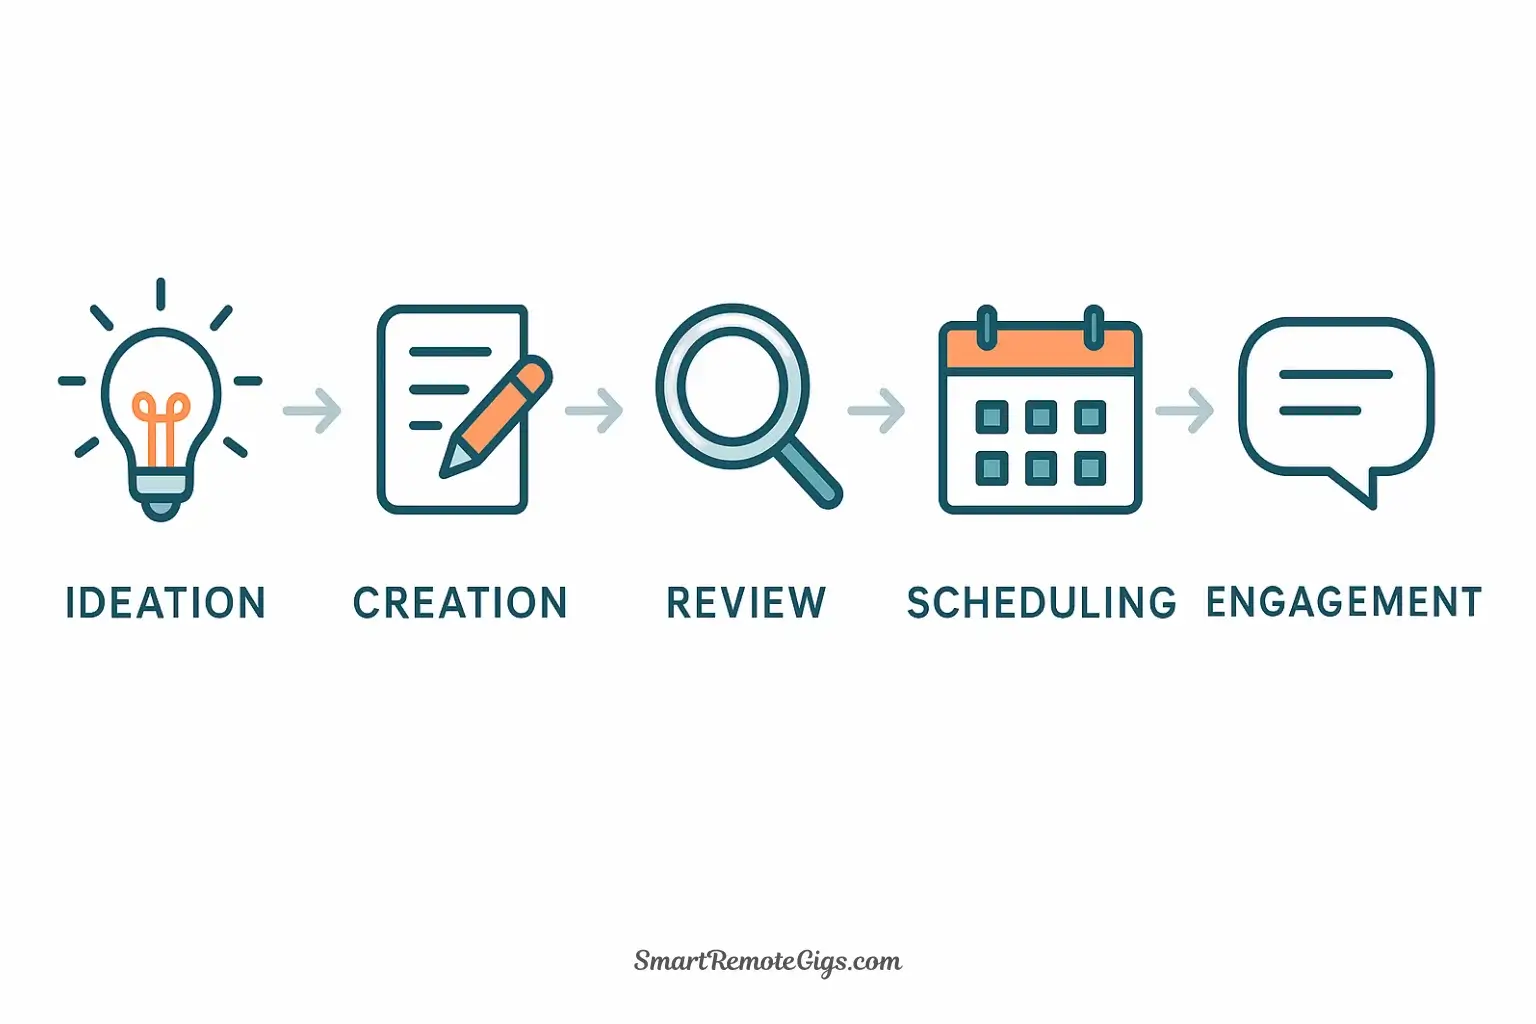
The 5-Phase Content Assembly Line
Social media batching isn’t about doing everything at once. It’s about separating distinct phases of the content creation process and completing each phase in dedicated batches. This is your assembly line.
Phase 1: The “Ideation” Batch (Brainstorming & Research)
Time Required: 1-2 hours
Frequency: Once per month
Goal: Generate 20-30 content ideas for the upcoming month
The ideation batch is where you think creatively without the pressure to produce. You’re collecting raw material—not polishing it.
The Process:
Step 1: Set Up Your Workspace (5 minutes)
- Open a blank document or spreadsheet
- Turn off all notifications
- Set a timer for 60-90 minutes
- Close social media apps (you’re not posting, just planning)
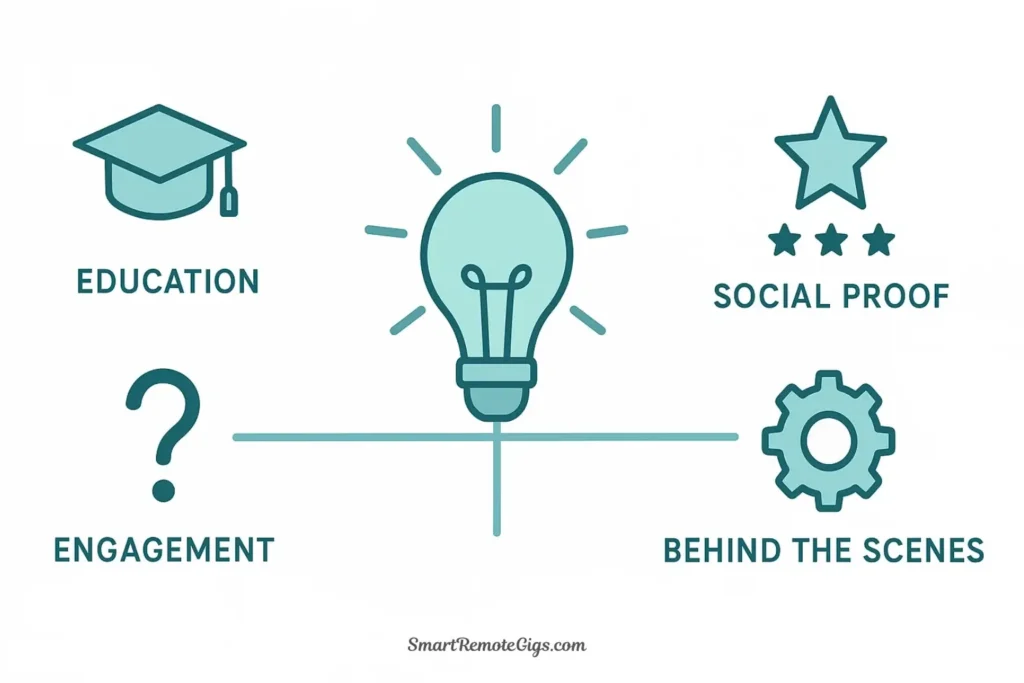
Step 2: Brain Dump Content Categories (10 minutes)
Create categories based on your content pillars. For most businesses, this includes:
- Educational content (teaching your audience something valuable)
- Behind-the-scenes content (humanizing your brand)
- Social proof content (testimonials, case studies, wins)
- Engagement content (questions, polls, conversation starters)
- Promotional content (products, services, offers)
Step 3: Rapid Ideation Within Each Category (40-60 minutes)
Set a timer for 10 minutes per category. Generate as many ideas as possible without self-editing. Write down everything—you’ll filter later.
Prompts to spark ideas:
- What questions do clients ask me repeatedly?
- What’s a common misconception in my industry?
- What’s a recent win or milestone I can share?
- What behind-the-scenes process would interest my audience?
- What content performed well last month? (Check analytics)
- What’s trending in my niche right now?
- What problem does my product/service solve?
Step 4: Curate to Your Target Number (15-20 minutes)
Review your list and select 20-30 of the strongest ideas. Assign each idea to a specific date on your content calendar. Consider:
- Variety (don’t schedule five educational posts in a row)
- Relevance (holiday tie-ins, seasonal content, launch dates)
- Balance (mix of promotional and value-driven content)
Batch Output: A content calendar with 20-30 rough ideas, each assigned to a specific date.
Pro Tip: Keep a “content idea parking lot” in your notes app. When inspiration strikes during the month, capture it immediately for next month’s ideation batch. This makes your monthly brainstorming session much easier.
Phase 2: The “Creation” Batch (Writing Captions & Creating Graphics)

Time Required: 2-4 hours
Frequency: Once per month (can be split into two 2-hour sessions)
Goal: Transform ideas into complete, unscheduled content
This is where ideas become actual posts. You’re in full creation mode—writing copy, designing visuals, and assembling everything needed to publish.
The Process:
Step 1: Batch Write All Captions (60-90 minutes)
Open your content calendar from Phase 1. Write the caption for each post, one after another, without switching to design work.
Caption writing tips:
- Start with a hook (first line must grab attention)
- Keep it scannable (short paragraphs, line breaks, emojis)
- Include a call-to-action (comment, share, click link)
- Use a consistent voice and tone
- Save captions in a document with corresponding dates
Step 2: Batch Create All Visuals (60-90 minutes)
Now switch entirely to design mode. Using a tool like Canva, create or select all images, graphics, or videos for your posts.
Design batching workflow:
- Create a consistent template in your brand colors
- Duplicate the template for each post
- Customize text, images, and elements for each piece
- Export all graphics at once
- Name files clearly (e.g., “2024-11-15-instagram-post.png”)
Step 3: Organize Everything (15-30 minutes)
Create a folder structure for your content:
Social Media Content - November 2024/
  ├── Captions.doc
  ├── Graphics/
  │   ├── 11-01-post.png
  │   ├── 11-03-post.png
  │   └── ...
  └── Notes.txt (any additional instructions)
Batch Output: Complete posts (caption + visual) ready to schedule, organized by date.
Common Mistake to Avoid: Don’t write one caption, then design its graphic, then write the next caption. This constant switching between writing and design mode kills your flow state. Complete all writing first, then move to all design work.
For more examples of marketing tasks you can batch similarly, see our comprehensive list of task batching examples.
Phase 3: The “Review” Batch (Editing & Fact-Checking)
Time Required: 30-60 minutes
Frequency: Once per month (24-48 hours after creation)
Goal: Polish content and catch errors with fresh eyes
This often-skipped phase is what separates amateur content from professional content. You’re reviewing everything with fresh eyes, checking for errors, and ensuring quality.
The Process:
Step 1: Wait 24-48 Hours
Don’t review immediately after creation. Your brain needs distance to spot typos, awkward phrasing, and unclear messaging. Schedule your review batch 1-2 days after your creation batch.
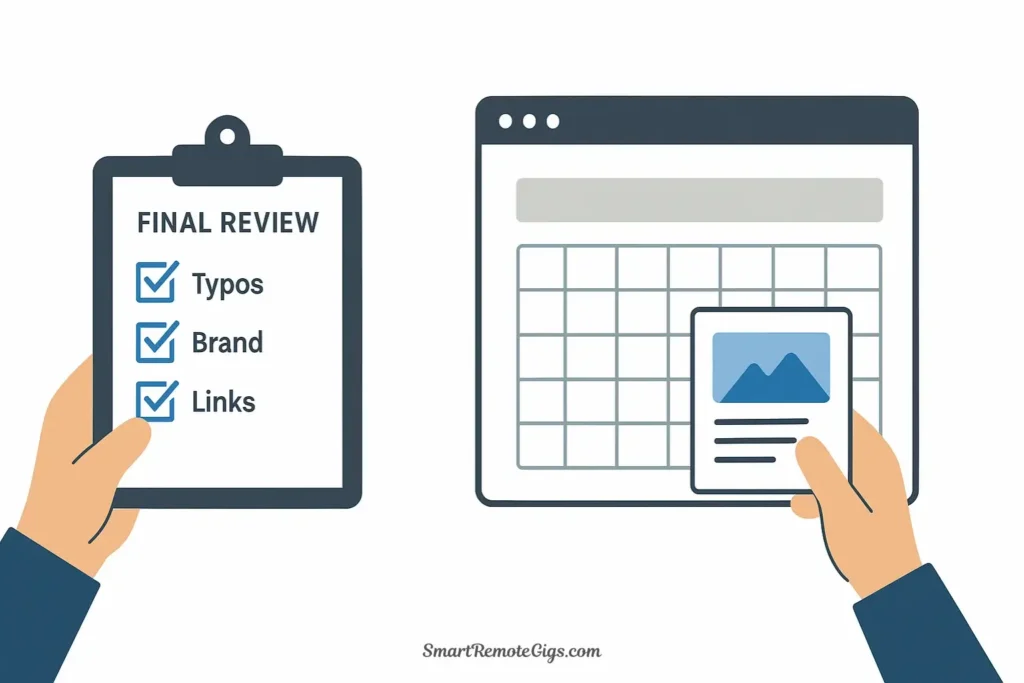
Step 2: Systematic Review (5-10 minutes per post)
Open each post and check:
- Copy: Typos, grammar errors, clarity, tone consistency
- Visuals: Image quality, brand consistency, text readability
- Links: All links work and go to correct destinations
- Hashtags: Relevant, not banned, appropriate number
- CTAs: Clear and compelling call-to-action included
- Accuracy: Facts, statistics, and claims are correct
Step 3: Make Revisions
Edit captions directly in your document. Replace graphics if needed. Mark any posts that need significant rework for a quick revision session.
Batch Output: Polished, error-free content ready for scheduling.
Phase 4: The “Scheduling” Batch (Uploading & Scheduling Posts)
Time Required: 30-60 minutes
Frequency: Once per month
Goal: Load all content into your scheduling tool and set publish times
This is the final assembly step. You’re taking your polished content and loading it into the system that will publish it automatically throughout the month.
The Process:
Step 1: Choose Your Scheduling Tool
Select a social media management platform. Popular options include:
- Buffer (simple, clean interface)
- Later (visual Instagram planner)
- Metricool (analytics-focused)
- Native platform tools (Meta Business Suite, LinkedIn scheduler)
Step 2: Batch Upload Content (30-45 minutes)
Open your scheduling tool and upload all posts systematically:
- Start with the first date on your calendar
- Upload the corresponding graphic
- Copy and paste the caption
- Set the publish date and time
- Add relevant hashtags or tags
- Move to the next post
Pro Tip: Use optimal posting times based on your analytics. Most tools show when your audience is most active. Schedule posts for these high-engagement windows.
Step 3: Final Calendar Review (5-10 minutes)
View your entire month at once. Check for:
- Even distribution of content (no gaps or clusters)
- Variety in content types throughout the week
- All posts scheduled at appropriate times
- No scheduling conflicts or errors
Batch Output: A fully scheduled content calendar that will publish automatically for the next 30 days.
Phase 5: The “Engagement” Batch (Replying to Comments)
Time Required: 15-30 minutes
Frequency: 2-3 times per week
Goal: Respond to comments and build community without getting sucked into scrolling
Content batching ends when posts are scheduled, but engagement still requires your attention. The key is to batch this too, rather than checking constantly.
The Process:
Step 1: Schedule Engagement Batches
Block 15-30 minutes in your calendar 2-3 times per week specifically for engagement. Common times:
- Tuesday and Thursday mornings
- Monday, Wednesday, Friday afternoons
- Whatever works for your schedule—just be consistent
Step 2: Focused Engagement Session
Set a timer for your allocated time. During this session:
- Open only the platforms you’re managing
- Navigate directly to your notifications
- Respond to all comments on your recent posts
- Like and reply to relevant comments
- Thank people for shares and tags
- Do NOT scroll your feed or explore page
Step 3: Close the App Immediately
When your timer ends or you’ve responded to all comments, close the app immediately. Don’t “just quickly check” your feed. That’s how 15 minutes becomes two hours.
Batch Output: Engaged community, strengthened relationships, zero time wasted scrolling.
Important Note: Engagement batching is about responding to your audience, not consuming content. The moment you start scrolling your feed, you’ve broken the batch and fallen back into the trap of context switching. If you want to stay current on industry trends or competitor content, create a separate “Content Research Batch” once per week specifically for that purpose—with a timer and a clear goal.
Toolkit: Essential Apps for Your Batching Workflow
Your social media batching system requires the right tools. Here’s the recommended tech stack:
For Ideation:
- Google Docs or Notion (content calendar and idea storage)
- Answer The Public (research what your audience is searching)
- Your own analytics dashboard (see what content performed well)
For Content Creation:
- Canva (graphic design for non-designers)
- Grammarly (caption editing and error-checking)
- Photo editing app (Lightroom, Snapseed, or native phone editor)
For Scheduling:
- Buffer, Later, Metricool, or native platform schedulers
- Choose ONE tool and master it rather than splitting across multiple platforms
For Engagement:
- Native mobile apps (fastest for responding to comments)
- Notification management tools to batch alerts
For Organization:
- Cloud storage (Google Drive, Dropbox) for graphics and captions
- Consistent file naming convention for easy retrieval
Pro Tip: Don’t over-complicate your toolkit. Start with free versions of essential tools. Canva Free + Buffer Free + Google Docs is enough to implement this entire system effectively.
A Sample Monthly Batching Schedule (Visual Calendar)
Here’s what a realistic monthly social media batching schedule looks like in practice:
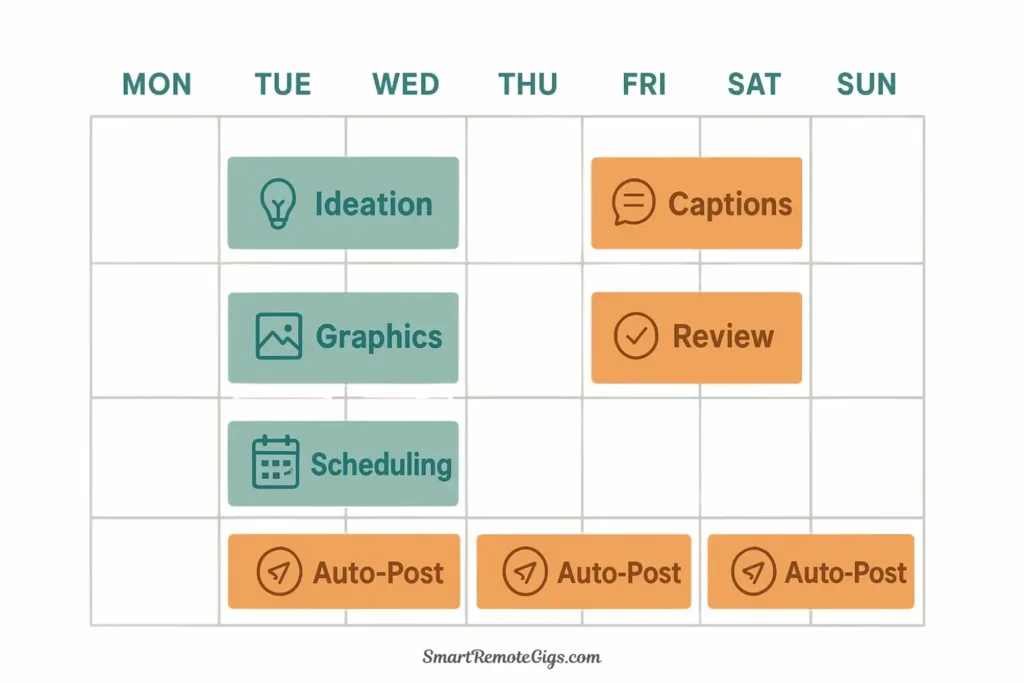
Week 1:
- Monday, 9-11 AM: Phase 1 – Ideation Batch (2 hours)
- Friday, 1-3 PM: Phase 2 – Creation Batch, Part 1 – Write all captions (2 hours)
Week 2:
- Tuesday, 9-11 AM: Phase 2 – Creation Batch, Part 2 – Design all graphics (2 hours)
- Friday, 10-11 AM: Phase 3 – Review Batch (1 hour)
Week 3:
- Monday, 9-10 AM: Phase 4 – Scheduling Batch (1 hour)
Week 4:
- Content publishes automatically
- Continue twice-weekly engagement batches (15-30 min each)
Total Time Investment: 6-8 hours for one month of content (20-30 posts)
Compare this to the traditional approach: 15-30 minutes per post x 20 posts = 5-10 hours of fragmented time, plus constant context switching and scrolling time. Batching saves time and produces better content.
Visual Representation:
MONTH VIEW: November Content Batching

Week 1: [Ideation] [_______] [_______] [_______] [Creation-Captions]
Week 2: [Creation-Graphics] [_______] [_______] [_______] [Review]
Week 3: [Scheduling] [_______] [_______] [_______] [_______]
Week 4: [AUTO-PUBLISH] ← Content goes live automatically
        ↓ Engagement batches continue 2-3x per week throughout
Understanding the difference between time blocking and task batching helps you protect the focused hours needed for these creation sessions.
Conclusion: Reclaim Your Time from the Social Media Vortex
Social media doesn’t have to consume your day. With a systematic batching approach, you can maintain a consistent, professional presence while spending 75% less time on platforms designed to distract you.
The transformation looks like this:
Before Batching:
- Daily: “I should post something…” (15-30 minutes of procrastination and scrolling)
- Inconsistent posting (3-4 posts per month when you remember)
- Low-quality content (rushed, unedited, reactive)
- Constant distraction (checking apps 10-20 times per day)
- High stress (guilt about not posting enough)
After Batching:
- Monthly: One focused week of content creation (6-8 hours total)
- Consistent posting (20-30 posts per month, scheduled automatically)
- High-quality content (edited, branded, strategically planned)
- Zero distraction (only open apps during scheduled engagement batches)
- Low stress (content calendar filled for 30 days)
Your Implementation Plan:
This Week: Schedule your first Ideation Batch (2 hours) for next Monday. Just get 20-30 rough ideas on a calendar.
Next Week: Schedule your Creation Batch (split into two 2-hour sessions if needed). Turn those ideas into actual captions and graphics.
Week 3: Schedule your Review and Scheduling Batches back-to-back (90 minutes total). Polish everything and load it into your scheduler.
Week 4: Watch your content publish automatically while you focus on actual revenue-generating work.
By the end of your first month using this system, you’ll have transformed social media from a daily time-drain into a monthly project. Your content will be more consistent, higher quality, and strategically planned—while you spend less time creating it.
That’s not a productivity hack. That’s a complete business transformation.
Ready to apply this batching mindset to other areas of your work? Explore our complete guide on task batching to learn how to systematically eliminate context switching across your entire workday.
This system is part of our complete productivity framework. For more time-saving workflows and strategies, explore our resource library designed for busy entrepreneurs and content creators.
Learn a 5-phase content assembly line to brainstorm, create, and schedule a month’s worth of high-quality social media content in just a few focused sessions. This system saves time, improves consistency, and eliminates daily distractions.
Total Time: 8 hours
Step 1: The “Ideation” Batch (Brainstorming & Research)

In a single 1-2 hour session, generate 20-30 content ideas for the upcoming month. Brainstorm within your core content pillars (e.g., educational, behind-the-scenes, promotional) and then curate the best ideas, assigning each to a specific date on your content calendar.
Step 2: The “Creation” Batch (Writing & Designing)

Transform your ideas into complete posts. First, write all captions for the month in one dedicated session. Then, in a separate session, create all corresponding graphics and visuals. This separation of writing and designing is key to maintaining focus. Organize all assets in a clear folder structure.
Step 3: The “Review” Batch (Editing & Polishing)

Wait at least 24 hours after creation to review your content with fresh eyes. In this 30-60 minute session, check every post for typos, grammar errors, brand consistency, and factual accuracy. Polish your work to ensure professional quality.
Step 4: The “Scheduling” Batch (Uploading & Automating)
Using your chosen social media scheduling tool, systematically upload all your polished content. Set the publish date and time for each post according to your calendar and audience analytics. Do a final review of the full monthly schedule to catch any errors.
Step 5: The “Engagement” Batch (Community Management)

Schedule 2-3 short (15-30 minute) blocks per week to manage community interaction. During these timed sessions, focus only on responding to comments and messages. Avoid scrolling the feed to prevent distraction and maintain the benefits of batching.
Tools:
- A content calendar (e.g., Google Docs, Notion)
- A graphic design tool (e.g., Canva)
- A social media scheduling tool (e.g., Buffer, Later)
- Cloud storage for organization (e.g., Google Drive)