
You’ve heard about Midjourney’s ability to transform simple text descriptions into stunning, professional-quality images. You’ve seen the mind-blowing artwork flooding social media. Now you’re ready to create your own AI-generated masterpieces—but there’s one small problem: how to use Midjourney when you’ve never touched it before?
Here’s the good news: despite operating through Discord (which might feel unfamiliar if you’ve never used it), Midjourney is designed to be remarkably beginner-friendly. Within the next 10 minutes, you’ll generate your first AI image. Within an hour of practice, you’ll be creating results that impress even yourself.
If you’re still deciding between platforms, our in-depth comparison of Midjourney vs. Stable Diffusion can help you understand why Midjourney’s ease of use makes it the perfect starting point for AI art creation.
This guide will walk you through everything: setting up your Discord account, writing your first prompt, understanding the results, and saving your creations. No prior experience required—just curiosity and creativity.
Step 1: Getting Set Up on Discord

Before you can start getting started with Midjourney, you need two things: a Discord account and access to the Midjourney server.
Create Your Discord Account
If you don’t already have Discord:
- Visit Discord.com and click “Open Discord in your browser” (or download the app)
- Create your account with an email address
- Verify your email—this is crucial, as Midjourney won’t work with unverified accounts
Join the Official Midjourney Server
Once your Discord account is ready:
- Go to the official Midjourney website
- Click “Join the Beta” or navigate directly to the Midjourney Discord invite
- Accept the invitation to join the server
- Read and accept the community guidelines
Navigate to a Generation Channel
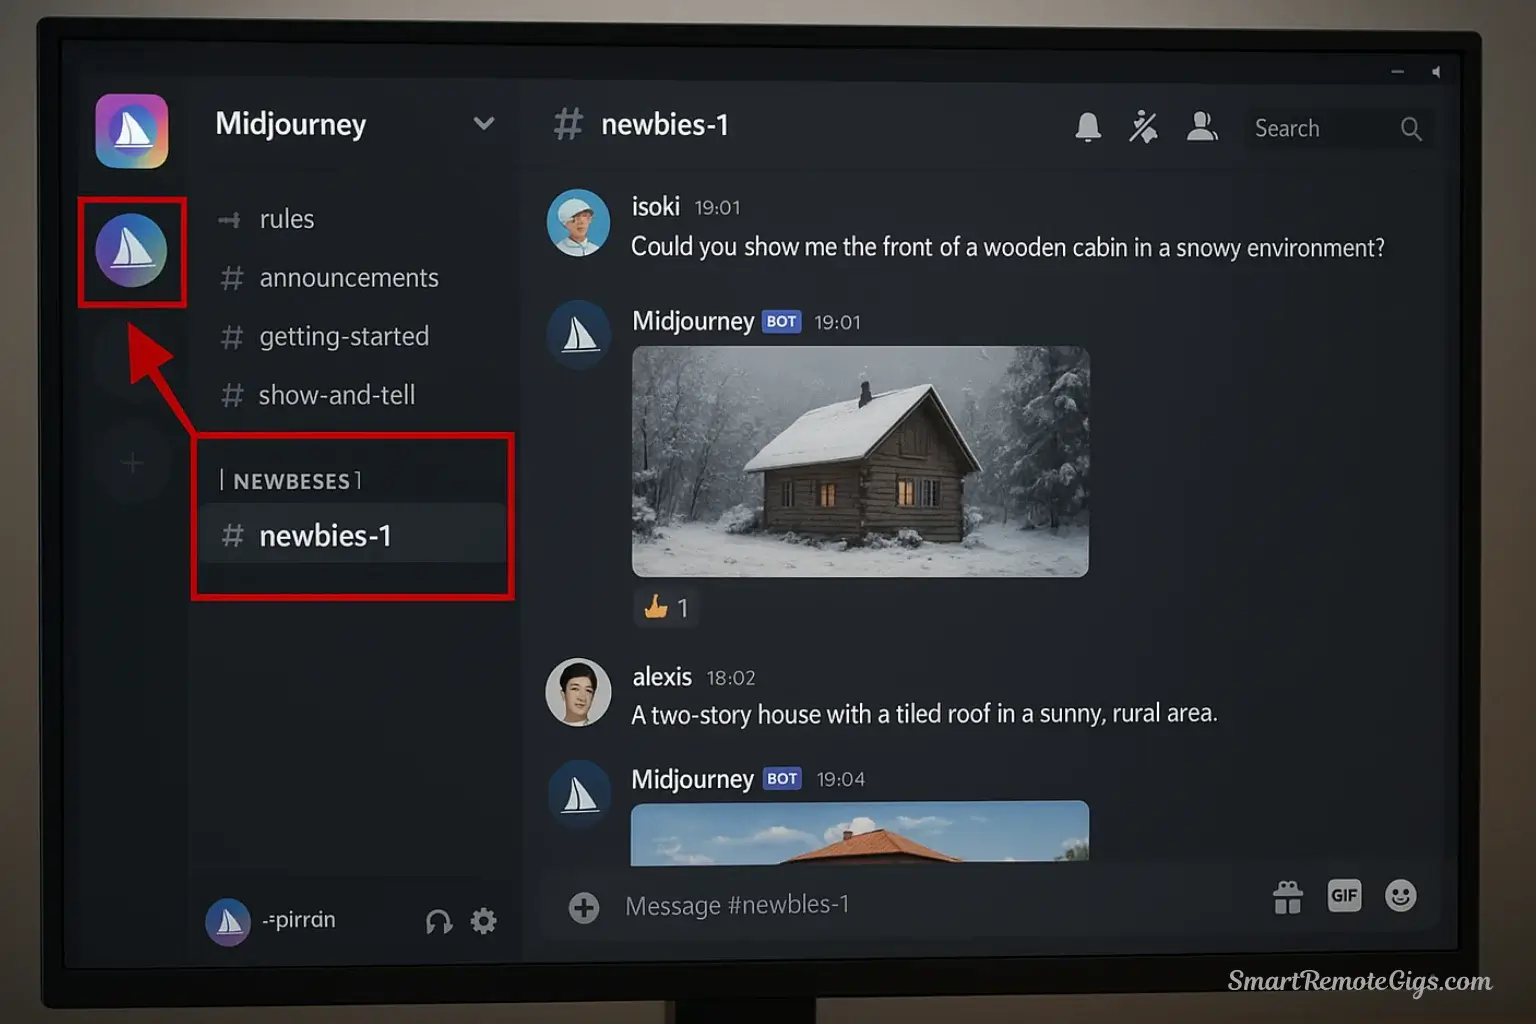
The Midjourney Discord server is massive, with hundreds of channels. Here’s where to start:
- Look for channels labeled “newbies-#” (like newbies-1, newbies-42, etc.) in the left sidebar
- Alternatively, find “general-#” channels
- These are public spaces where everyone generates images together
Pro Tip: Don’t worry about “bothering” others in these channels. Thousands of prompts are being run simultaneously—yours is just one of many scrolling by.
Step 2: Generating Your First Image with /imagine
This is where the magic happens. The Midjourney Discord tutorial begins with one simple command: /imagine.
Understanding Slash Commands
Discord uses “slash commands” to communicate with bots. When you type / in the message box, Discord shows available commands. Midjourney listens specifically for /imagine.
Your First Prompt
Here’s exactly what to do:
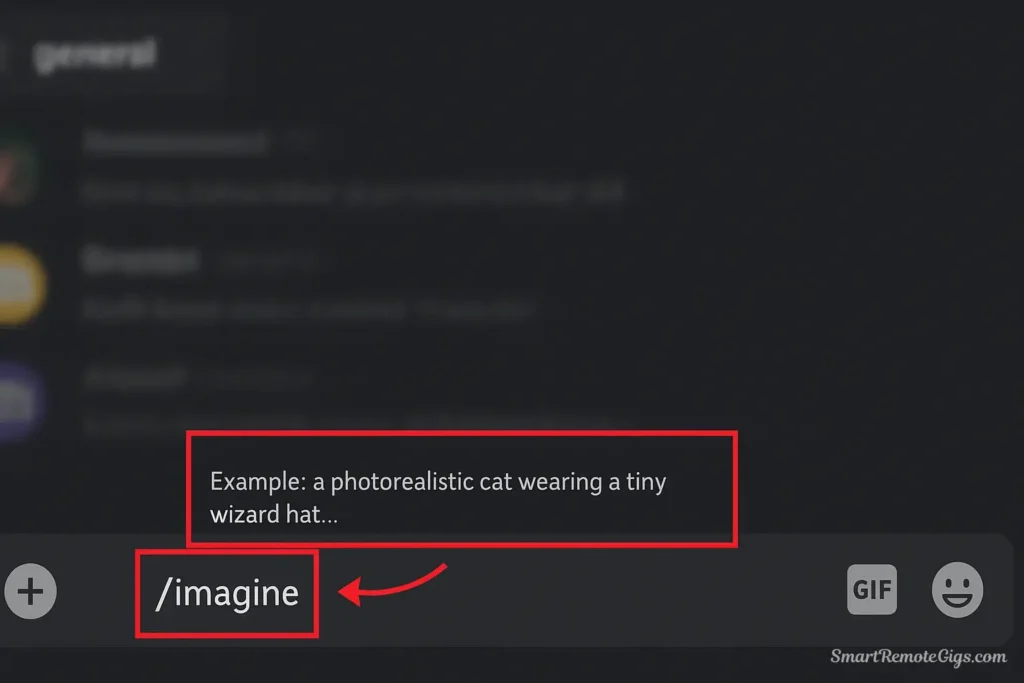
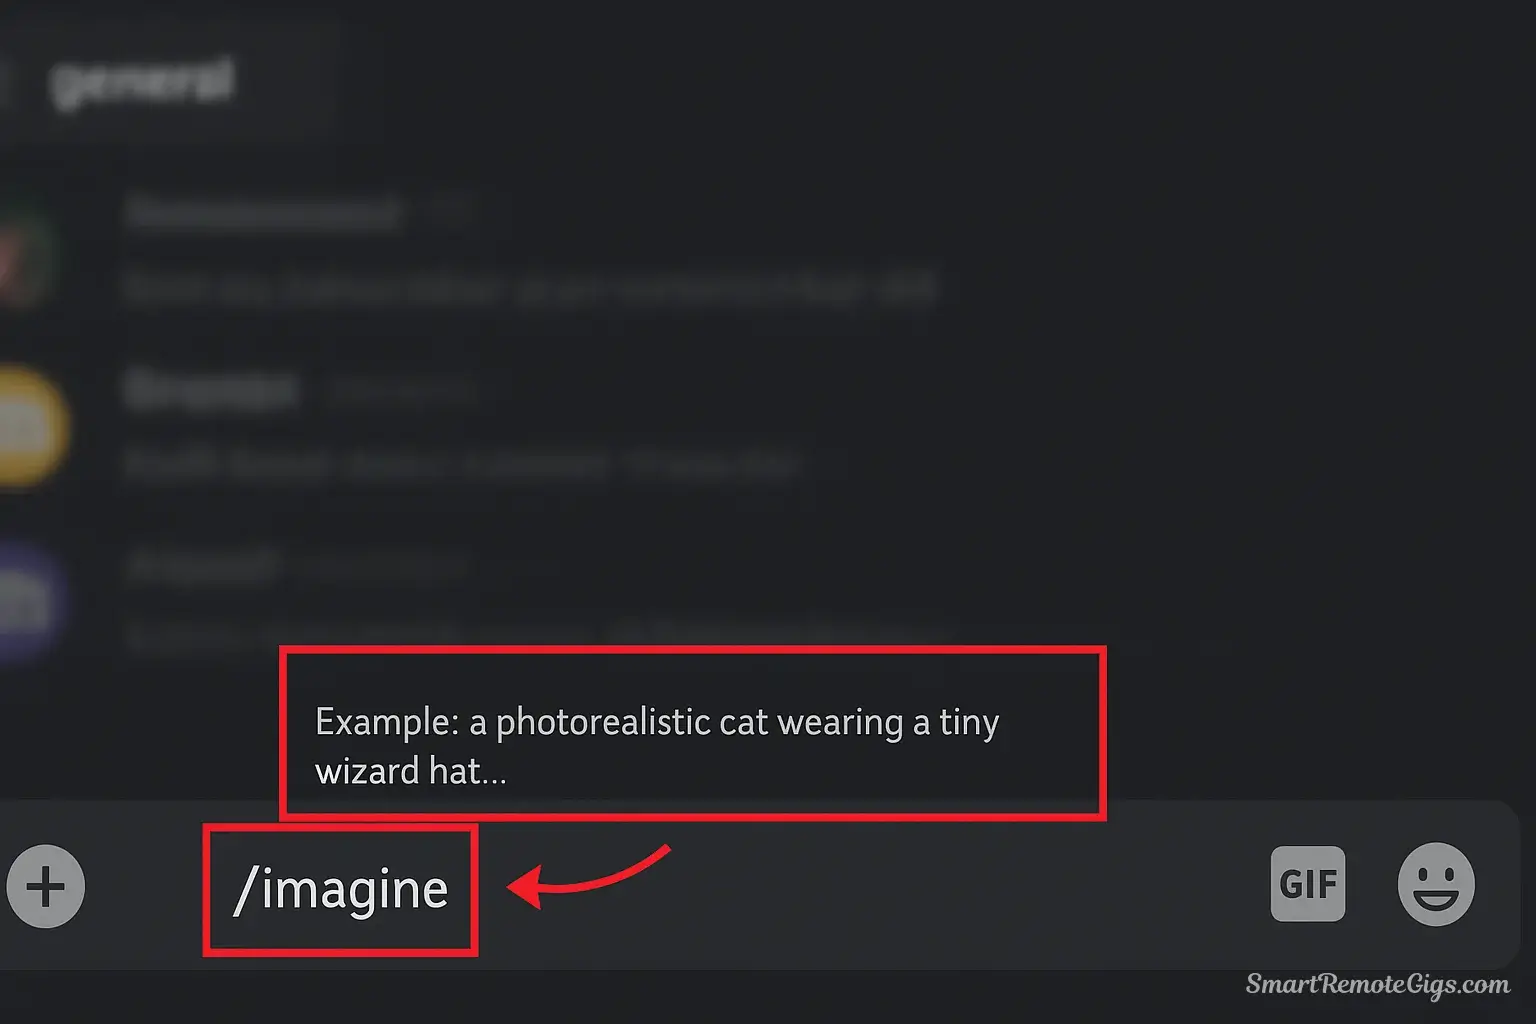
- Click in the message box at the bottom of your chosen channel
- Type
/imagineand press spacebar - You’ll see a
prompt:field appear - Type your description after
prompt:
Try this exact prompt for your first image:
/imagine prompt: a photorealistic cat wearing a tiny wizard hat, studio lighting- Press Enter to submit
What Happens Next
Within seconds, you’ll see the Midjourney Bot respond with a loading bar. The generation process typically takes 30-60 seconds depending on server load.
Your prompt appears at the top, followed by four small preview images as they’re being generated. Once complete, you’ll see a 2×2 grid of four different interpretations of your prompt.
You’ll be “pinged” (your username will be highlighted in yellow) once your image grid is ready, so you won’t lose it in the fast-scrolling channel.
Step 3: Understanding the Results (The 4-Grid, U & V Buttons)

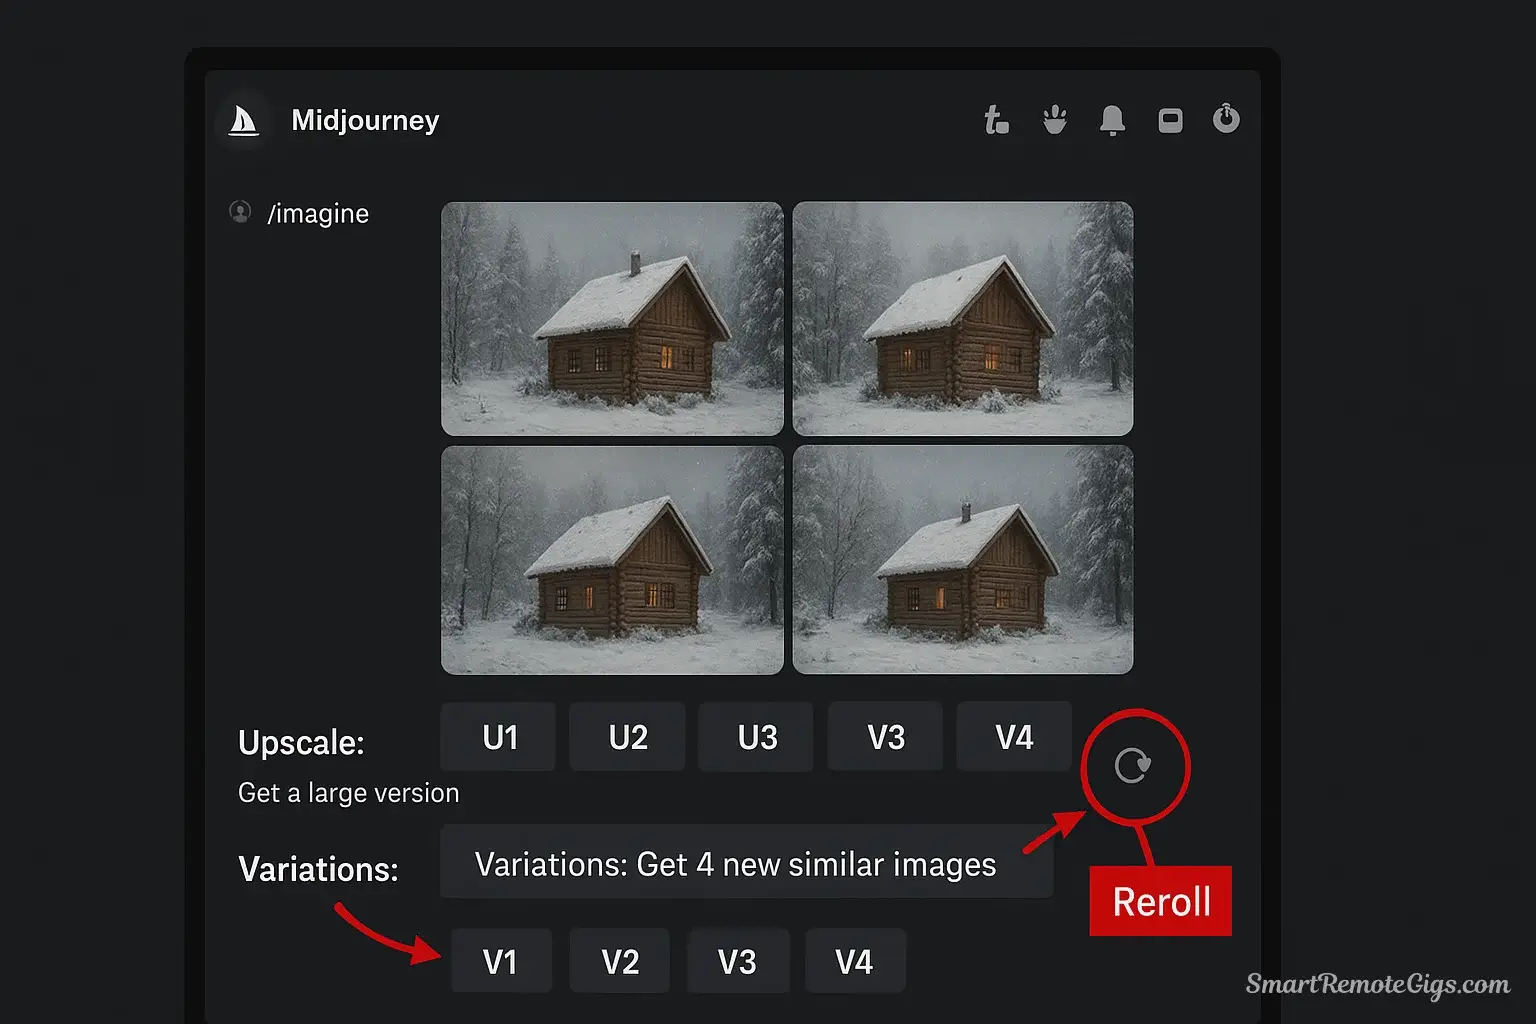
When your generation finishes, Midjourney presents you with four variations arranged in a grid, numbered 1-4 (top-left, top-right, bottom-left, bottom-right). Below this grid, you’ll see two rows of buttons—this is where Midjourney basic commands become interactive.
The four images are numbered 1-4, starting from the top-left and moving clockwise. Keep this numbering in mind when selecting buttons.
Upscaling (The “U” Buttons)
The U buttons (U1, U2, U3, U4) correspond to each of the four images.
What upscaling does: Creates a larger, higher-resolution, more detailed version of your chosen image. This is what you click when you’ve found “the one” you want to save and use.
Click the U button for whichever image you like best. Midjourney will generate a full-resolution version (typically 1024×1024 or larger depending on your settings).
Creating Variations (The “V” Buttons)
The V buttons (V1, V2, V3, V4) also correspond to the four images, but they serve a different purpose.
What variations do: Generate four new images that are similar to your selected one, exploring slight differences in composition, style, or details.
This is incredibly useful when you like the general direction of an image but want to explore alternatives before committing to an upscale.
The Reroll Button (🔄)
Don’t love any of the four results? The reroll button runs your exact prompt again, generating four completely new interpretations.
It’s the “try again” option—same prompt, different creative dice roll.
Beginner Strategy: Most users generate several sets (using reroll), pick their favorite result, create variations from that one (V button), then upscale the absolute best (U button).
Step 4: Crafting Better Prompts (The Basics)
Now that you understand the mechanics of how to use Midjourney, let’s improve your results. The quality of your output is directly related to the quality of your prompt.
The Basic Prompt Structure
Effective Midjourney prompts for beginners follow this simple formula:
[Subject] + [Style/Medium] + [Details/Lighting/Mood]
Let’s break this down with examples:
Example 1: Portrait Photography
/imagine prompt: a elderly woman with silver hair, portrait photography, soft natural window light, warm tonesExample 2: Fantasy Illustration
/imagine prompt: a dragon perched on a mountain peak, digital painting, dramatic sunset, epic fantasy art styleExample 3: Product Visualization
/imagine prompt: a sleek modern coffee maker, product photography, white background, studio lighting, minimalistExample 4: Landscape
/imagine prompt: a misty forest at dawn, cinematic photography, rays of light through trees, serene atmosphereEssential Parameters: Aspect Ratio
By default, Midjourney generates square images (1:1 ratio). You can change this with the --ar parameter:
- 16:9 (widescreen):
--ar 16:9 - 9:16 (portrait/vertical):
--ar 9:16 - 4:3 (classic):
--ar 4:3 - 2:3 (portrait):
--ar 2:3
How to use it:
/imagine prompt: a vast desert landscape at sunset --ar 16:9The parameter always goes at the end of your prompt, separated by a space.
Quick Prompting Tips
- Be specific: “A happy golden retriever” beats “a dog”
- Add style keywords: “oil painting,” “3D render,” “watercolor,” “photograph”
- Include lighting: “golden hour,” “dramatic shadows,” “soft diffused light”
- Avoid contradictions: Prompts like “photorealistic cartoon” can confuse the AI, as it tries to average two conflicting concepts. Choose one clear stylistic direction.
- Keep it concise: Extremely long prompts (100+ words) often confuse the AI
Step 5: Saving Your Masterpiece

Once you’ve upscaled your favorite image, saving it is simple:
- Click on the upscaled image in Discord to open it in full view
- Click “Open in Browser” to view it in full resolution
- Right-click the image and select “Save image as…”
- Choose your destination folder and save
Alternative method: Click the image in Discord and look for a download button (↓) in the top-right corner.
Where to Find Your Images Later
All your generations are stored in your Midjourney gallery:
- Visit midjourney.com
- Sign in using your Discord account
- Your entire generation history appears in your personal gallery
- You can download any image directly from there
What’s Next? Exploring More Commands
Once you’re comfortable with /imagine, explore these additional commands:
/settings
Opens a menu to adjust your default settings:
- Version selection: Choose which Midjourney model version to use
- Style settings: Adjust the “stylize” parameter default
- Quality settings: Control generation quality
- Mode selection: Switch between fast, relaxed, or turbo modes
/blend
Combines 2-5 images together to create something new. Upload your images, and Midjourney merges their visual concepts.
/describe
Upload an image, and Midjourney generates four text prompts that would create similar images. Perfect for reverse-engineering styles you admire.
/info
Check your subscription status, remaining fast hours, and usage statistics.
For a complete reference of all commands and advanced features, check the official Midjourney documentation.
Frequently Asked Questions for Beginners
Is Midjourney free to use?
Midjourney is subscription-based with no free tier currently available. Plans start at $10/month for the Basic plan (~200 generations). There’s no free trial, but the low entry cost makes it accessible for experimentation.
How do I find my old images?
All your images are stored in two places:
- Your Discord chat history (scroll up in the generation channels)
- Your web gallery at midjourney.com/app (sign in with Discord)
The web gallery is much easier for browsing your entire history.
Can I use Midjourney privately?
Yes, but it requires the Pro Plan ($60/month) or higher, which includes “Stealth Mode.” This keeps your prompts and images private rather than visible in public channels. Basic and Standard plans generate in public channels where anyone can see your work.
What if my prompt is rejected?
Midjourney has content guidelines that block certain words or concepts (violence, explicit content, etc.). If your prompt is rejected, try:
- Using more general terms
- Focusing on artistic style rather than specific content
- Reviewing the community guidelines for restricted topics
How many images can I generate?
This depends on your subscription tier:
- Basic Plan: ~200 fast generations per month
- Standard Plan: 15 hours of fast generation, then unlimited relaxed mode
- Pro/Mega Plans: 30+ hours of fast generation plus unlimited relaxed
Conclusion
Congratulations! You’ve just learned how to use Midjourney from absolute beginner to confident creator. You can now:
✓ Set up Discord and access Midjourney
✓ Generate images with the /imagine command
✓ Understand upscaling, variations, and rerolling
✓ Write effective prompts with proper structure
✓ Save and organize your creations
The real learning begins with experimentation. Try different subjects, styles, and parameters. Don’t be afraid to create “bad” images—they teach you what works and what doesn’t.
Ready to level up your prompting skills? Now that you’ve mastered the basics, check out our guide to the best prompts for photorealism to discover expertly crafted examples that will dramatically improve your results and inspire your creativity.
The AI art revolution is here, and you’re now part of it. Start creating, keep experimenting, and watch your skills grow with every generation.
This step-by-step guide teaches beginners how to set up Discord, join the Midjourney server, write their first prompt, and generate, refine, and save their first AI-generated images.
Total Time: 10 minutes
Step 1: Set Up Discord and Join the Midjourney Server
First, create a verified Discord account if you don’t have one. Go to the official Midjourney website and click “Join the Beta” to accept the Discord server invitation. Once inside, navigate to one of the channels labeled “newbies-#” in the left sidebar to get started.
Step 2: Generate Your First Image with the /imagine Command
In the message box of a “newbies” channel, type /imagine and press the spacebar. A prompt: field will appear. Type your image description directly after it. For example: a photorealistic cat wearing a tiny wizard hat, studio lighting. Press Enter to submit your prompt to the Midjourney Bot.
Step 3: Understand and Refine Your Results
Midjourney will generate a 2×2 grid of four image variations. Below the grid, use the ‘U’ buttons (U1-U4) to Upscale your favorite image to a higher resolution. Use the ‘V’ buttons (V1-V4) to create new Variations based on an image you like. Use the Reroll button (🔄) to run the same prompt again for a completely new set of images.
Step 4: Craft a Better Prompt
Improve your results by structuring your prompt with a clear [Subject], [Style/Medium], and [Details/Lighting]. To control the shape of your image, add parameters like –ar 16:9 for widescreen or –ar 4:5 for a portrait rectangle at the very end of your prompt.
Step 5: Save Your Final Image

After you have upscaled an image, click on it to view it. Select the “Open in Browser” button to see the full-resolution version. From there, simply right-click the image and choose “Save image as…” to download the file to your computer.
Estimated Cost: 10 USD
Tools:
- A computer or mobile device with internet access
- A verified Discord account
- An active Midjourney subscription