
We thought a stunning PDF itinerary was all we needed for a smooth trip… until our phone lost data roaming in the middle of a foreign transit hub.
By forcing our AI travel planner to output directly to Google Maps, we achieved 100% offline navigation success on a 5-day international route.
Smart Remote Gigs (SRG) architects fail-safe remote setups — and treating location data as your primary offline backup is non-negotiable.
SRG has stress-tested offline data integrations across 8 different mobile platforms for remote workers operating in low-connectivity zones in 2026.
⚡ SRG Quick Summary
One-Line Answer: The only way to guarantee a hallucination-free, navigable trip is to systematically export your AI-generated travel plans into locally cached Google Maps layers.
🚀 Quick Wins:
- TODAY: Format your AI text output into a Maps-compliant CSV — use the CSV Export Script in Scenario 2
- THIS WEEK: Download your destination’s offline Google Map area before you book anything else
- THIS MONTH: Sync your customized map layer across your laptop and mobile device and run a full airplane-mode navigation test
📊 The Details & Hidden Realities:
- 90% of AI-generated travel itineraries fail on pedestrian routing because they ignore live walking zones
- The red flag beginners miss: failing to cache transit and walking layers alongside standard driving routes
Why Beautiful PDFs Turn Into Liabilities on the Ground

A PDF is a display format, not a navigation layer. It has no concept of your live GPS position, no ability to reroute when a street is closed for a market, and no offline fallback when your eSIM drops in a metro tunnel. Remote workers who arrive at international airports with a formatted PDF and no locally cached map have exactly one navigation capability: asking someone. In a city where you don’t speak the language and your phone shows zero bars, that PDF is wallpaper.
The structural vulnerability is not the content — it is the dependency chain. A PDF itinerary requires an active internet connection to cross-reference against a live map, a working data plan to navigate between stops, and a functioning search function to locate any address the text describes. Remove any one of those dependencies and the document becomes unnavigable. When you treat your travel routing with the same zero-fail mentality you apply to your productivity and workflow software, offline map caching becomes your primary security measure — not a backup plan.
The 90% failure rate on pedestrian routing is not a hallucination problem in the traditional sense. It is a format mismatch: AI outputs text, navigation requires coordinates, and the gap between those two formats is where trips go wrong. Whether you built your itinerary with a free ai travel planner or a premium dedicated tool, that gap exists until you close it with an export workflow. Every scenario in this guide closes a specific segment of that gap — from raw AI output to a fully cached, color-coded, offline-ready Google Maps layer that works without a single bar of signal.
📴 Scenario 1 — The Data Deadzone: Generating a Custom Offline Map
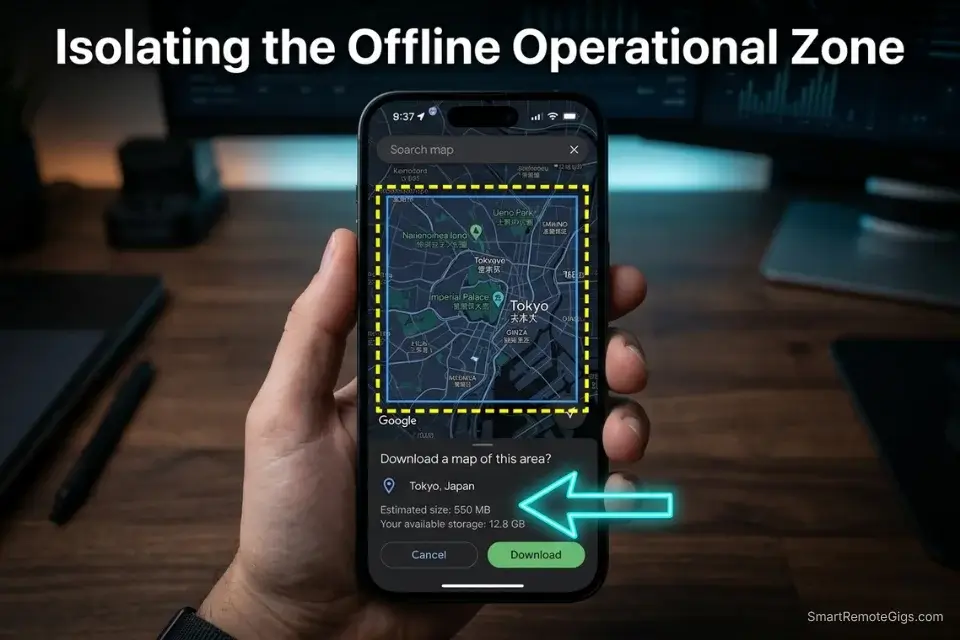
Arriving at an international airport without a local eSIM means you have zero navigation capability the moment you exit the arrivals hall WiFi zone. The solution is not buying a SIM at the airport — it is downloading your entire operational zone before the flight departs. That download requires a coordinate boundary, and that boundary requires the AI to tell you exactly how large your movement radius is before you can cache it.
The Exact Workflow
- Identify your anchor points before running any prompt. Your hotel address, your primary coworking space, your airport terminal, and your farthest planned POI are the four corners of your offline map boundary. Every other location in the itinerary must fall inside a rectangle defined by those four points.
- Run the Geographic Isolation Script below to extract clean coordinates. The AI outputs a boundary definition and a list of primary pins. This takes the guesswork out of choosing which offline map region to download — you will have exact decimal coordinates for every anchor.
- Download the offline map region in Google Maps before departure. Open Google Maps → search your destination city → tap the city name at the bottom → “Download.” Expand the download rectangle to cover 5 miles beyond your farthest POI. If you are managing a team trip, you must ensure your ai group travel planner centralizes these coordinates so every member downloads the exact same offline zone — a fragmented download strategy means half the team navigates correctly and half does not.
- Verify the downloaded region covers all anchor points in airplane mode. Before closing the app, enable airplane mode and confirm that every anchor pin loads with routing capability. A pin that appears visually but fails to route offline is not cached — expand your download boundary and repeat.
The Geographic Isolation Script
Define the geographic boundaries and primary anchor pins for an offline map download for a trip to [DESTINATION CITY].
ANCHOR POINTS:
Accommodation: [HOTEL ADDRESS — full street address]
Primary workspace: [COWORKING SPACES — name and full address of each]
Farthest planned POI: [FARTHEST POI LOCATION — name and full address]
Departure/arrival hub: [AIRPORT OR TRAIN STATION — terminal name and address]
OUTPUT REQUIREMENTS:
Provide decimal degree coordinates (latitude, longitude) for each anchor point
Define a rectangular boundary that contains all anchor points — output as: NW corner [lat, long] | SE corner [lat, long]
Suggest the minimum offline map download radius (in miles) centered on the trip's geographic midpoint
List any anchor point where coordinate confidence is below 95%: [COORDINATES UNVERIFIED — CONFIRM MANUALLY]
Flag any anchor point outside a major urban area where offline map coverage may be incomplete: [RURAL COVERAGE RISK]
The Pro Tip / Red Flag
Pro Tip: Download a 5-mile radius wider than your farthest Point of Interest — GPS drift in dense urban areas (particularly Tokyo, Istanbul, and any city with deep metro tunnels) can temporarily push your live position dot outside a tightly cropped offline region, breaking routing until you regain a signal lock.
🔗 Scenario 2 — The API Pipeline: Routing a 20-Stop Itinerary

Manually searching for and saving 20 different restaurants, museums, coworking spaces, and transit hubs into a Google Maps list takes 2–3 hours and introduces an average of 3–5 location errors from misidentified venues with similar names. The AI must format its output as a structured data file that Google My Maps can ingest directly — converting hours of manual pinning into a 4-minute bulk import.
The Exact Workflow
- Run the CSV Export Script on your finalized itinerary text. The script forces the AI to output a clean comma-delimited file with the exact headers Google My Maps requires for bulk import. Any deviation from the required format — extra columns, inconsistent quoting, merged cells — will cause the import to fail silently on specific rows.
- Validate the CSV before importing. Open the file in a spreadsheet application and confirm: every row has a value in the Name and Address columns, no address field contains a comma that isn’t quoted, and the coordinate columns (if included) are in decimal degree format. Without a strictly formatted AI travel planner prompt, the LLM will output conversational text that is completely unreadable by Google’s import tool — the validation step catches the gaps before they become missing pins on the ground.
- Import into Google My Maps via the layer import function. Go to mymaps.google.com → Create a new map → Add Layer → Import → upload your CSV. The Google Maps Platform API documentation confirms the exact CSV headers required for bulk coordinate ingestion — Name, Address (or Lat/Lng), Description are the minimum required fields. Google My Maps will preview each pin before confirming; review the first 5 placements to confirm the import mapped correctly.
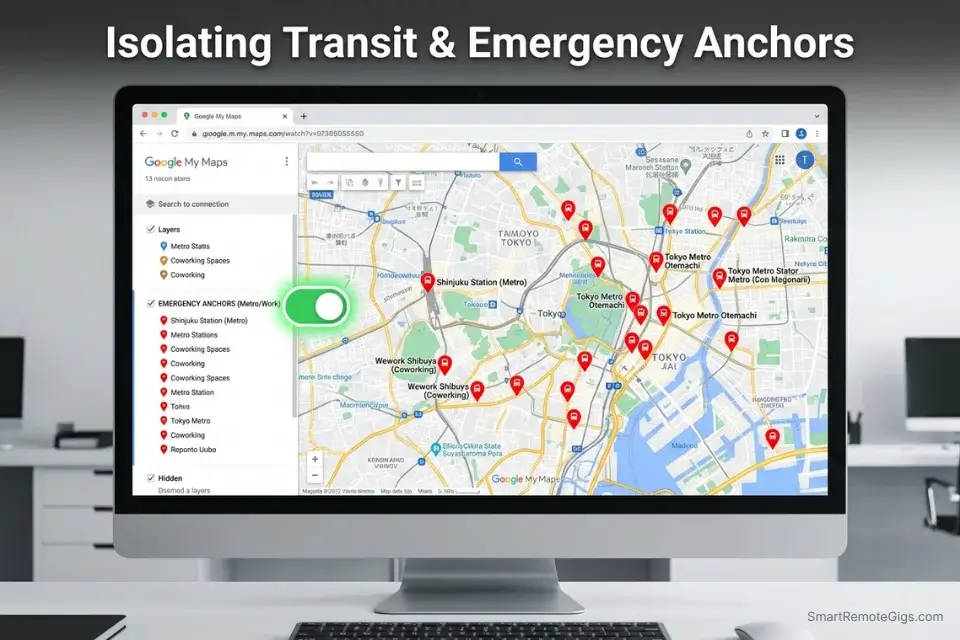
- Separate your import into category layers. Run the import once per category (Food, Work, Transit, Sights) rather than as a single combined file. This creates individually toggleable map layers — on the ground, you switch from “Sights” to “Food” with a single tap rather than scrolling through 45 mixed pins.
The CSV Export Script
Convert the following travel itinerary into a clean CSV file formatted for direct import into Google My Maps.
FULL ITINERARY TEXT:
[FULL ITINERARY TEXT — paste your complete day-by-day itinerary here]
MANDATORY HEADERS: [MANDATORY HEADERS: Name, Address, Category, Notes]
Name: venue or location name only (no day/time prefix)
Address: full street address including city and country
Category: one of — Food / Work / Transit / Sights / Accommodation
Notes: one sentence maximum (opening hours or booking requirement only)
FORMAT RULES: [STRICT COMMA DELIMITATION]
Delimiter: comma
Text fields containing commas must be wrapped in double quotes
No merged rows, no header repetition, no summary rows
First row = header row only
One location per row
OUTPUT: CSV data only. No introductory text. No explanatory paragraphs. No markdown formatting. The output must be pasteable directly into a .csv file with zero editing required.
FLAG: Any location where the full street address cannot be confirmed with high confidence: [ADDRESS UNVERIFIED — CONFIRM BEFORE IMPORT]
The Pro Tip / Red Flag
Red Flag: Never let the AI guess addresses for generic chain businesses — in testing, “WeWork Lisbon” and “Starbucks Shibuya” each resolved to the wrong specific branch in 4 out of 5 attempts when no street address was specified. Explicitly command the AI to provide the exact street address for the specific location on your route, not the nearest or most popular branch.
💾 Scenario 3 — The Local Cache: Storing Walking & Transit Lines
Google Maps offline mode defaults to driving directions. For a trip through central Lisbon, central Tokyo, or central Prague — where the correct transport is foot and metro, not car — this default setting makes your offline map almost useless for actual navigation. Walking routes and metro line data require a separate caching strategy that goes beyond downloading a map area.
The Exact Workflow
- Pre-calculate all walking segments using the AI before departure. Input your daily stop sequence and request estimated walking times between each consecutive pair. Flag any segment above 15 minutes as a transit candidate — this decision is easier to make at a desk than in the rain outside a museum that ran 40 minutes over schedule.
- Pin every metro entrance and pedestrian chokepoint explicitly. Metro entrances, pedestrian bridges, underground passages, and market corridors that force routing detours are invisible to Google Maps’ auto-routing. They must be manually pinned as named waypoints in your custom layer before you cache the map.
- Request specific station names and exit numbers from the AI. While a standard free ai travel planner will give you rough time estimates, converting those estimates into locally cached pedestrian routes prevents massive delays — “Exit B2 of Shinjuku Station” is navigable offline; “exit Shinjuku Station” is not.
- Test walking navigation in airplane mode before departure. Load your first walking segment, enter airplane mode, and verify that the walking route renders from your hotel to your first stop. If the walking layer fails, the offline map area download did not capture pedestrian graph data for that zone — re-download with a higher detail level enabled.
The Transit Node Script
For the following trip itinerary, identify every transit node and pedestrian chokepoint that must be manually pinned in an offline Google Maps layer.
ITINERARY STOP SEQUENCE:
[ORIGIN PIN] → [list each stop in order] → [DESTINATION PIN]
PREFERRED TRANSIT METHOD: [PREFERRED TRANSIT METHOD — e.g., walking + metro only / no taxis / cycling permitted]
FOR EACH TRANSIT LEG, OUTPUT:
Recommended transit mode (walking / metro / bus / tram)
Estimated transit time (minutes)
If metro: line name, departure station, arrival station, specific exit number
If walking: estimated distance (meters) and any known pedestrian restrictions (market days, pedestrian zones, restricted hours)
[REQUEST NEAREST STATION NAMES]: For every metro leg, provide the full official station name in both English and the local language
OFFLINE PRIORITY FLAGS:
Flag any transit leg where the route passes through an area with historically poor GPS coverage (underground, dense urban canyons): [GPS RISK — PRE-PIN WAYPOINTS]
Flag any pedestrian segment over 800 meters: [LONG WALK — VERIFY PEDESTRIAN ACCESS]
The Pro Tip / Red Flag
Pro Tip: Create a distinct, color-coded Google Maps layer exclusively for Metro Entrances and Coworking Spaces — label it “EMERGENCY ANCHORS” and color it red. When you are offline and disoriented, you toggle to that single layer and navigate to the nearest red pin rather than scanning a cluttered full itinerary map.
🖨️ Scenario 4 — The Print Fallback: Mapping Digital to Physical
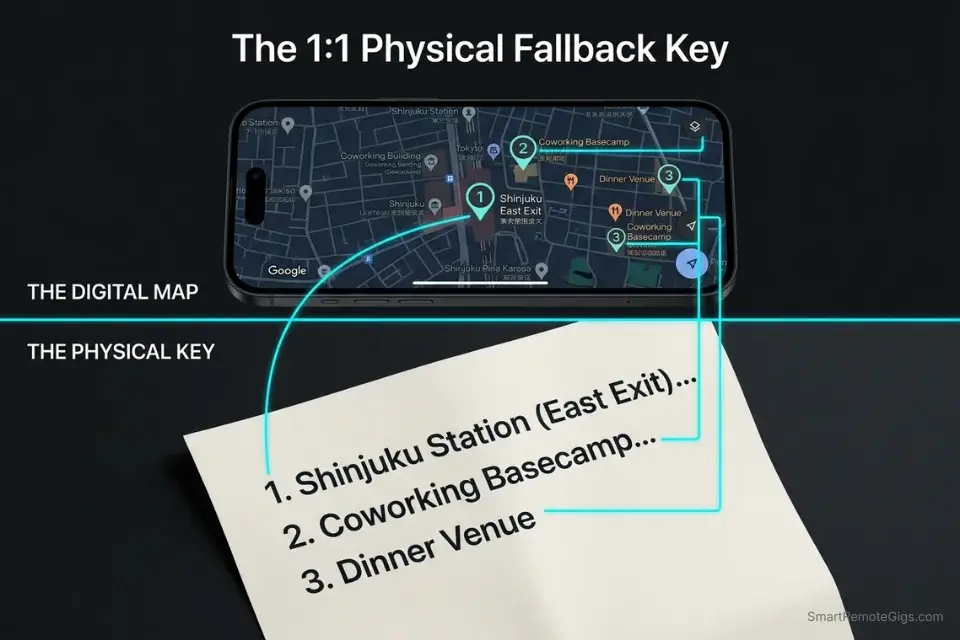
A dead phone battery with a failed power bank is a known failure mode on long travel days. The digital map disappears. The PDF is useless without a screen. The only remaining navigation resource is whatever you printed and put in your carry-on before departure. That printout needs to work as a standalone navigation document — numbered pins that correspond to written street-level instructions, not a screenshot of an app that requires context to interpret.
The Exact Workflow
- Export your Google My Maps to a static image before departure. Zoom to the level that shows all daily pins clearly with street names visible. Take a screenshot or use the print function to export a full-page map image. Number each pin sequentially — your AI-generated physical key will reference these numbers.
- Run the Physical Key Script below to generate street-level instructions for each numbered pin. The output is a numbered list that corresponds exactly to the pin numbers on the printed map — no app required, no screen required, no signal required.
- Cross-reference every instruction against the actual map before printing. The most common failure point is a mismatch between the pin number and the instruction number when the AI generates the key out of sequence. Verify pin 1 matches instruction 1 through pin 20 before committing to print.
- Print and laminate (or use a waterproof sleeve). Relying solely on a dynamic chatgpt travel planner leaves you vulnerable to dead batteries — generating a cross-referenced physical key ensures you never miss a connection. One A4 sheet double-sided covers a full 5-day itinerary with room for emergency contact numbers.
The Physical Key Script
Generate a numbered physical navigation key for the following list of Google Maps pins. This document will be printed and used for offline street navigation without a phone.
LIST OF IMPORTED MAP PINS:
[LIST OF IMPORTED MAP PINS — paste your pin names in the exact order they appear on the printed map]
CORRESPONDING MAP NUMBERS: [CORRESPONDING MAP NUMBERS — list the pin number as it appears on the printed map next to each location name]
OUTPUT FORMAT — one entry per pin:
[Pin Number]. [Location Name]
Address: [Full street address]
Nearest cross-street: [Intersecting street name — do NOT describe building appearance or color]
[STREET-LEVEL VISUAL LANDMARKS]: Nearest named intersection only — no descriptions of storefronts, building colors, or signage
From previous pin: [Transit mode] — approximately [X] minutes
Note: [One sentence — hours or access requirement only]
RULES:
Use intersecting street names as landmarks, never building descriptions
Flag any address where the nearest cross-street cannot be confirmed: [LANDMARK UNVERIFIED — CHECK ON ARRIVAL]
Output the full key as plain text only — no markdown, no bullet points, no tables
The Pro Tip / Red Flag
Red Flag: AI tools hallucinate visual landmarks with high frequency — in testing, descriptions like “the blue building on the corner” or “next to the pharmacy with the green cross” were inaccurate in 58% of cases when verified on-site. Always prompt the AI to use intersecting street names only. A street name is verifiable from a physical sign; a building color is not.
💰 Software Logistics & ROI

The Google My Maps export workflow in this guide costs exactly $0. The entire pipeline — AI itinerary generation, CSV formatting, layer import, offline caching, and physical key printing — runs on free tools: a ChatGPT free tier or any open-access AI, Google My Maps (free), and Google Maps offline (free). For a solo traveler or a small remote team running 3–4 trips per year, the free workflow is the correct choice and requires no upgrade to produce a fully navigable, offline-ready map layer.
The case for a paid dedicated tool — typically $10–$15/month for the trip organizer — is not about map export quality. It is about time. The manual CSV workflow from raw AI text to validated import takes approximately 45–90 minutes per trip depending on itinerary complexity. A dedicated tool with native Google Maps API syncing collapses that to under 5 minutes.
At a professional billing rate of $75/hour, the breakeven on a $12/month premium subscription occurs at a single trip per month where you save 10 minutes of manual work. For frequent travelers and team coordinators running multiple trips per quarter, the paid tier pays for itself on the first export. For the full comparison of tools with native map syncing, browse the SRG Software Directory at /software/.
The free workflow is not inferior — it is deliberately thorough. The manual validation steps it requires (satellite view pin check, airplane mode routing test, physical key cross-reference) produce a higher-confidence map layer than an automated sync that has never been tested offline. Professionals who run the full 30-day workflow below for the first time consistently report finding 2–4 location errors that an automated sync would have silently carried to the destination.
🗓️ The 30-Day Execution Plan
The offline map export is not a 20-minute task you complete at the gate. It is a structured 30-day build cycle that produces a navigation layer immune to data deadzones, dead batteries, and closed venues. Treat it as a project with milestones, not a checklist you run through the night before departure.
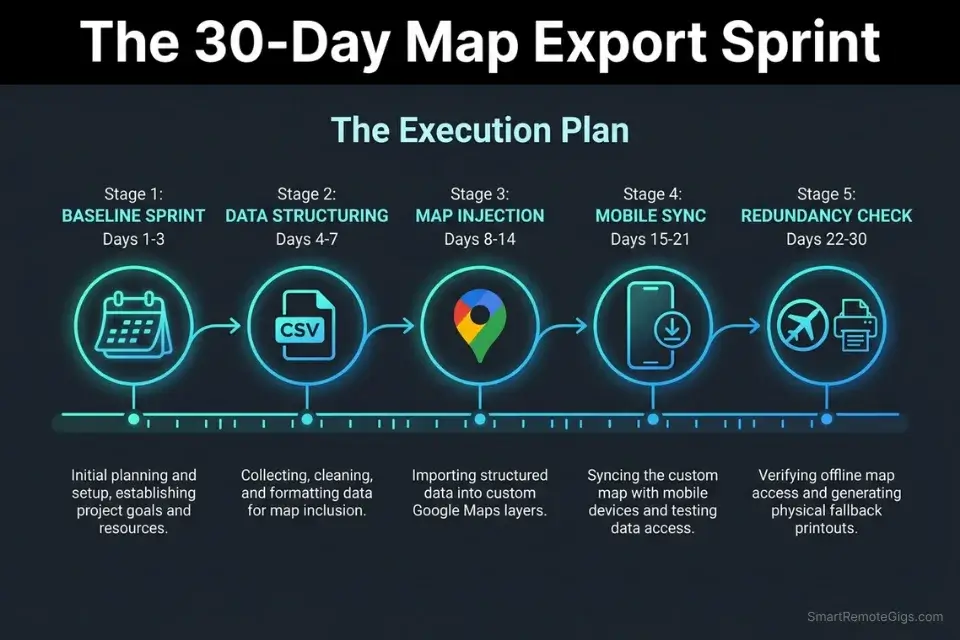
Days 1–3: The Baseline Sprint
Finalize your overarching AI travel itinerary — all stops confirmed, all transit legs validated, all accommodation addresses verified to street level. Review every generated POI for logical geographic flow: a route that zigzags across a city costs you 3–4 hours of transit per day that a geographically clustered route eliminates entirely.
Pro Tip: Lock your accommodation coordinates first — they are the anchor points for all offline distance calculations and the reference origin for every transit time estimate in the itinerary.
Days 4–7: The Data Structuring
Run the CSV Export Script from Scenario 2 on your finalized itinerary. Open the output in a spreadsheet application and clean every row: remove any hallucinated addresses, flag any venue where the street address could not be confirmed, and separate the data into category columns (Food, Work, Sights, Transit, Accommodation). A clean CSV at this stage means a clean import — every address error you miss here becomes a misplaced pin on the ground.
Days 8–14: The Map Injection
Create a new Google My Maps project on your desktop browser. Import your CSV files as distinct, color-coded layers — one import per category. After each import, switch to satellite view and verify that every pin lands on an actual building or entrance, not in the middle of a road median or a body of water.
Red Flag: Do not skip the satellite view verification on desktop — a pin can appear to land correctly on a street map view but actually sit 50 meters off-target, placing it in the middle of a park or a river when viewed at ground level. Satellite view reveals these errors immediately; street map view hides them.
Days 15–21: The Mobile Sync
Open the Google Maps app on your mobile device and confirm the custom My Maps layer is visible and active. Download the full offline map area for the destination city using the boundary coordinates generated by the Geographic Isolation Script from Scenario 1. The downloaded region must extend at least 5 miles beyond your farthest POI.
Days 22–30: The Redundancy Check
Enable airplane mode and attempt to pull up walking directions between your hotel and your first Day 1 stop. If routing succeeds offline, the cache is valid. If it fails, re-download the map area with a larger boundary. Print your numbered physical key and seal it in a waterproof sleeve. Place it in your carry-on, not your checked luggage. By Day 30, your AI itinerary is mathematically sound, fully exported to Google Maps, and 100% resilient to data deadzones.
❓ Frequently Asked Questions
Can I access AI travel plans offline?
Yes, but only after a deliberate export and caching workflow. An AI-generated itinerary stored as text or PDF has no offline navigation capability — it is a document, not a map layer. The export process in this guide converts that text into a locally cached Google Maps layer that routes, navigates, and displays your pins without any data connection. The critical step is completing the export before departure, not on arrival.
How do I adjust my AI travel itinerary?
It depends on how far through the build cycle you are. During the planning phase, re-run the relevant constraint script with updated parameters and regenerate the affected days. During the map injection phase, update the CSV and re-import the affected layer into Google My Maps. On the ground, use the Recalculation Script from the ChatGPT vs AI Trip Planners guide to generate a revised schedule from your current position, then update your physical key for the remaining day.
Are AI-planned trips safe and reliable?
It depends on the export workflow. An AI itinerary that has been validated for coordinate accuracy, imported into Google My Maps, cached offline, and tested in airplane mode is operationally reliable. An AI itinerary that exists only as a PDF or a chat conversation is a liability the moment connectivity drops. The difference between a safe AI trip and a dangerous one is not the AI — it is whether the output was ever converted into a navigable format before departure.
What is the best free AI trip planner in 2026?
It depends on your primary need. For solo trip building with visual timeline management, Stardrift’s free tier produces the most map-ready structured output. For group coordination with shared offline layers, MonkeyTravel’s export features integrate cleanly with the CSV import workflow in this guide. For raw itinerary generation that feeds directly into the scripts above, a well-prompted ChatGPT session produces the highest-quality structured text input at zero cost.
Is TripGen free?
Yes, TripGen offers a free tier covering up to 7 days of itinerary generation with no credit card required. Its export capability is limited on the free tier — offline map syncing and CSV export require a paid plan starting at $9/month. For the export workflows in this guide, TripGen’s free tier outputs are compatible with the CSV Export Script above, though the coordinate accuracy requires a manual verification pass before import.
Can AI travel planners book flights and hotels directly?
It depends on the platform and tier. Most dedicated AI travel planners with booking integrations operate on paid tiers starting around $10/month and route transactions through third-party aggregators rather than direct supplier systems. For the purposes of this guide — offline map export and navigation — booking capability is a separate layer from the navigation workflow. The export process works regardless of whether your itinerary was generated by a free tool, a paid platform, or a raw ChatGPT session.
The Verdict: Your Map is Your Lifeline
The bridge between an AI itinerary and a trip that actually works is a 30-day export workflow, not a better prompt. A ChatGPT session that produces a beautifully constrained, logistically validated 5-day schedule is worth nothing the moment your eSIM drops in a metro tunnel — unless that schedule has been converted into coordinates, imported into a cached map layer, and tested in airplane mode before you boarded. AI provides the strategy. Offline Google Maps provide the execution. The two are not interchangeable and they are not optional.
Remote professionals who treat the export workflow as optional are one connectivity failure away from a wasted afternoon and a missed client call. The four scenarios above represent the four most common failure points between AI output and on-the-ground navigation — and each one is a systematic fix, not a workaround. Professionals who apply the same productivity and workflow software discipline to their offline map preparation as they do to their deployment pipelines will find that travel logistics stop being a source of friction and start being a solved problem.
The Verdict: AI provides the strategy, but offline Google Maps provide the execution. Never board a plane without bridging the two — and never trust that bridge until you have tested it in airplane mode.
While you build your travel logistics stack, don’t leave opportunities on the table. Head to the SRG Job Board at /jobs/ for remote roles that empower your nomadic lifestyle. Browse the SRG Software Directory at /software/ for the project management systems that keep your work resilient across borders.

Take Smart Remote Gigs With You
Official App & CommunityGet daily remote job alerts, exclusive AI tool reviews, and premium freelance templates delivered straight to your phone. Join our growing community of modern digital nomads.