
You want Notion’s power, but you’re terrified of losing your Evernote ‘brain.’
I get it. You have years of notes, scanned receipts, and web clippings. The idea of moving feels like a weekend project that could destroy everything.
Here is the truth: We have perfected the Evernote to Notion migration process after doing it 50+ times.
The actual move takes just 30 minutes. The cleanup comes later. This guide shows you the exact path to zero data loss. No technical expertise required.
Let’s get your brain moved safely.
Before You Start: The Pre-Flight Checklist
Step 0: Don’t Import Junk

This is the most important step, and most people skip it.
Warning: If you import 5,000 messy Evernote notes into Notion, you will hate Notion. Delete the trash first.
I had 3,847 notes in Evernote. I deleted 1,200+ before migrating. Things I deleted:
- Duplicate web clippings
- Outdated project notes from 2015
- Random screenshots with no context
- “Read later” articles I never read
Spend 20 minutes doing this cleanup in Evernote. It’s easier to delete there than after import.
What You’ll Need
- Your Evernote account (paid plan recommended for full export)
- A Notion account (free tier works fine)
- 30-60 minutes of uninterrupted time
- A computer (desktop/laptop—don’t try this on mobile)
What to Expect
- Tags will convert to Select properties (but need manual cleanup)
- Notebooks become pages in Notion
- Formatting may break (especially complex tables)
- Attachments come along (PDFs, images, files)
- Web clips will look ugly (this is normal and fixable)
Mentally prepare: your notes will look messier in Notion at first. This is temporary.
Phase 1: The Export (Getting Out of Evernote)
Step 1: Open Evernote Desktop App
You need the desktop application for this. The web version doesn’t have full export functionality.
Download it from evernote.com if you don’t have it.
Step 2: Select What to Export
Option A: Export Everything at Once (Small Libraries)
If you have fewer than 500 notes:
- Click on “All Notes” in the sidebar
- Press
Cmd+A(Mac) orCtrl+A(Windows) to select all - Go to
File > Export Notes... - Save as
.enexfile
Option B: Export by Notebook (Recommended)
If you have 500+ notes or multiple notebooks:
- Click on a notebook in the sidebar
- Select all notes in that notebook (
Cmd+AorCtrl+A) - Go to
File > Export Notes... - Save with a descriptive name:
Work-Projects.enex,Personal-Notes.enex - Repeat for each notebook
Pro Tip: Export one notebook at a time. Do not try to export all 10,000 notes at once, or Notion’s importer will crash or hang indefinitely.
Step 3: Save Your Exports
Create a folder on your desktop called Evernote-Export.
Save all your .enex files there with clear names. You’ll need these in Phase 2.
Time for Phase 1: 5-10 minutes
Phase 2: The Import (Getting Into Notion)
Step 1: Open Notion
Log into your Notion account on desktop (notion.so or the desktop app).
Create a new page called “Evernote Import” as a staging area. This is where everything will land.
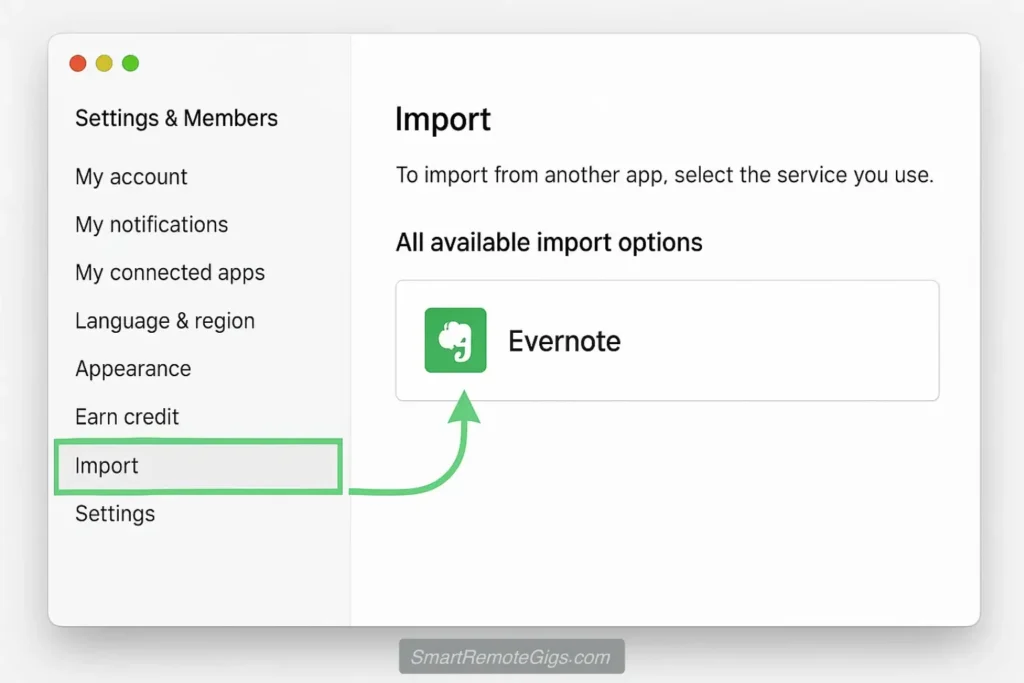
Step 2: Use Notion’s Import Function
- Click the
⋮⋮menu (three dots) at the top right of any page - Scroll down and click “Import”
- Select “Evernote” from the list
- Click “Select Files”
- Choose your
.enexfile(s)
Notion will process the import. For 100 notes, this takes 30 seconds. For 1,000 notes, it might take 5 minutes.
Do NOT close the browser or app during import. Let it finish completely.
Step 3: Review What Landed
After import, you’ll see:
- A new page for each Evernote notebook
- Each note becomes a Notion page
- Tags convert to a “Tags” property (Select type)
- Created dates and modified dates are preserved
- Attachments are embedded in pages
What Will Look Broken (and Why It’s Okay)
Formatting Issues:
- Complex tables may lose structure
- Nested bullet points might flatten
- Font sizes and colors are stripped (Notion uses consistent styling)
Web Clips:
- They look like walls of text now
- Images might be at the bottom instead of inline
- This is fixable but tedious—decide if it’s worth it
The Reality: Tags will break. Formatting will look weird. This is normal. Don’t panic. You haven’t lost data—it just needs reorganization.
Time for Phase 2: 10-20 minutes (depending on note count)
Phase 3: The Cleanup (Making Notion Usable)
This is where migration becomes transformation.
You could stop here and just use Notion with your messy imported notes. But you’d be missing Notion’s superpower: databases and organization systems.
Strategy: Don’t Just Dump Notes. Organize Them.
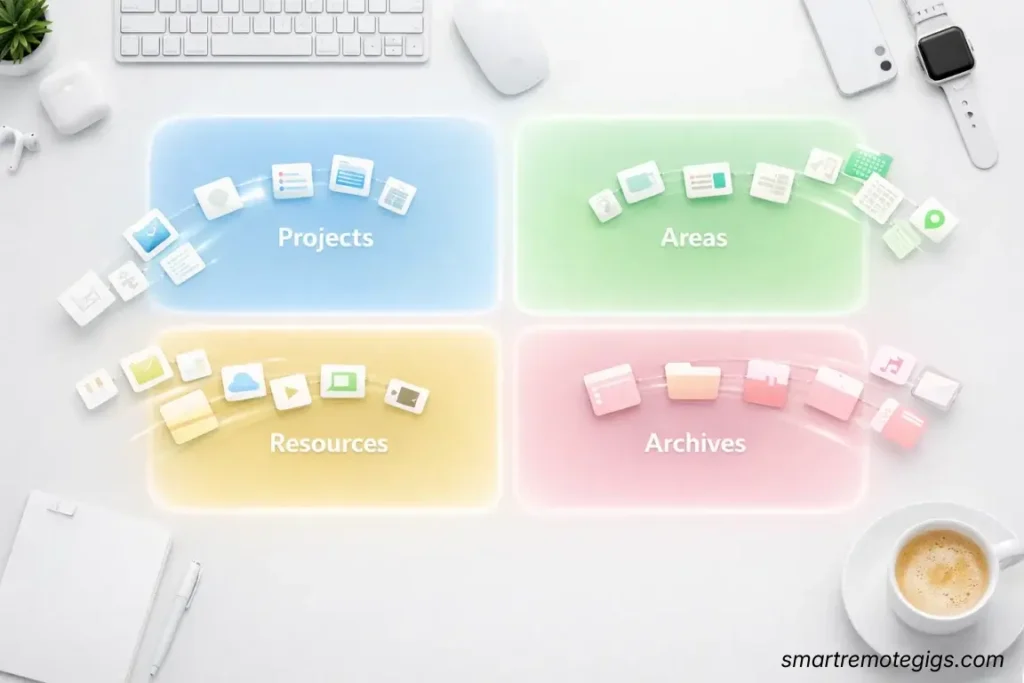
The best approach: use the P.A.R.A. Method to structure your workspace.
P.A.R.A. stands for:
- Projects: Active work with deadlines
- Areas: Ongoing responsibilities
- Resources: Reference material
- Archives: Inactive stuff
Step 1: Create Your P.A.R.A. Structure
Create four top-level pages in Notion:
📁 Projects🎯 Areas📚 Resources📦 Archives
Step 2: Sort Your Imported Notes
Go through your “Evernote Import” staging area and drag notes into the appropriate P.A.R.A. category.
Examples:
- “Q1 Marketing Plan” → Projects
- “Team Meeting Templates” → Areas
- “JavaScript Cheat Sheet” → Resources
- “2019 Tax Documents” → Archives
You don’t have to do this all at once. Sort 20 notes per day if that feels manageable.
Step 3: Convert Important Collections to Databases
Some of your old Evernote notebooks should become Notion databases.
Example 1: Meeting Notes
Instead of scattered pages, create a database:
- Create a new database called “Meeting Notes”
- Add properties: Date, Attendees, Project, Action Items
- Move old meeting notes into this database
- Now you can filter by project, search by attendee, sort by date
Example 2: Book Notes or Article Clippings
- Create a “Reading List” database
- Properties: Title, Author, Status (To Read/Reading/Done), Rating, Notes
- Import your web clips and book notes here
- Use gallery view for visual browsing
Pro Tip: Start with 1-2 databases for your most-used collections. Don’t try to database everything on day one. Notion paralysis is real.
Time for Phase 3: 1-2 hours initially, then ongoing
Comparison: Your Old Life vs. Your New Life

Feature | In Evernote | In Notion (After Move) |
|---|---|---|
Structure | Notebooks & Stacks | Pages & Databases |
Tags | Native Tag System | “Select” Properties (needs cleanup) |
Search | OCR (Inside PDFs & Images) | Text Only (No OCR) |
Web Clips | Clean, formatted | Raw HTML (messy initially) |
Organization | Folders & Tags | Flexible (Pages, DBs, Links) |
Collaboration | Basic sharing | Real-time editing & comments |
Offline Access | 🟢 Excellent | 🟡 Cached (unreliable) |
Price | $129.99/year | Free or $96/year |
Troubleshooting: Common Migration Problems
“Where are my web clips? They look terrible!”
The Problem: Evernote’s Web Clipper saves clean, formatted articles. Notion imports the raw HTML, which looks like a wall of text.
The Fix:
- For important clips: manually clean up formatting (15-30 seconds per clip)
- For archives: leave them as-is. They’re searchable, which is what matters
- Going forward: use Notion’s Web Clipper for new articles
“Can I search inside my scanned PDFs and handwritten notes?”
No. Notion does not have OCR (optical character recognition) like Evernote.
If this is a dealbreaker, you should stay with Evernote. Seriously. Read our Evernote Review to see if it’s worth keeping for this feature alone.
Some users keep Evernote for document archival and use Notion for active work. That’s a valid hybrid approach.
“My tags are a mess. I have ‘productivity,’ ‘Productivity,’ and ‘productivity-tips.'”
The Problem: Evernote tags were case-sensitive and informal. Notion converts them to Select properties, exposing the chaos.
The Fix:
- Open any imported page
- Click on the “Tags” property
- Click “Edit Property”
- Merge duplicate tags (drag one onto another)
- Delete unused tags
This is tedious but necessary. Spend 10 minutes cleaning it up once.
“The import failed or got stuck.”
Common causes:
- File too large (>500 notes in one
.enex) - Notion server hiccup
- Corrupted note in Evernote
The Fix:
- Export smaller batches (100-200 notes per file)
- Try again during off-peak hours
- Skip problematic notes and import them individually later
“I imported everything but now I’m overwhelmed.”
This is normal. You just dumped years of accumulated knowledge into a new system.
The Fix:
- Don’t try to organize everything at once
- Use Notion’s search to find what you need
- Organize notes as you use them (gradually)
- Consider this a fresh start—you don’t need to recreate your old system
What You Gain (and Lose) by Moving
What You Gain
✅ Databases: Turn collections into filterable, sortable databases
✅ Collaboration: Share pages with teammates who can edit in real-time
✅ Flexibility: Pages can be anything—docs, tasks, wikis, databases
✅ Cost Savings: $34/year cheaper than Evernote
✅ Modern Interface: Notion feels 10 years newer
What You Lose
❌ OCR Search: Can’t search inside PDFs or images
❌ Offline Reliability: Notion’s offline mode is weaker
❌ Web Clipper Quality: Evernote’s clipper is still better
❌ Simplicity: Notion has a steeper learning curve
The Trade-off: You trade specialized archival features for general-purpose power and flexibility.
For 90% of users, that’s a good trade. For researchers and document hoarders who rely on OCR, it’s not.
After Migration: Next Steps
1. Learn Notion’s Core Features
Don’t try to master everything. Start with:
- Linked pages:
@to link to other pages - Databases: Create one for your most common collection
- Templates: Use button templates for repeated workflows
2. Set Up Your Workflow
Now that your notes are in Notion, organize them using the P.A.R.A. Method.
Want to go deeper? Learn how to build a Second Brain using your Notion workspace.
3. Cancel Evernote (or Keep It for Archives)
Option A: Full Migration
Export your remaining notebooks, import to Notion, cancel Evernote subscription.
Option B: Hybrid Approach
Keep Evernote for document archives (OCR is irreplaceable), use Notion for active work.
Many users do the hybrid approach for 6-12 months before fully committing to Notion.
Should You Actually Make This Move?
Migrate to Notion If:
- You’re paying for Evernote but barely using its unique features
- You need collaboration tools for team projects
- You want databases, calendars, and project management
- You’re willing to invest 2-3 hours learning a new system
Stay with Evernote If:
- You scan hundreds of documents and need OCR search
- You work offline frequently (planes, rural areas)
- You love Evernote’s Web Clipper and use it daily
- Your workflow is built around Evernote’s strengths
Consider Alternatives If:
- You want maximum privacy → Obsidian
- You just need simple notes → Apple Notes vs. Google Keep
- You’re still deciding → Best Note-Taking Apps 2026
The Bottom Line: It’s Easier Than You Think
The migration from Evernote to Notion takes 30 minutes.
The transformation from dumped notes to organized system takes 1-2 hours initially, then evolves over weeks.
You won’t lose data. Export, import, verify. That’s it.
You will need to reorganize. But this is a chance to build something better than what you had.
I migrated in 2023 and haven’t looked back. My notes are more useful now than they ever were in Evernote—not because Notion is “better,” but because the migration forced me to actually organize my knowledge.
Stop procrastinating. Start the export. You’ll be done before lunch.