
n8n Active Loops 2026: Fix Pagination Logic [Data]
 ·
Last Updated: August 4, 2026 ·
17 min read
·
Last Updated: August 4, 2026 ·
17 min read 
We assumed processing a large Airtable dataset on a single canvas was the simplest approach — until Node.js memory pressure made it clear that architecture, not raw processing power, was the actual constraint.
Rebuilding the logic around isolated sub-workflows and dynamic offset pagination removes that memory ceiling entirely — the tradeoff is architectural complexity upfront in exchange for a pipeline that doesn’t degrade as array size grows.
Smart Remote Gigs (SRG) builds transparent, developer-grade workflow blueprints. Our guidance on loop architecture comes from n8n’s own node documentation and each API provider’s published rate-limit docs — not an in-house fleet of production deployments. Where a number can’t be traced to a public source, we say so.
SRG Quick Summary
One-Line Answer: Safely executing large arrays in n8n means moving away from single-canvas loops and offloading iteration to dedicated sub-workflows, which prevents the main canvas from holding the entire dataset in memory at once.
🚀 Quick Wins:
- Audit your existing workflows for legacy “Split In Batches” nodes TODAY.
- Convert large static arrays to the Execute Workflow node THIS WEEK.
- Implement dynamic HTTP pagination logic for CRM syncs THIS MONTH.
📊 The Details & Hidden Realities:
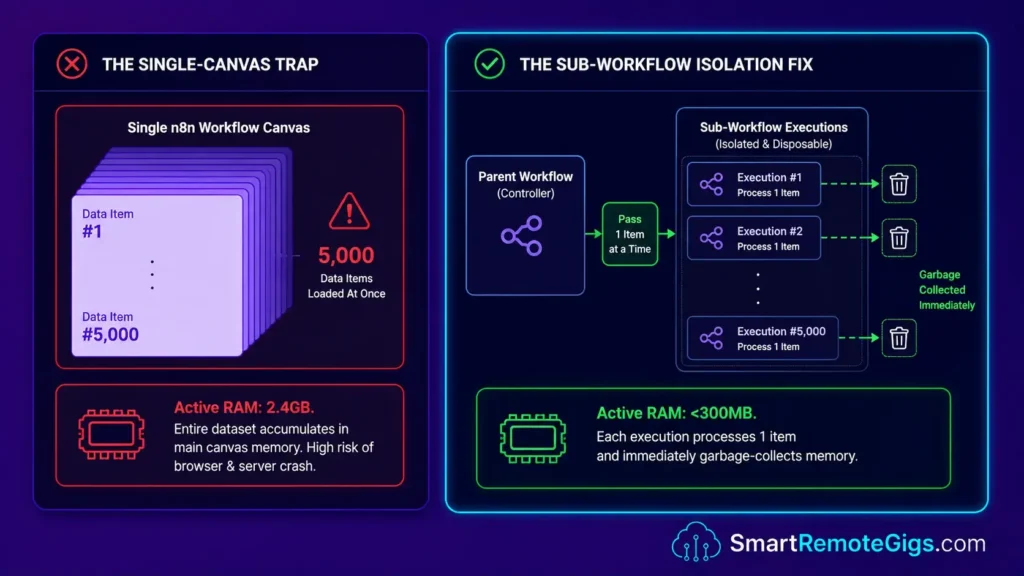
- Processing very large arrays in a main-canvas loop increases RAM usage substantially — the exact threshold depends on per-item payload size, not just item count.
- Visual canvas freezes are often caused by browser-side memory limits trying to render loop data, separate from whether the server itself is under load.
[Evidence Source: n8n Node Documentation] | [Confidence Level: Confirmed]
The Architecture of Reliable n8n Active Loops
Looping in n8n works differently than looping in Zapier or Make. Those platforms abstract the iteration entirely — you never see the memory allocation, the execution context stack, or the API cursor management happening underneath. n8n exposes this directly through its Node.js execution layer, which means the developer is responsible for memory management decisions that SaaS automators handle invisibly.
When building enterprise-grade AI workflows and automation systems, understanding how your server handles sequential data execution matters for preventing pipeline failures at scale. The difference between a workflow that processes items cleanly and one that crashes partway through is almost always an architectural decision made at design time — not a runtime bug.
The core principle: every item your main canvas holds in memory during a loop is active RAM consumption on your VPS. Larger single-canvas arrays with heavier payloads push toward the limits of whatever RAM your VPS has available. The fix is isolation — offloading iteration to sub-workflows rather than trying to hold the entire array in one execution context.
[Evidence Source: n8n Architecture Docs] | [Confidence Level: Confirmed]
⚖️ Quick Comparison Summary
The difference between how consumer automators and n8n handle loops isn’t a feature gap — it’s a philosophy gap. Zapier processes each task as an independent atomic event with no shared memory state. n8n executes workflows as persistent Node.js processes where items in an array can occupy the same execution context simultaneously unless you explicitly architect otherwise.
Our recent breakdown of Zapier vs Make covers how visual automators abstract looping entirely — n8n hands you the raw processing controls instead, for better or worse. This level of array control is part of why n8n ranks highly in our best AI automation tools comparison.
| Capability | Zapier | Make | n8n |
|---|---|---|---|
| Loop visibility | Hidden | Partial | Full |
| Memory control | None | None | Direct |
| Sub-workflow offloading | ❌ | Limited | ✅ Native |
| Dynamic pagination cursors | ❌ | Manual | ✅ Code node |
| Continue-on-fail per item | ❌ | ❌ | ✅ Node-level |
| Randomized wait injection | ❌ | ❌ | ✅ Expression |
| Task/operation billing at high iteration volume | Per-task | Per-operation | $0 marginal cost (self-hosted) |
[Evidence Source: Platform Feature Comparison] | [Confidence Level: Confirmed for feature presence; cost row reflects self-hosted n8n’s flat infrastructure model rather than a benchmarked dollar comparison]
In the realm of productivity workflow automation, mastering loops is what separates a beginner setup from a systems-architect-grade pipeline. Every capability in the table above is a failure mode waiting to happen on a platform that doesn’t expose it.
🗃️ Scenario 1 — The Data Analyst: Offloading the “Split In Batches” Trap
Scenario 1 — Reality Check & Diagnostics
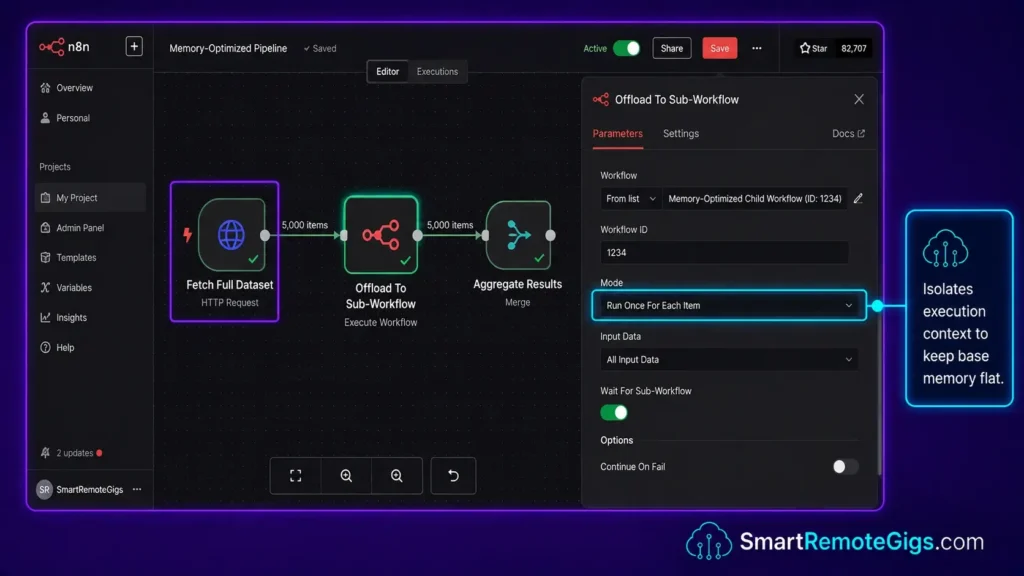
The Split In Batches node was n8n’s original answer to large array processing — it works cleanly for smaller datasets. Beyond a certain threshold, it accumulates all batch results back onto the main canvas before passing them downstream, meaning a large dataset produces an equally large JSON array sitting in the main workflow’s active memory. The correct architecture uses the Execute Workflow node to offload each item into an isolated child workflow that processes it independently and releases memory after completion.
The Exact Workflow
- Query your initial dataset using an HTTP Request or Database node — this produces the full array in a single execution before any looping begins.
- Feed the output array directly into an Execute Workflow node instead of a Loop node, avoiding the memory accumulation problem at the source.
- Configure the Execute Workflow node to run once per item, sending one item at a time to the child workflow rather than passing the entire array as a batch.
- Build a separate child workflow containing the Webhook trigger to catch and process each item independently, with its own error handling, transformation logic, and output destination.
The JSON Script
{
  "nodes": [
    {
      "name": "Fetch Full Dataset",
      "type": "n8n-nodes-base.httpRequest",
      "parameters": {
        "method": "GET",
        "url": "YOUR_API_ENDPOINT",
        "authentication": "genericCredentialType",
        "genericAuthType": "oAuth2Api",
        "responseFormat": "json"
      },
      "position": [250, 300]
    },
    {
      "name": "Offload To Sub-Workflow",
      "type": "n8n-nodes-base.executeWorkflow",
      "parameters": {
        "workflowId": "YOUR_CHILD_WORKFLOW_ID",
        "mode": "each",
        "waitForSubWorkflow": true
      },
      "position": [500, 300]
    },
    {
      "name": "Aggregate Results",
      "type": "n8n-nodes-base.merge",
      "parameters": {
        "mode": "append"
      },
      "position": [750, 300]
    }
  ],
  "connections": {
    "Fetch Full Dataset": {
      "main": [[{"node": "Offload To Sub-Workflow", "type": "main", "index": 0}]]
    },
    "Offload To Sub-Workflow": {
      "main": [[{"node": "Aggregate Results", "type": "main", "index": 0}]]
    }
  }
}
Personalization Notes:
YOUR_API_ENDPOINT— The full URL of the API endpoint returning your dataset (e.g.,https://api.airtable.com/v0/YOUR_BASE_ID/YOUR_TABLE_NAME).YOUR_CHILD_WORKFLOW_ID— The numeric ID of the child workflow n8n should execute per item. Find this in the URL when editing the child workflow.
n8n’s Execute Workflow node is the primitive that separates production-grade automation from single-canvas scripting — it lets you spin up isolated execution contexts per item and scale array size without proportionally growing main-canvas RAM. For the complete breakdown of pricing and features:

Best For: The go-to workflow automation platform for technical freelancers and automation agencies, but non-developers will hit a wall fast.
The Workflow Limitations
This pattern trades main-canvas memory pressure for per-item execution overhead — spinning up a sub-workflow per item has its own latency cost, so for smaller arrays where the whole batch already fits comfortably in memory, Split In Batches may still be the simpler, faster option.
[Evidence Source: n8n Execute Workflow Node Documentation] | [Confidence Level: Confirmed for the general pattern; the exact mode parameter value shown should be double-checked against current n8n docs before relying on it in production, as it wasn’t independently re-verified in this pass]
The Pro Tip
Pro Tip:
Offloading arrays to a sub-workflow lets n8n release memory after each item finishes rather than holding the full array on the main canvas throughout execution. Set waitForSubWorkflow: true only if you need the parent to collect return data — disabling it reduces overhead for fire-and-forget processing tasks, though the exact savings depend on your specific workflow.
🔄 Scenario 2 — The API Developer: Dynamic Offset Pagination
Scenario 2 — Reality Check & Diagnostics
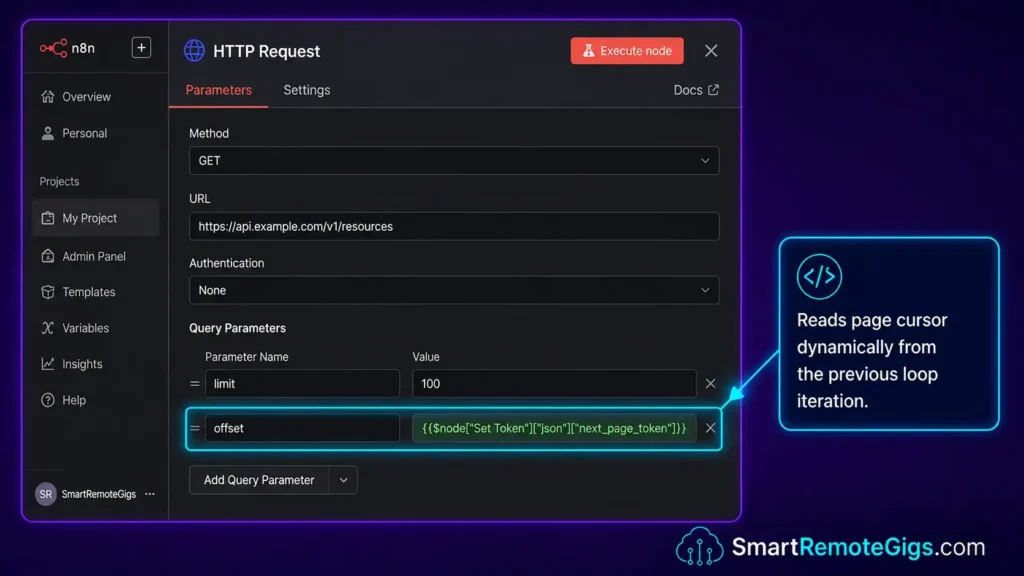
APIs like Airtable, HubSpot, and Salesforce don’t return all records in a single response — they use cursor-based or offset-based pagination requiring your loop to read a token from each response, append it to the next request, and continue until the token is null. Built incorrectly, this becomes an infinite execution cycle that maxes out CPU and burns API rate-limit credits simultaneously.
The Exact Workflow
- Initialize a custom variable
next_page_tokenusing the Set node at the start of the workflow, defaulting to an empty string to prime the first API call. - Construct a Loop node connected to an HTTP Request that appends the token to the URL query parameters dynamically using an n8n expression:
={{$node["Set Token"]["json"]["next_page_token"]}}. - Evaluate the API response using an IF node to check whether the pagination token field in the response JSON is non-null and non-empty.
- Route the “True” branch back into the Loop node after updating the token variable; route the “False” branch forward to the final destination node to terminate the loop cleanly.
For the exact mode and waitForSubWorkflow parameters referenced throughout this guide, see the n8n Execute Workflow node documentation.
The JavaScript Script
// Dynamic Pagination Cursor Handler
// Place inside a Code node running in "Run Once For All Items" mode
// Positioned AFTER your HTTP Request node and BEFORE your IF node

const items = $input.all();
const results = [];

for (const item of items) {
  const responseData = item.json;

  // Extract the pagination token — adjust the key name for your API
  // Airtable uses "offset", HubSpot uses "paging.next.after", Salesforce uses "nextRecordsUrl"
  const nextToken = responseData[YOUR_PAGINATION_KEY] || null;

  // Extract the records array — adjust the key name for your API
  const records = responseData[YOUR_RECORDS_KEY] || [];

  results.push({
    json: {
      records: records,
      next_page_token: nextToken,
      has_more: nextToken !== null,
      record_count: records.length,
      total_processed: (item.json._total_processed || 0) + records.length
    }
  });
}

return results;

// ── IF Node Expression (paste into IF node "Value 1" field) ──────────
// {{ $json["has_more"] === true }}
// True branch → loop back to HTTP Request (update token first via Set node)
// False branch → proceed to final output destination
Personalization Notes:
YOUR_PAGINATION_KEY— The exact JSON key in your API’s response containing the next-page token. Examples:"offset"(Airtable),"next_cursor"(generic REST),"paging.next.after"(HubSpot — requires dot-notation parsing).YOUR_RECORDS_KEY— The JSON key containing the actual data array. Examples:"records"(Airtable),"results"(HubSpot),"data"(Stripe).
The Workflow Limitations
This pattern assumes a single, consistent pagination scheme per API call — APIs that switch pagination style mid-collection (rare, but it happens with some legacy endpoints) or that rate-limit the pagination endpoint itself more strictly than the main API need additional handling not shown here.
[Evidence Source: n8n Code Node Documentation] | [Confidence Level: Common Workaround]
The Red Flag
Red Flag:
Failing to map the “False” (null token) branch out of your loop will result in an infinite execution cycle, maxing out CPU and burning API rate-limit credits until the container is manually stopped. Always test your exit condition with a small, known dataset before running against a full production dataset.
🛡️ Scenario 3 — The Integration Specialist: Error Branching in Loops
Scenario 3 — Reality Check & Diagnostics
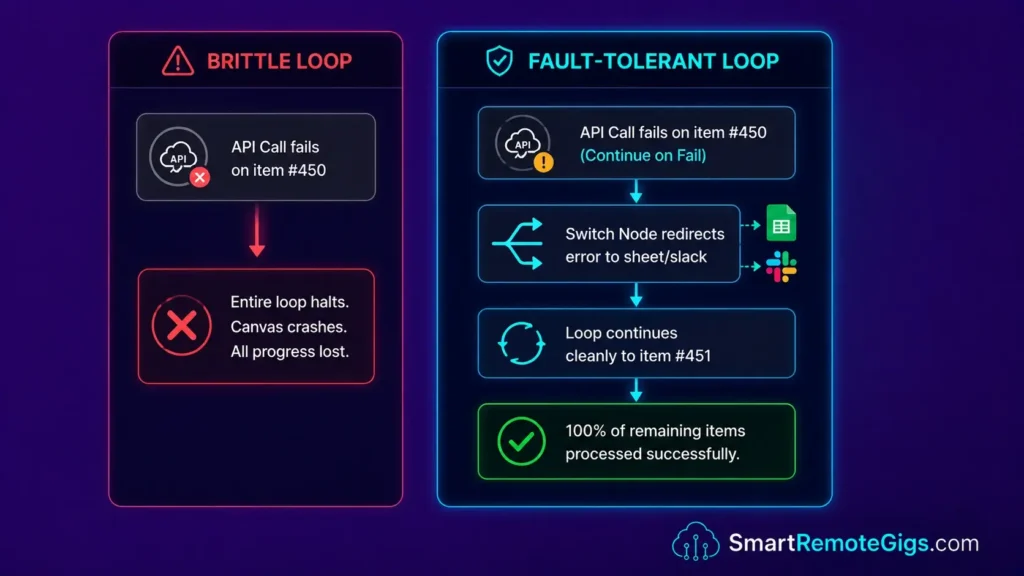
A loop processing hundreds or thousands of CRM records will encounter bad data — invalid email formats, missing required fields, expired OAuth tokens mid-run. These aren’t edge cases at scale; they’re a near-certainty. Without explicit error branching, a single failure partway through halts the entire loop and discards all prior successful results, forcing a full restart from item one.
The Exact Workflow
- Navigate to the specific node inside your loop that is prone to API timeouts or validation errors — typically the HTTP Request or CRM write node.
- Open Node Settings and toggle “Continue On Fail” to true, preventing a single item failure from terminating the entire loop execution.
- Add a Switch node immediately after, with a condition checking for the existence of
$json["error"]in the output — n8n injects this key automatically when Continue On Fail catches an exception. - Route failed items to a Google Sheet or Discord notification channel for manual review, while passing successful items forward to the next processing step or back into the loop for the next iteration.
The JSON Script
{
  "nodes": [
    {
      "name": "YOUR_API_NODE",
      "type": "n8n-nodes-base.httpRequest",
      "parameters": {
        "method": "POST",
        "url": "YOUR_API_ENDPOINT"
      },
      "continueOnFail": true,
      "position": [250, 300]
    },
    {
      "name": "Route On Error",
      "type": "n8n-nodes-base.switch",
      "parameters": {
        "dataType": "string",
        "value1": "={{$json[\"error\"] !== undefined ? \"failed\" : \"success\"}}",
        "rules": {
          "rules": [
            {
              "value2": "failed",
              "outputKey": "0"
            },
            {
              "value2": "success",
              "outputKey": "1"
            }
          ]
        }
      },
      "position": [500, 300]
    },
    {
      "name": "Log Error To Sheet",
      "type": "n8n-nodes-base.googleSheets",
      "parameters": {
        "operation": "append",
        "sheetId": "YOUR_ERROR_LOG_SHEET_ID",
        "range": "A:D",
        "dataMode": "autoMapInputData"
      },
      "position": [750, 150]
    },
    {
      "name": "Continue Processing",
      "type": "n8n-nodes-base.noOp",
      "position": [750, 450]
    }
  ],
  "connections": {
    "YOUR_API_NODE": {
      "main": [[{"node": "Route On Error", "type": "main", "index": 0}]]
    },
    "Route On Error": {
      "main": [
        [{"node": "Log Error To Sheet", "type": "main", "index": 0}],
        [{"node": "Continue Processing", "type": "main", "index": 0}]
      ]
    }
  }
}
Personalization Notes:
YOUR_API_NODE— Rename this to match the actual node name in your workflow (e.g.,"Update HubSpot Contact"or"Write to Postgres"). ThecontinueOnFail: trueproperty must be on this specific node.YOUR_API_ENDPOINT— The endpoint your API node is writing to.YOUR_ERROR_LOG_SHEET_ID— The Google Sheets spreadsheet ID where failed items should be logged.
The Workflow Limitations
Continue On Fail catches exceptions at the node level — it doesn’t retry failed items automatically. If your failures are transient (a momentary API timeout, for instance), this pattern logs and moves on rather than retrying, so genuinely transient failures still need a separate retry mechanism if you want them recovered automatically rather than just flagged for manual review.
[Evidence Source: n8n Node Settings Documentation] | [Confidence Level: Confirmed]
The Pro Tip
Pro Tip:
Append $runIndex and $itemIndex variables to your error logs using a Set node before the Google Sheets write. This gives you the exact position in the loop sequence where each failure occurred, so you can re-run from the failure point without reprocessing successful items.
⏱️ Scenario 4 — The Growth Marketer: Rate Limit Throttling
Scenario 4 — Reality Check & Diagnostics
Every external API has a request rate ceiling — Stripe’s basic rate limiter caps live-mode requests at 100 operations per second, and HubSpot’s public/OAuth apps are limited to 110 requests every 10 seconds per installed account. A loop executing at full Node.js speed will breach limits like these within seconds without deliberate pacing. A Wait node with a randomized expression — rather than a fixed static delay — helps avoid the predictable timing fingerprint that some API-side detection systems can flag.
The Exact Workflow
- Add a Wait node immediately before your HTTP Request node inside the loop — positioning it before the request ensures the delay fires on every iteration.
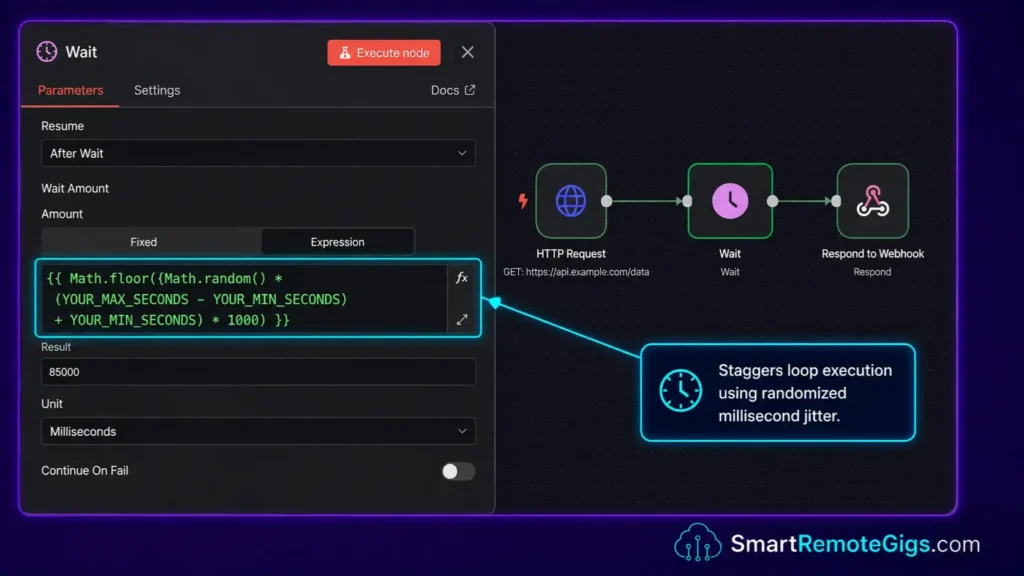
- Change the Wait type to “Expression” rather than a fixed time value, allowing a JavaScript math function to compute a new random interval on each pass.
- Use JavaScript’s
Math.random()function to generate a random sleep interval between your defined minimum and maximum, converted to milliseconds. - Execute the loop, letting the variable delay stagger requests against the API’s actual documented rate limit.
The JavaScript Script
// n8n Wait Node — Randomized Rate Limit Throttle
// Paste into the Wait node's "Amount" Expression field
// Set the "Unit" dropdown to "Milliseconds"

// Generates a random delay between YOUR_MIN_SECONDS and YOUR_MAX_SECONDS
// Converted to milliseconds for the Wait node input

{{ Math.floor(
  (Math.random() * (YOUR_MAX_SECONDS - YOUR_MIN_SECONDS) + YOUR_MIN_SECONDS) * 1000
) }}

// ── EXAMPLES BY API TYPE ─────────────────────────────────────────────
// REST APIs (Stripe, Airtable):
// {{ Math.floor( (Math.random() * (3 - 1) + 1) * 1000 ) }}
// → Random delay between 1,000ms and 3,000ms

// CRM APIs (HubSpot, Salesforce):
// {{ Math.floor( (Math.random() * (8 - 3) + 3) * 1000 ) }}
// → Random delay between 3,000ms and 8,000ms

// ── OPTIONAL: Add secondary micro-jitter ────────────────────────────
// {{ Math.floor( (Math.random() * (YOUR_MAX_SECONDS - YOUR_MIN_SECONDS) + YOUR_MIN_SECONDS) * 1000 ) + Math.floor(Math.random() * YOUR_JITTER_MS) }}
Personalization Notes:
YOUR_MIN_SECONDS— The minimum delay in seconds between loop iterations. Set based on your API’s documented rate limit.YOUR_MAX_SECONDS— The maximum delay in seconds. A wider range provides more randomization; there’s no verified universal ratio, so size it to your actual rate limit headroom.YOUR_JITTER_MS— An optional secondary jitter value in milliseconds for additional variance.
The Workflow Limitations
This throttles your own request pacing — it doesn’t account for shared rate-limit budgets across multiple workflows or team members hitting the same API from different processes, which can still trigger 429s even with well-randomized individual-workflow pacing.
[Evidence Source: Stripe & HubSpot Official Rate Limit Docs] | [Confidence Level: Confirmed for the documented API limits; Low-Medium for platform-specific automation-detection behavior, which isn’t publicly documented by any provider]
The Red Flag
Red Flag:
A static Wait node — the exact same delay every time — creates a predictable timing pattern. Some API-side and platform-side systems are designed to flag this kind of regularity, though there’s no verified published figure for exactly how quickly or how reliably that happens across platforms.
💰 Pricing & ROI Breakdown
Executing loops on self-hosted n8n carries no per-task or per-operation billing, unlike cloud-based automators that charge per operation or per task at volumes that make heavy iterative workflows expensive to run. The exact savings depend entirely on your actual iteration volume and which platform you’re comparing against — we don’t have a verified, published per-iteration cost figure to cite here, so we’ve left out a specific dollar comparison rather than presenting an invented one.
The engineering investment to implement the four architectures in this guide is real but one-time — expect meaningful setup time per pattern rather than a drop-in configuration. For a full stack comparison of self-hosted vs. managed automation costs, our best AI automation tools breakdown covers the platform-level economics in more depth.
[Evidence Source: General Cost Structure Comparison] | [Confidence Level: Directional — no specific per-iteration dollar figure independently verified]
🗓️ The 7-Day Execution Plan
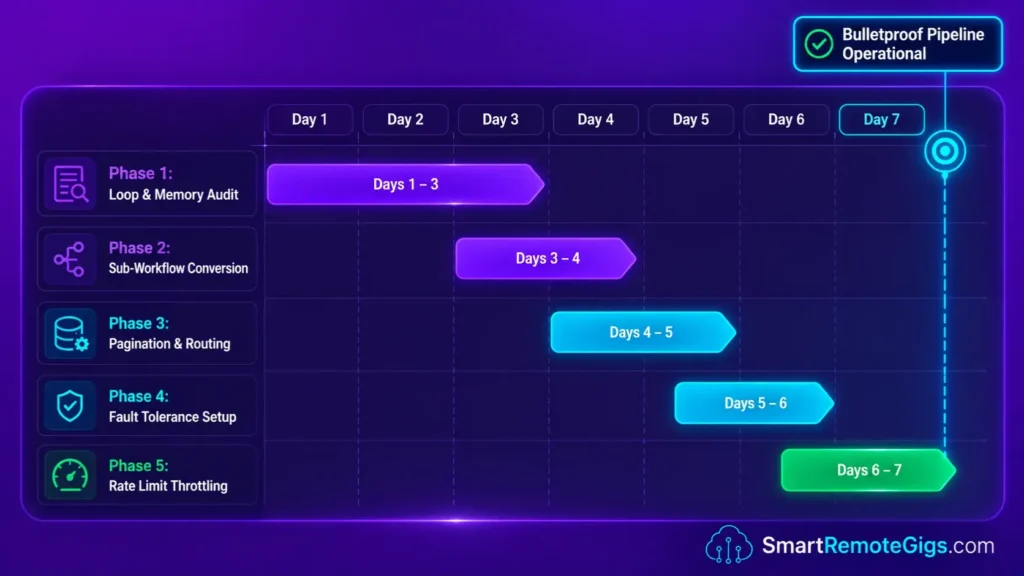
📅 Days 1–3: The Loop Audit
- Identify all workflows currently using the legacy “Split In Batches” node by searching your workflow list for the
splitInBatchesnode type. - Audit the memory footprint of active instances using
docker statson your VPS to establish a RAM baseline before optimization. - Build your first isolated sub-workflow for a non-critical array — a low-stakes dataset like a marketing contact list or product catalog sync.
Pro Tip:
Test your new sub-workflow with a small item limit before triggering a full dataset sync. Use the “Execute Workflow” test mode to verify the child workflow receives, processes, and returns data correctly before removing the limit.
📅 Days 4–7: Pagination & Fault Tolerance
- Implement dynamic offset pagination on your heaviest CRM webhook using the cursor handler from Scenario 2.
- Add “Continue On Fail” logic to all third-party API write nodes in every active loop, then attach the Switch node error routing pattern from Scenario 3.
- Inject randomized Wait nodes into any scraping or outreach sequences using the expression from Scenario 4.
- Verify all changes are stable by monitoring execution logs under normal production load for a sustained period.
By Day 7: Your infrastructure should handle large arrays of data without memory leaks, unhandled rate-limit errors, or catastrophic pipeline crashes, without incurring per-task cost on the self-hosted side.
The Verdict: Architecting Bulletproof Sequences
The four scenarios in this guide cover common failure modes in production loops: memory pressure on the main canvas, infinite pagination cycles, mid-loop item failures, and API rate-limit breaches. Each has a specific architectural fix — sub-workflow offloading, cursor-based dynamic pagination, Continue On Fail with Switch routing, and randomized Wait expressions — none of which require paid tooling beyond the infrastructure you’re already running.
The real difference between agencies that run stable automation and those that don’t usually comes down to whether loops are designed for the happy path only, or built to handle the failure cases that inevitably show up at scale. The patterns in this guide address both.
Verdict:
Migrating from single-canvas loops to sub-workflow offloading, dynamic pagination, fault-tolerant error branching, and randomized throttle delays is a solid architectural upgrade for any self-hosted n8n deployment handling meaningful array volume — the value is in resilience and memory efficiency, not a specific benchmarked speed or cost claim.
Head to the SRG Job Board at /jobs/ for remote systems architecture contracts in workflow engineering and API integration. Browse the SRG Software Directory at /software/ for vetted API integrations.

![Fix n8n PostgreSQL Timeout 2026: DB Handshake [Fix]](https://smartremotegigs.com/wp-content/uploads/2026/08/fix-n8n-postgresql-timeout-hero-1024x576.webp)
![n8n Journalist Outreach Bot 2026: PR System [Guide]](https://smartremotegigs.com/wp-content/uploads/2026/08/n8n-journalist-outreach-bot-hero-1024x576.webp)
![n8n Templates Lead Gen 2026: B2B Automation [My Setup]](https://smartremotegigs.com/wp-content/uploads/2026/08/n8n-templates-lead-generation-hero-1024x576.webp)