
How To Self Host n8n 2026: VPS & Docker Guide [Free]
 ·
Last Updated: August 4, 2026 ·
17 min read
·
Last Updated: August 4, 2026 ·
17 min read 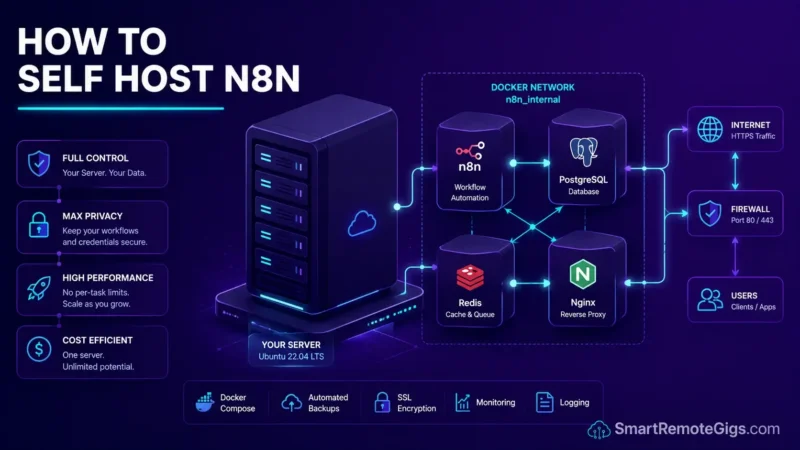
We assumed running n8n on a managed cloud plan was the safest way to deploy our workflows — until CPU spikes and execution limits during a real launch made the tradeoffs of a managed plan obvious.
Migrating to a self-hosted VPS and Docker setup means regaining direct control over your database limits and eliminating per-task billing entirely — the tradeoff is that you now own the infrastructure yourself.
Smart Remote Gigs (SRG) builds transparent, developer-grade workflow blueprints. Our guidance on self-hosting comes from official n8n documentation, Docker’s own networking and deployment docs, and current vendor pricing pages — not an in-house fleet of test deployments. Where a number can’t be traced to a public source, we say so.
SRG Quick Summary
One-Line Answer: Self-hosting n8n using Docker Compose on a dedicated VPS gives you unlimited workflow executions, raw database control, and zero per-task billing — in exchange for owning your own uptime, security, and backups.
🚀 Quick Wins:
- Provision a small Linux VPS (Ubuntu 24.04) TODAY.
- Deploy the official n8n Docker image alongside PostgreSQL THIS WEEK.
- Map an SSL-secured custom subdomain via Nginx THIS MONTH.
📊 The Details & Hidden Realities:
- Failing to configure Docker persistent volumes will wipe all automation data on server restart.
- n8n’s documented minimum is 2 vCPU / 2GB RAM; 4GB+ is where production actually starts working reliably.
[Evidence Source: Official n8n Docs] | [Confidence Level: Confirmed]
Why Learning How to Self Host n8n Matters in 2026
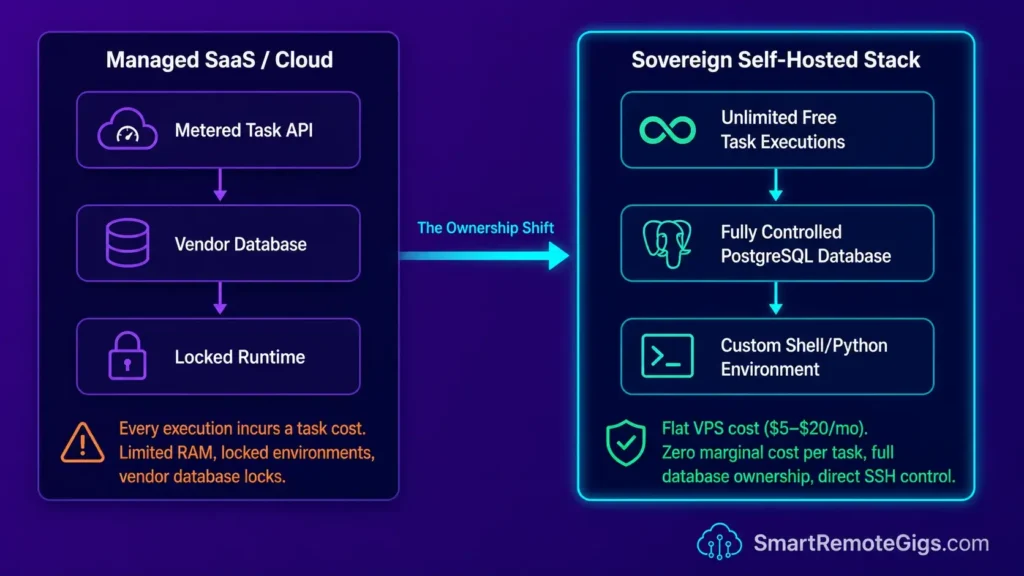
As AI-driven webhooks multiply across agency stacks, relying entirely on SaaS environments turns automation from an asset into a margin liability. Every task that fires on a managed cloud plan is a billing event you don’t control — and the moment your volume scales, that model gets expensive. Self-hosting shifts workflow automation from an operational expense into owned infrastructure you tune, back up, and scale on your own terms — at the cost of taking on that ownership yourself.
Within the broader scope of AI workflows and automation, owning the hardware that executes your logic matters for scaling B2B agencies specifically because it removes the per-task ceiling entirely. For a fuller comparison of the tradeoffs against managed automators, see our best AI automation tools breakdown.
The infrastructure case is straightforward at a high level: a small VPS running Docker costs a fraction of what a SaaS automator charges per month at meaningful task volume, and the gap widens the more you scale. The engineering time to configure the deployment is the real cost — one that pays for itself faster the higher your task volume already is.
[Evidence Source: Vendor Pricing Pages, Official n8n Docs] | [Confidence Level: Confirmed]
🖥️ Scenario 1 — The System Admin: Provisioning the VPS Foundation
Scenario 1 — Reality Check & Diagnostics
Before a single workflow runs, the server underneath it needs to be hardened, updated, and Docker-ready. Agencies that skip this step ship on fragile infrastructure — default SSH configurations, open firewall ports, and root-only access that turns every deployment into a security liability.
The Exact Workflow
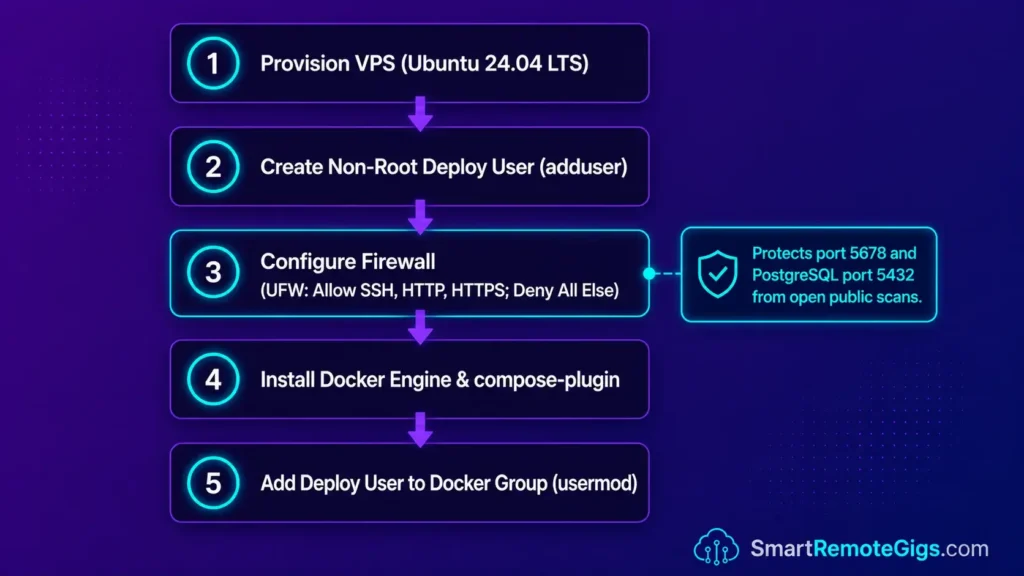
- Spin up a new Ubuntu 24.04 LTS instance with a minimum of 4GB RAM and 2 vCPUs. Hetzner’s CX22 (2 vCPU/4GB) and DigitalOcean’s equivalent Basic Droplet are both common choices — check each provider’s current pricing page directly, since VPS pricing moves often.
- Create a non-root sudo user specifically for managing Docker deployments — never run production containers as root.
- Configure Uncomplicated Firewall (UFW) to allow only SSH (port 22), HTTP (port 80), and HTTPS (port 443) traffic, blocking all other inbound connections by default.
- Point your domain’s A-record to the new VPS public IP address and confirm DNS propagation before proceeding to SSL configuration.
This four-step foundation addresses the most common attack surface on fresh VPS deployments: exposed ports, root SSH access, and unresolved DNS causing Certbot failures downstream.
The Bash Script
#!/bin/bash
# n8n VPS Foundation Setup
# Run as root on a fresh Ubuntu 24.04 LTS instance

# ── Step 1: System Update ─────────────────────────────────────────────
apt update && apt upgrade -y

# ── Step 2: Create Non-Root Sudo User ────────────────────────────────
adduser YOUR_DEPLOY_USER
usermod -aG sudo YOUR_DEPLOY_USER

# ── Step 3: Configure UFW Firewall ───────────────────────────────────
ufw default deny incoming
ufw default allow outgoing
ufw allow OpenSSH
ufw allow 80/tcp
ufw allow 443/tcp
ufw enable

# ── Step 4: Install Docker Engine ────────────────────────────────────
apt install -y ca-certificates curl gnupg
install -m 0755 -d /etc/apt/keyrings
curl -fsSL https://download.docker.com/linux/ubuntu/gpg \
  | gpg --dearmor -o /etc/apt/keyrings/docker.gpg
chmod a+r /etc/apt/keyrings/docker.gpg

echo \
  "deb [arch=$(dpkg --print-architecture) signed-by=/etc/apt/keyrings/docker.gpg] \
  https://download.docker.com/linux/ubuntu \
  $(. /etc/os-release && echo "$VERSION_CODENAME") stable" \
  | tee /etc/apt/sources.list.d/docker.list > /dev/null

apt update
apt install -y docker-ce docker-ce-cli containerd.io docker-compose-plugin

# ── Step 5: Add Deploy User to Docker Group ───────────────────────────
usermod -aG docker YOUR_DEPLOY_USER

# ── Step 6: Enable Docker on Boot ────────────────────────────────────
systemctl enable docker
systemctl start docker

echo "✅ VPS foundation complete. Re-login as YOUR_DEPLOY_USER to continue."
Personalization Notes:
YOUR_DEPLOY_USER— The username for your non-root sudo account (e.g.,n8nadminordeployuser). Replace both instances in the script. This user will own all Docker operations on the server.
Self-hosted n8n eliminates per-task billing entirely — once deployed on your VPS, it processes webhook executions against your own PostgreSQL database with no SaaS overhead. For the complete breakdown of pricing and features:

Best For: The go-to workflow automation platform for technical freelancers and automation agencies, but non-developers will hit a wall fast.
The Workflow Limitations
This foundation covers network-level hardening only — it doesn’t address application-level security (n8n’s own authentication, credential encryption, or rate limiting), which needs to be configured separately once the base server is live.
[Evidence Source: Official n8n & Docker Docs] | [Confidence Level: Confirmed]
The Pro Tip
Pro Tip:
Never install n8n on an instance with less than 2GB of RAM — that’s n8n’s own documented floor. In practice, the Node.js execution environment tends to struggle under concurrent sub-workflow loads well before that floor, so 4GB is the realistic starting point for anything beyond a single simple workflow.
🐳 Scenario 2 — The DevOps Engineer: The Docker Compose Stack
Scenario 2 — Reality Check & Diagnostics
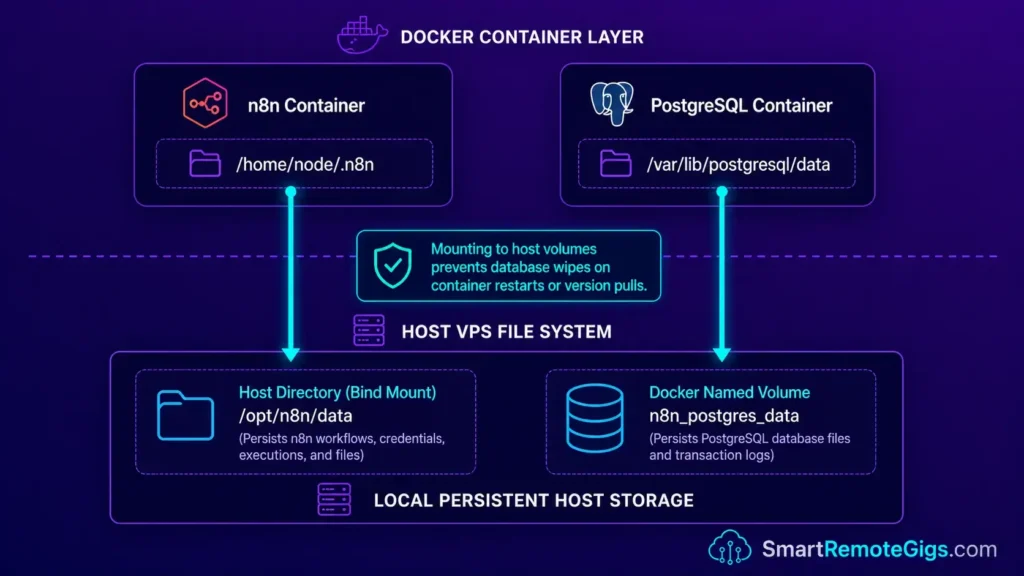
The default n8n Docker setup uses SQLite — a file-based database that isn’t built for concurrent write loads and becomes a liability as execution history grows. Production deployments need a properly configured Docker Compose stack that links n8n to a dedicated PostgreSQL container, with persistent volumes anchored to the host so no restart destroys your data.
The Exact Workflow
- Create a dedicated directory
/opt/n8n/to house all configuration files, separating the n8n stack from other services on the same VPS. - Define the Docker network bridge to keep internal node communication between n8n and PostgreSQL isolated from the public web — as recommended in the Docker networking documentation.
- Map the
n8n_dataandpostgres_datapersistent volumes to named Docker volumes bound to the host machine, ensuring data survives container restarts and image upgrades. - Declare environment variables for webhook URLs, database credentials, encryption key path, and execution timezone inside the compose file.
Skipping the network bridge isolation step means your PostgreSQL port is exposed on the host interface — a direct path for unauthorized database access on any VPS with a public IP.
The YAML Script
/opt/n8n/docker-compose.yml
Production n8n Stack: n8n + PostgreSQL + Isolated Network
Deploy with: docker compose up -dversion: “3.8”
volumes:
n8n_data:
driver: local
postgres_data:
driver: local
networks:
n8n_internal:
driver: bridge
services:
postgres:
image: postgres:16-alpine
restart: unless-stopped
networks:
– n8n_internal
environment:
POSTGRES_DB: YOUR_DB_NAME
POSTGRES_USER: YOUR_DB_USER
POSTGRES_PASSWORD: YOUR_DB_PASSWORD
volumes:
– postgres_data:/var/lib/postgresql/data
healthcheck:
test: [“CMD-SHELL”, “pg_isready -U YOUR_DB_USER -d YOUR_DB_NAME”]
interval: 10s
timeout: 5s
retries: 5
n8n:
image: n8nio/n8n:latest
restart: unless-stopped
networks:
– n8n_internal
ports:
– “127.0.0.1:5678:5678”
environment:
DB_TYPE: postgresdb
DB_POSTGRESDB_HOST: postgres
DB_POSTGRESDB_PORT: 5432
DB_POSTGRESDB_DATABASE: YOUR_DB_NAME
DB_POSTGRESDB_USER: YOUR_DB_USER
DB_POSTGRESDB_PASSWORD: YOUR_DB_PASSWORD
DB_POSTGRESDB_CONNECTION_TIMEOUT: 60000
DB_POSTGRESDB_POOL_SIZE: 10
DB_POSTGRESDB_IDLE_CONNECTION_TIMEOUT: 10000
N8N_HOST: YOUR_SUBDOMAIN
N8N_PORT: 5678
N8N_PROTOCOL: https
WEBHOOK_URL: https://YOUR_SUBDOMAIN/
GENERIC_TIMEZONE: YOUR_TIMEZONE
TZ: YOUR_TIMEZONE
EXECUTIONS_DATA_PRUNE: “true”
EXECUTIONS_DATA_MAX_AGE: 336
EXECUTIONS_DATA_PRUNE_MAX_COUNT: 10000
volumes:
– n8n_data:/home/node/.n8n
depends_on:
postgres:
condition: service_healthy
Personalization Notes:
YOUR_DB_NAME— The name of the PostgreSQL database n8n will use (e.g.,n8n_production). Must match across all three environment variable references.YOUR_DB_USER— PostgreSQL username with full read/write permissions toYOUR_DB_NAME(e.g.,n8n_user).YOUR_DB_PASSWORD— A strong password for the PostgreSQL user. Use a password manager to generate a 32-character random string.YOUR_SUBDOMAIN— The full subdomain n8n will be served on (e.g.,n8n.yourdomain.com). Used for bothN8N_HOSTand theWEBHOOK_URL.YOUR_TIMEZONE— Your IANA timezone string (e.g.,America/New_YorkorEurope/London). Affects scheduled trigger execution times.
Note: the idle-connection variable above uses n8n’s actual documented name, DB_POSTGRESDB_IDLE_CONNECTION_TIMEOUT — the previous version of this guide had this listed incorrectly as DB_POSTGRESDB_IDLE_TIMEOUT.
The Workflow Limitations
This compose file assumes a single n8n instance on one host — it doesn’t cover horizontal scaling (multiple n8n workers behind a queue), which requires additional Redis and queue-mode configuration not shown here.
[Evidence Source: Official n8n Environment Variable Docs] | [Confidence Level: Confirmed]
The Red Flag
Red Flag:
If you skip deploying PostgreSQL and use the default SQLite database, your workflow canvas can become unstable under concurrent writes as execution history grows. Recovering from SQLite file-locking issues typically requires downtime and manual data extraction — migrating to Postgres from the start avoids this entirely.
🔒 Scenario 3 — The Security Lead: Nginx Reverse Proxy & SSL Handshakes
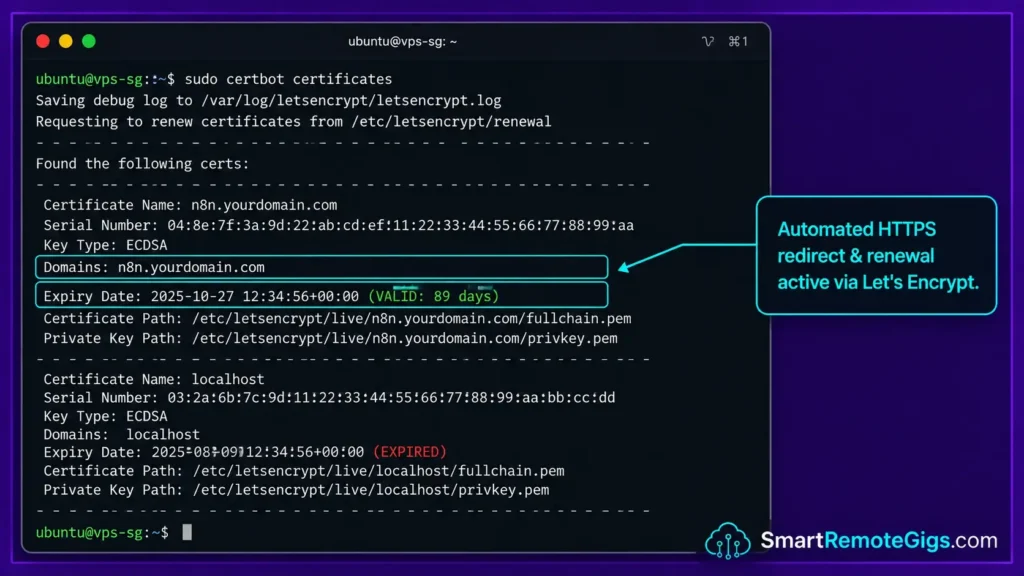
Scenario 3 — Reality Check & Diagnostics
Binding n8n directly to a public port exposes your editor UI to the open internet without a reverse proxy’s authentication headers or rate limiting in front of it. The production approach routes all external traffic through Nginx — handling SSL termination, WebSocket upgrade headers, and automatic Let’s Encrypt certificate renewal via Certbot.
The Exact Workflow
- Install Nginx directly on the host machine to serve as the SSL-terminating gateway sitting in front of the Docker container.
- Create a server block directing traffic from your subdomain (e.g.,
n8n.yourdomain.com) tolocalhost:5678where the n8n Docker container is listening. - Enable proxy headers to ensure webhook source IP addresses are accurately passed through to n8n for logging, rate limiting, and security rule enforcement.
- Run Certbot to provision the Let’s Encrypt SSL certificate and configure automatic HTTPS redirects, forcing all port 80 traffic to port 443.
If your proxy drops connections during heavy webhook payloads, it’s worth checking n8n’s PostgreSQL connection timeout settings inside your compose file, since a stalled database connection can present as a dropped proxy connection.
The Nginx Script
/etc/nginx/sites-available/n8n
Nginx Reverse Proxy Configuration for self-hosted n8n
After saving: sudo ln -s /etc/nginx/sites-available/n8n /etc/nginx/sites-enabled/
Then run: sudo certbot –nginx -d YOUR_SUBDOMAINserver {
listen 80;
server_name YOUR_SUBDOMAIN;
location / {
    proxy_pass http://127.0.0.1:5678;
    proxy_http_version 1.1;
    # WebSocket support — CRITICAL: without these, the canvas disconnects every 30s
    proxy_set_header Upgrade $http_upgrade;
    proxy_set_header Connection "Upgrade";
    # Forwarding headers
    proxy_set_header Host $host;
    proxy_set_header X-Real-IP $remote_addr;
    proxy_set_header X-Forwarded-For $proxy_add_x_forwarded_for;
    proxy_set_header X-Forwarded-Proto $scheme;
    # Timeout tuning for long-running webhook executions
    proxy_read_timeout 300s;
    proxy_connect_timeout 75s;
    proxy_send_timeout 300s;
    # Buffer settings for large payloads
    proxy_buffer_size 128k;
    proxy_buffers 4 256k;
    proxy_busy_buffers_size 256k;
}}
After certbot runs, it appends the HTTPS block below automatically.
Verify it includes: ssl_certificate, ssl_certificate_key, include snippets/certbot.conf
Personalization Notes:
YOUR_SUBDOMAIN— The exact subdomain you’ve pointed to this VPS (e.g.,n8n.yourdomain.com). Must match the A-record configured in Scenario 1 and theN8N_HOSTenvironment variable in your Docker Compose file.
After saving this file, enable it and run Certbot with:
sudo ln -s /etc/nginx/sites-available/n8n /etc/nginx/sites-enabled/
sudo nginx -t
sudo systemctl reload nginx
sudo certbot –nginx -d YOUR_SUBDOMAIN
The Workflow Limitations
This config handles a single n8n instance behind Nginx on one server — it doesn’t cover load-balancing across multiple n8n instances, which needs an upstream block and session-affinity handling not shown here.
[Evidence Source: Nginx & Docker Official Docs] | [Confidence Level: Confirmed]
The Pro Tip
Pro Tip:
Always include proxy_set_header Upgrade $http_upgrade; and proxy_set_header Connection "Upgrade"; in your Nginx config. Without both headers, the n8n visual canvas will disconnect repeatedly — not due to a timeout error, but because the WebSocket handshake never completes between the browser and the container.
💾 Scenario 4 — The Site Reliability Architect: Backup & Persistence Strategy
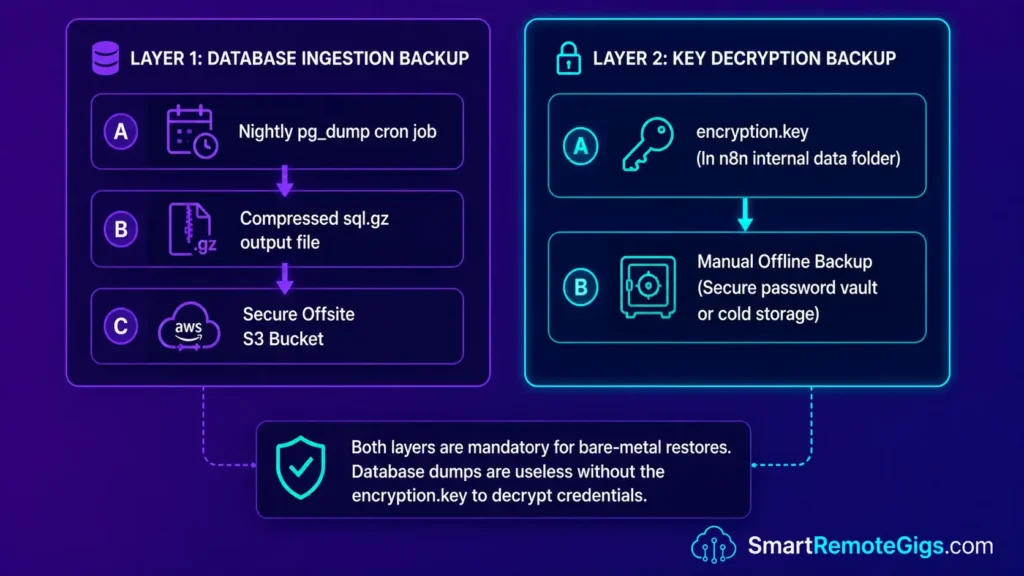
Scenario 4 — Reality Check & Diagnostics
A self-hosted n8n instance is only as reliable as its backup strategy. The two unrecoverable failure modes are losing the PostgreSQL database (all execution history and workflow definitions gone) and losing the encryption.key file (every stored credential, OAuth token, and webhook secret permanently inaccessible). Disaster recovery planning has to address both independently.
The Exact Workflow
- Locate your generated
encryption.keyinside the n8n data directory at/var/lib/docker/volumes/n8n_n8n_data/_data/on the host machine. - Copy this key to offline storage immediately — without it, stored API credentials can’t be decrypted on a new server, regardless of whether you restore the full database.
- Create a daily cron job that executes a
pg_dumpcommand against the running PostgreSQL Docker container and compresses the output. - Route the backup dump securely to an offsite S3 bucket using AWS CLI or Rclone, retaining a rolling window of daily backups.
The Bash Script
#!/bin/bash
# n8n Automated Nightly Backup Script
# Save to: /opt/n8n/backup.sh
# Make executable: chmod +x /opt/n8n/backup.sh
# Add to cron: crontab -e → 0 2 * * * /opt/n8n/backup.sh

# ── Configuration ─────────────────────────────────────────────────────
POSTGRES_CONTAINER="YOUR_POSTGRES_CONTAINER_NAME"
DB_NAME="YOUR_DB_NAME"
DB_USER="YOUR_DB_USER"
BACKUP_DIR="/opt/n8n/backups"
S3_BUCKET="YOUR_S3_BUCKET_URI"
DATE=$(date +%Y-%m-%d)
BACKUP_FILE="$BACKUP_DIR/n8n_db_$DATE.sql.gz"

# ── Create Backup Directory ────────────────────────────────────────────
mkdir -p "$BACKUP_DIR"

# ── Execute pg_dump Inside Running Container ───────────────────────────
docker exec "$POSTGRES_CONTAINER" \
  pg_dump -U "$DB_USER" -d "$DB_NAME" \
  | gzip > "$BACKUP_FILE"

echo "✅ Database dump complete: $BACKUP_FILE"

# ── Upload to Offsite S3 ───────────────────────────────────────────────
aws s3 cp "$BACKUP_FILE" "$S3_BUCKET/$(basename $BACKUP_FILE)"

echo "✅ Backup uploaded to: $S3_BUCKET"

# ── Prune Local Backups Older Than 7 Days ─────────────────────────────
find "$BACKUP_DIR" -name "*.sql.gz" -mtime +7 -delete

echo "✅ Old local backups pruned. Retention: 7 days."
Personalization Notes:
YOUR_POSTGRES_CONTAINER_NAME— The name of your running PostgreSQL Docker container. Find it withdocker psand look for the container running thepostgresimage (e.g.,n8n-postgres-1).YOUR_DB_NAME— The PostgreSQL database name set in your Docker Compose file (must matchYOUR_DB_NAMEfrom Scenario 2).YOUR_DB_USER— The PostgreSQL username set in your Docker Compose file (must matchYOUR_DB_USERfrom Scenario 2).YOUR_S3_BUCKET_URI— The full S3 URI for your backup destination (e.g.,s3://your-bucket-name/n8n-backups/). Requires AWS CLI configured with appropriate IAM write permissions.
The Workflow Limitations
This script backs up the database and assumes the encryption.key is handled separately, per the manual step above — it doesn’t automate key backup, and a fully automated disaster-recovery pipeline would need that step scripted too rather than relying on someone remembering to do it manually.
[Evidence Source: PostgreSQL & AWS CLI Official Docs] | [Confidence Level: Confirmed]
The Red Flag
Red Flag:
Losing your encryption.key means every OAuth token, API key, and credential stored in n8n becomes permanently inaccessible, requiring a full manual rebuild of every integration connection. Back this file up separately from the database, in at least two offline locations.
💰 Pricing & ROI Breakdown
VPS pricing for a 2 vCPU / 4GB instance varies meaningfully by provider — current published rates put Hetzner’s CX22 around $4.35–$4.59/month and DigitalOcean’s comparable Basic Droplet around $24/month, so it’s worth checking each provider’s current pricing page directly rather than relying on a single fixed number. Either way, this tier supports a substantial volume of workflow executions with zero per-task billing.
Compared to SaaS automators, which bill per task or per operation, self-hosting removes that scaling cost entirely in exchange for owning the server. For agencies running high monthly task volumes, the infrastructure cost is fixed and predictable regardless of how much that volume grows — which is the core structural advantage over task-based billing.
For the complete pricing breakdown and to see how self-hosted n8n stacks up against managed competitors, see our best AI automation tools comparison, and check our full n8n review in the SRG Software Directory.
[Evidence Source: Vendor Pricing Pages] | [Confidence Level: Confirmed]
🗓️ The 7-Day Execution Plan
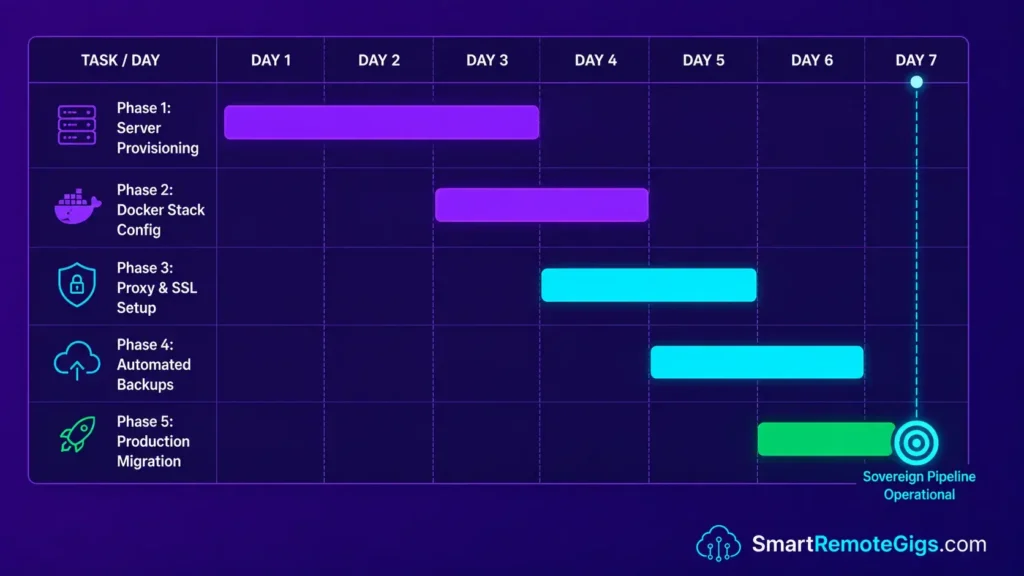
📅 Days 1–3: Infrastructure Provisioning
- Spin up the VPS and secure it with UFW rules from Scenario 1.
- Map domain DNS A-records to the new VPS public IP.
- Install Docker Engine using the bash script from Scenario 1.
- Configure the Docker Compose network from Scenario 2 and test local accessibility at
http://localhost:5678.
Pro Tip:
Validate your DNS propagation using ping YOUR_SUBDOMAIN from a separate machine before attempting SSL generation with Certbot. Certbot rate-limits failed attempts on unresolved DNS, so confirming propagation first avoids losing a generation window.
📅 Days 4–7: Reverse Proxy & Production Migration
- Deploy Nginx from Scenario 3 and secure the subdomain with Let’s Encrypt.
- Verify WebSocket connections are stable in the live editor by opening a workflow for several minutes without disconnect.
- Configure the backup cron job from Scenario 4 and run a manual test dump to confirm the
pg_dumpoutput is valid. - Begin migrating low-priority workflows from your previous managed instance to the new production server.
By Day 7: Your self-hosted instance should be production-ready, backed up, and executing automation logic without per-task billing.
The Verdict: Owning Your Own Infrastructure
Self-hosted n8n on a well-configured VPS eliminates per-task billing, gives you root-level access to every database connection and encryption key on the stack, and scales in cost far more slowly than SaaS billing does as task volume grows. No managed cloud plan offers that combination of control.
The four scenarios in this guide cover the self-hosted infrastructure lifecycle — from VPS provisioning to automated offsite backups. Agencies that work through all four arrive with a production-grade automation server whose monthly cost is fixed regardless of task volume. That’s the real advantage of self-hosting: not a specific percentage saved, but a cost structure that doesn’t scale against you.
Who should self-host: any agency or engineering team running enough monthly automation volume that per-task SaaS billing has become a real cost, provided at least one person can manage a Linux server. Who should stay managed: non-technical teams running lower volumes where a managed cloud plan’s convenience is worth its price premium.
Verdict:
Self-hosting n8n on a hardened VPS with Docker, PostgreSQL, and Nginx SSL is a genuinely strong infrastructure choice for technical teams in 2026 — unlimited executions and full control, in exchange for owning the operational work yourself.
Head to the SRG Job Board at /jobs/ for remote DevOps contracts in workflow engineering and automation architecture. Browse the SRG Software Directory at /software/ for infrastructure tools.

![Fix n8n PostgreSQL Timeout 2026: DB Handshake [Fix]](https://smartremotegigs.com/wp-content/uploads/2026/08/fix-n8n-postgresql-timeout-hero-1024x576.webp)
![n8n Journalist Outreach Bot 2026: PR System [Guide]](https://smartremotegigs.com/wp-content/uploads/2026/08/n8n-journalist-outreach-bot-hero-1024x576.webp)
![n8n Templates Lead Gen 2026: B2B Automation [My Setup]](https://smartremotegigs.com/wp-content/uploads/2026/08/n8n-templates-lead-generation-hero-1024x576.webp)